
What You Need
You can build and preview the whole app before you pay Apple anything. The Apple membership only matters once you want the app on a real iPhone or in the App Store.
Step 1: Create an iOS App Project
- Go to vibecodeapp.com and sign up, or open the Vibecode iPhone app
- Click New app (web) or tap the new project button (iPhone)
- Choose iOS app: “Native apps for iPhone, iPhone Duo and iPad, ready for the App Store”
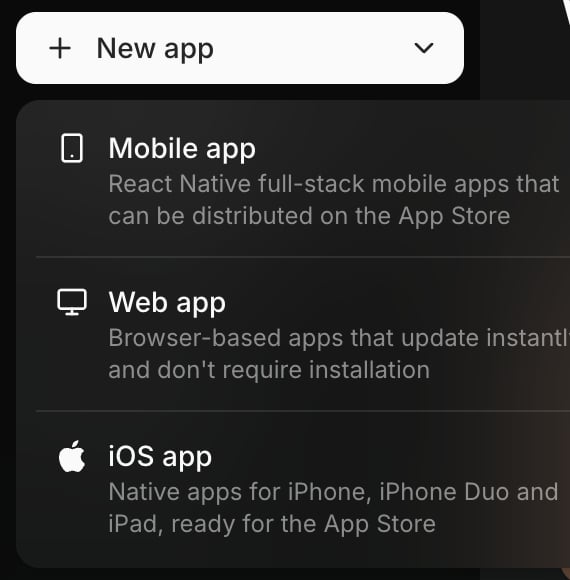
Pick iOS app for a native Swift app
Step 2: Describe Your App
Write what the app does, who it’s for, and the main screens. A good first prompt covers the core feature, not everything you’ll ever want:Step 3: Watch It Build and Test Itself
When you send the prompt, the agent:- Plans the app and writes it in Swift and SwiftUI as a standard Xcode project
- Adds Swift packages if the app needs them
- Builds the app and opens it in a cloud iOS Simulator
- Taps through what it just built and fixes what doesn’t work (agent testing)
Step 4: Change It by Chatting
Keep describing changes, one at a time:- “Make the check-off animation bounce and add a haptic tap”
- “Add a settings screen with reminder times”
- “The streak resets wrong after midnight. Fix it.”
Step 5: Add Accounts, Data, and AI Features
Ask for what the app needs and the agent adds it:- User accounts and a database: “Add sign-in and save each user’s habits.” Vibecode Cloud adds a backend with a database and login. See How to Add a Database and Login.
- AI features: “Add an AI coach that suggests habits,” or image generation, voice, and more through built-in integrations, paid with your Vibecode credits. No API keys needed.
- Generated assets: an app icon or images and sound effects
Step 6: Install It on Your iPhone
- Click Publish and choose Install (or click Install on iPhone in the preview toolbar)
- Sign in with your Apple ID so Vibecode can connect your Apple Developer account
- Register your iPhone by scanning the QR code
- Wait for the build, then scan the install QR code on your iPhone
Step 7: Publish It to the App Store
Click Publish → Publish to App Store, confirm your bundle ID (for examplecom.yourname.habits), and click Confirm and publish. Vibecode builds and signs the app, uploads it to Apple, updates your listing, and submits it for review. The full steps are in Native iOS Apps: Publish to the App Store; check the review guidelines checklist before you submit.
Other Ways to Build an iPhone App with AI
Chat assistants and coding agents can write Swift, but on your own computer you still need a Mac with Xcode to build and run it, plus signing and App Store Connect to ship it. More on that in Claude Code.
Tips for Better Results
- Start with the core loop. Get the one thing your app does working, then add accounts, payments, and polish.
- Name the screens. “A tab bar with Today, Stats, and Settings” is clearer than “a few pages”.
- Describe the feel. “Native iOS, like Apple’s Reminders app” or “playful, with big rounded cards”.
- Test on a real iPhone before you publish. Haptics, the camera, and performance are best judged on a device.
- Ask for a plan first on big changes. “Plan how you’d add a social feed, don’t code yet.”
Frequently Asked Questions
Can AI really build a working iPhone app?
Can AI really build a working iPhone app?
Yes. In Vibecode, the agent writes a complete native Swift and SwiftUI app, builds it, runs it in an iOS Simulator, and tests it before you see it. You keep refining it by chatting. Complex apps still take many rounds of feedback, the same as working with a developer.
Do I need a Mac to make an iPhone app?
Do I need a Mac to make an iPhone app?
Not with Vibecode, which compiles the app on cloud Macs. Building it yourself without an AI app builder does require a Mac with Xcode. See How to Publish an iPhone App Without a Mac.
How much does it cost to build an iPhone app with AI?
How much does it cost to build an iPhone app with AI?
In Vibecode your first app build is free, and after that building uses credits from a paid plan (from 99/year. See Plans and Credits and pricing.
Can ChatGPT build an iPhone app?
Can ChatGPT build an iPhone app?
ChatGPT can write Swift code, but it doesn’t build, sign, run, or publish the app. You’d copy the code into Xcode on a Mac and handle errors, signing, and App Store Connect yourself. An AI app builder like Vibecode does those parts for you.
Is the app native or a web view?
Is the app native or a web view?
An iOS app project is native Swift and SwiftUI, a standard Xcode project with no web view or React Native. A Mobile app project is React Native, which also renders native components and runs on Android too.
Do I own the app and the code?
Do I own the app and the code?
Yes. The app is published under your own Apple Developer account, and on the Pro and Max plans you can download the Xcode project and open it in Xcode.
Can I build the app from my iPhone?
Can I build the app from my iPhone?
Yes. In the Vibecode iPhone app you can create an iOS app project, describe it, use the live simulator preview, and tap Publish to install it or send it to the App Store.
Next Steps
Native iOS Apps
Everything about Swift projects in Vibecode
Publish to the App Store
From finished app to App Store listing
Swift vs React Native
Which kind of app to build
Start Building
Build your first iPhone app free