> ## Documentation Index
> Fetch the complete documentation index at: https://www.vibecodeapp.com/docs/llms.txt
> Use this file to discover all available pages before exploring further.
# Google Sign-In Setup
> Learn how to integrate Google Sign-In with your Vibecode app using Better Auth
> Learn how to integrate Google Sign-In with your Vibecode app using Better Auth.
## Before You Start
You'll need the following:
* [**Google Account**](https://accounts.google.com) (for [Google Cloud](https://cloud.google.com/))
* [**Vibecode Account**](https://vibecodeapp.com) and a project with the agent and deploy available
* [**Database**](/features/backend-auth) — you must have database enabled before you start
Your app must be deployed in Vibecode to get your backend URL. You'll get the backend URL in Step 5 — we do this before creating the OAuth client so you only enter the URL once in Google Cloud.
## Step 1: Create a Google Cloud Project
1. Go to [Google Cloud Console](https://console.cloud.google.com)
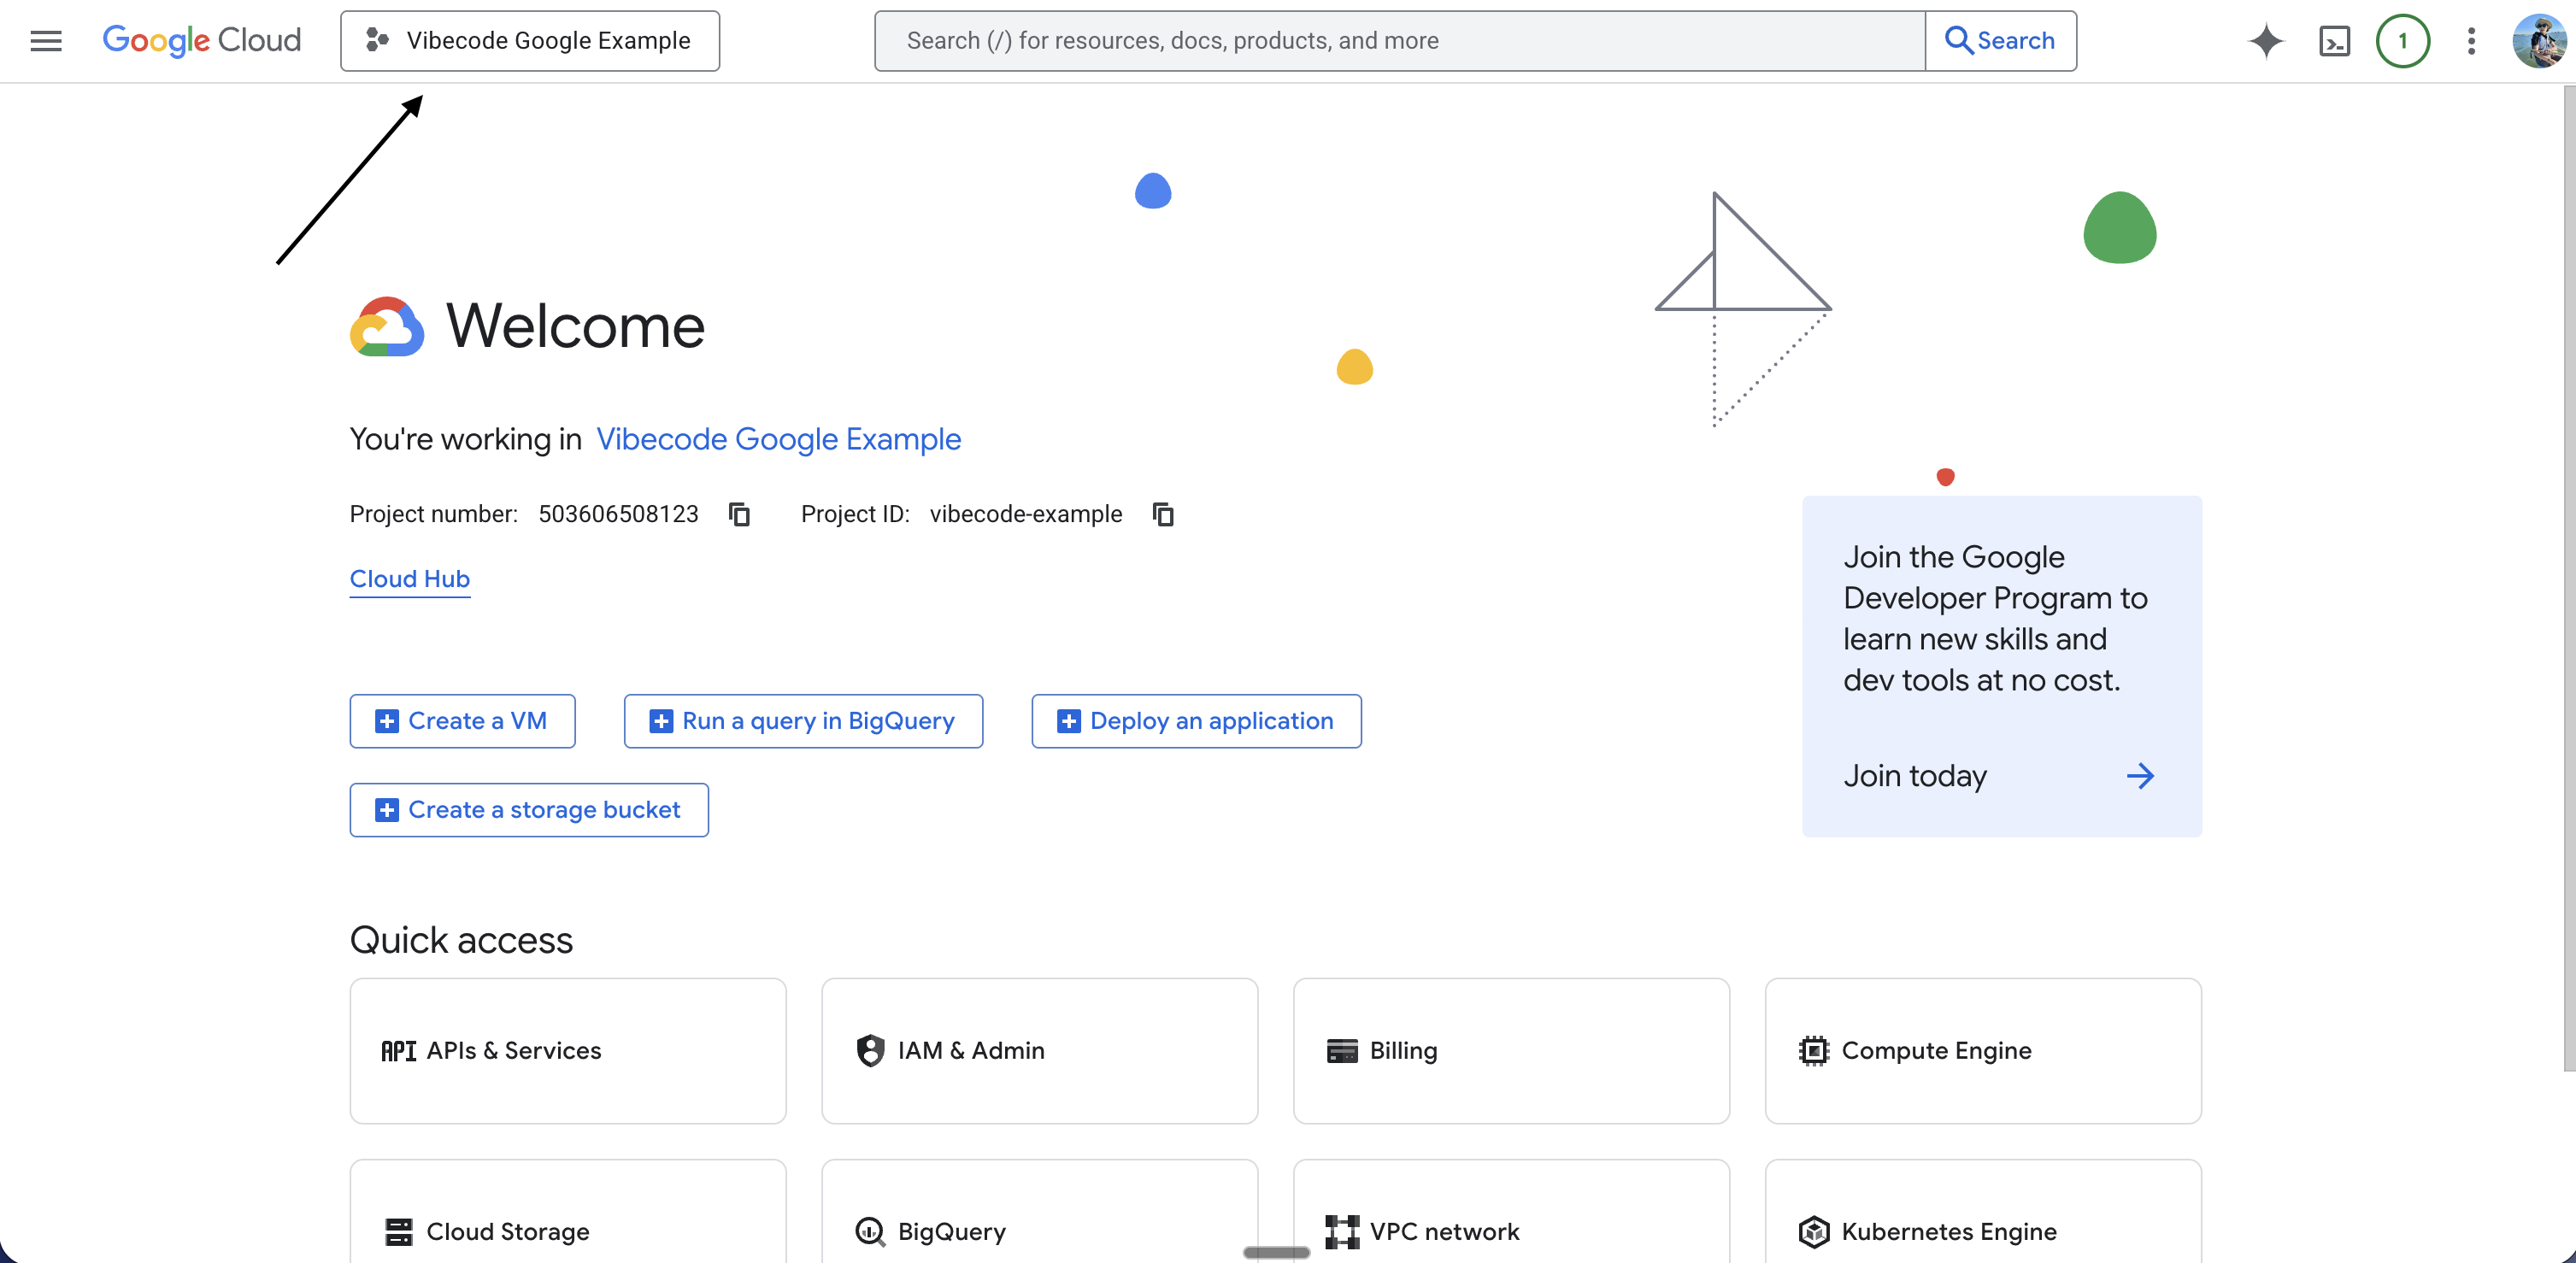
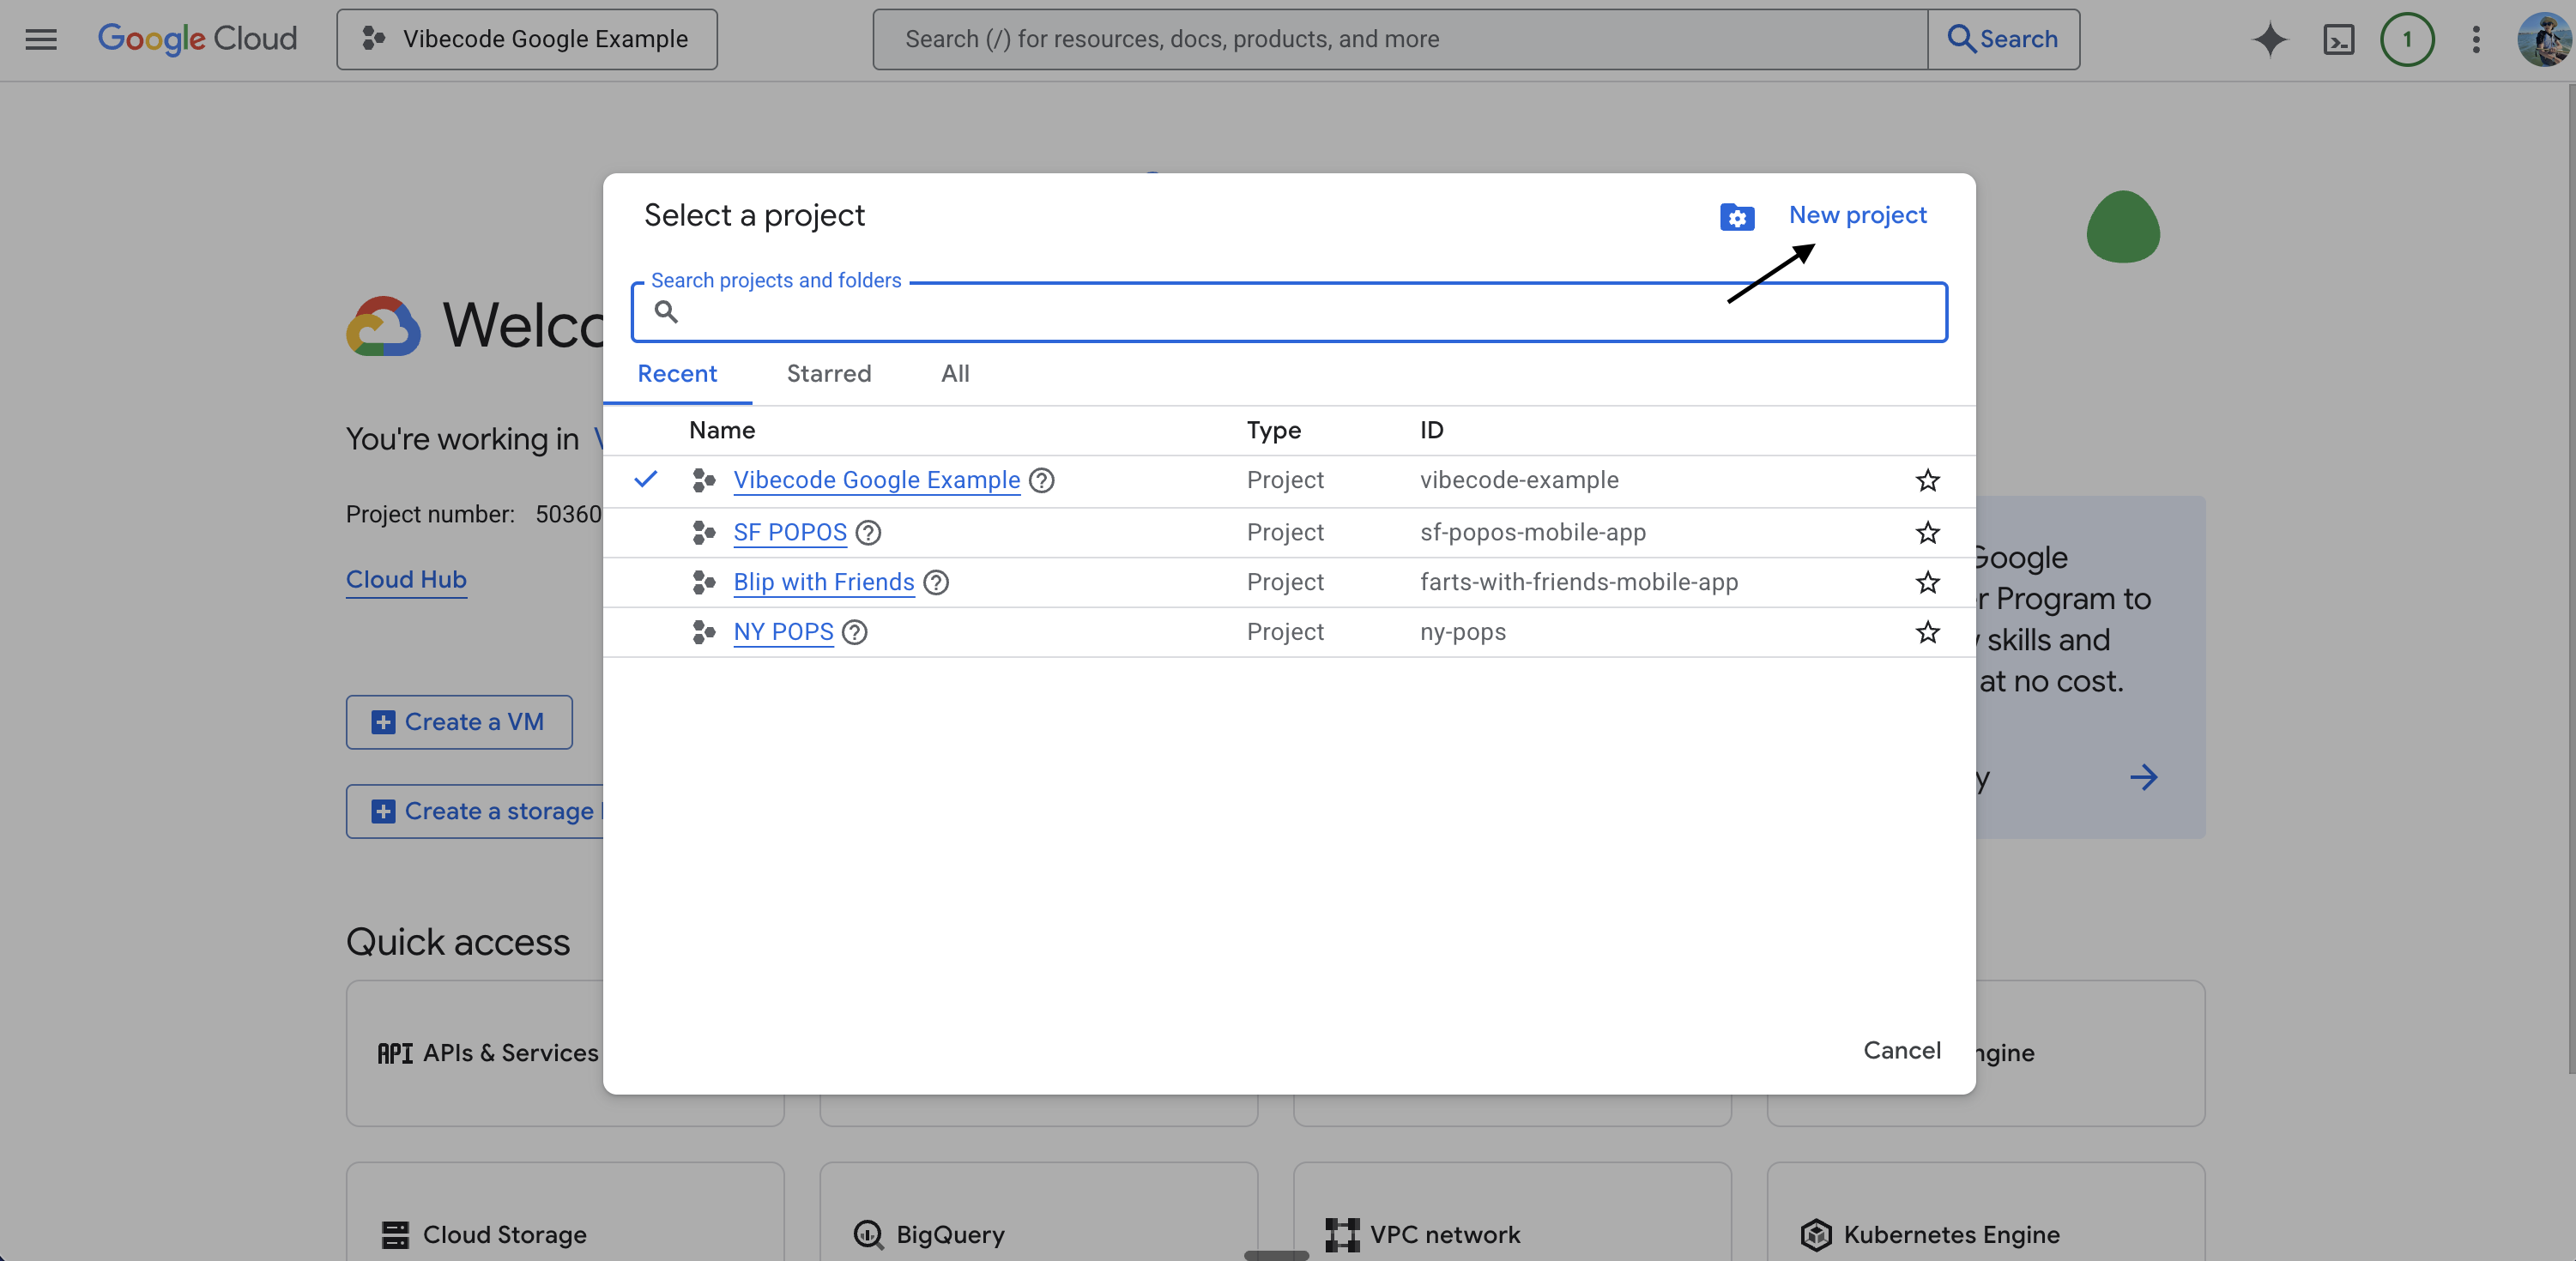
2. At the top of the page, click **Select a project** (or the project dropdown)
3. Click **New project**
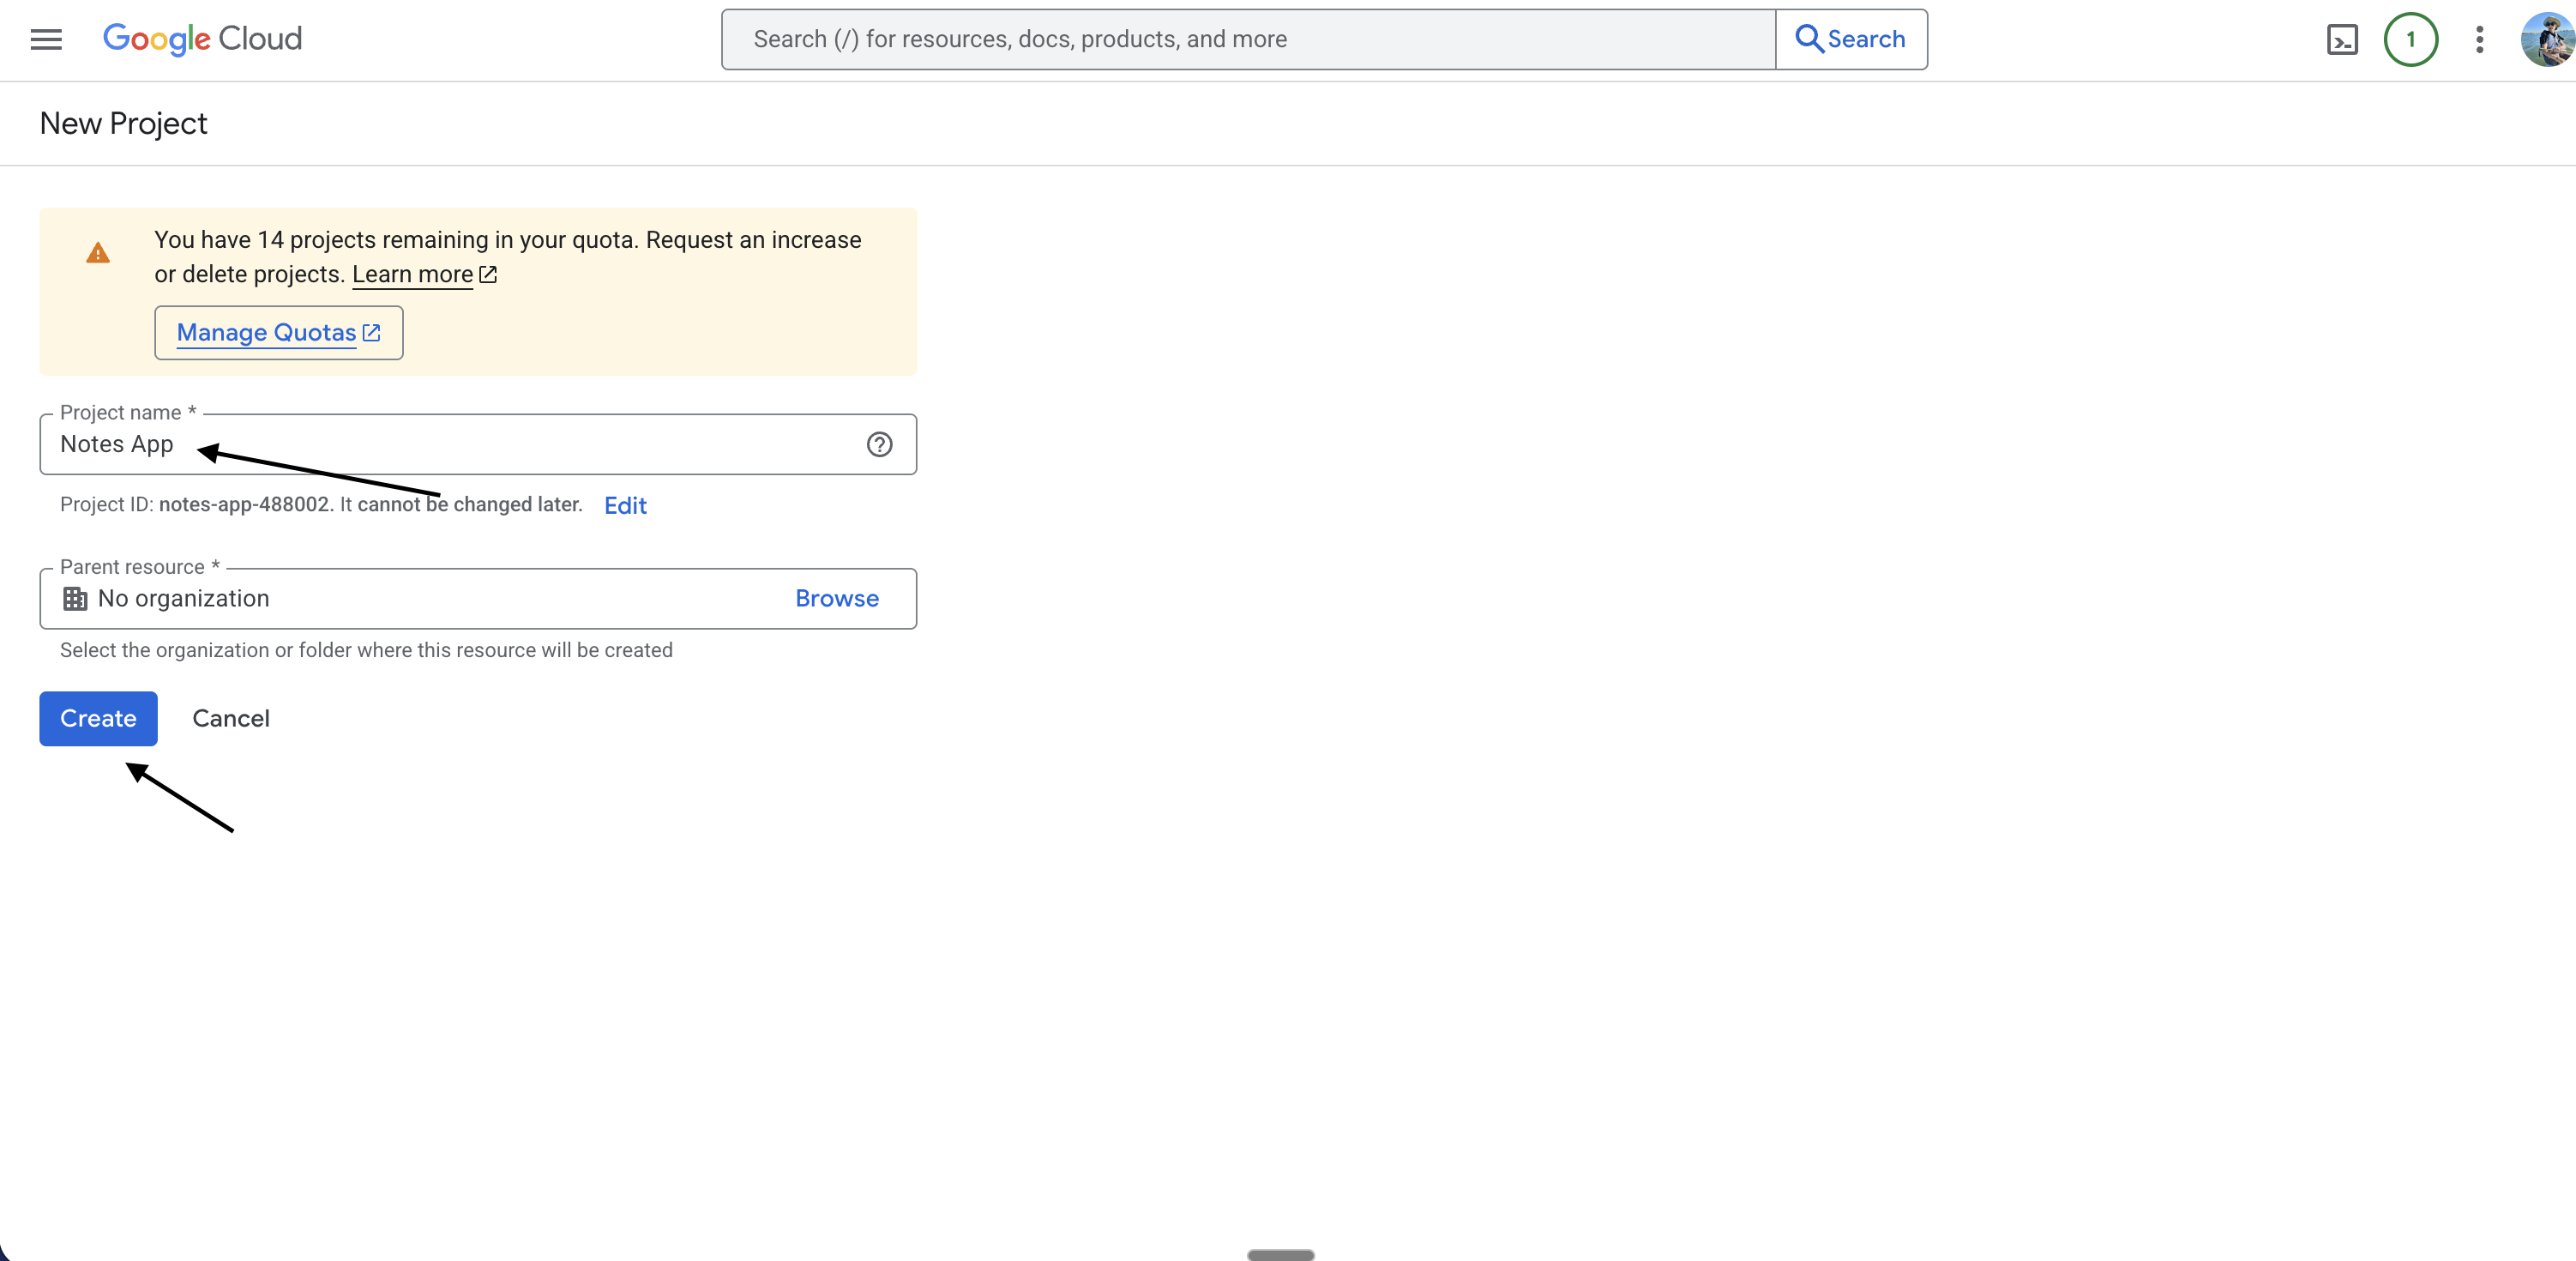
4. Name your project (e.g. "My App")
5. Click **Create**
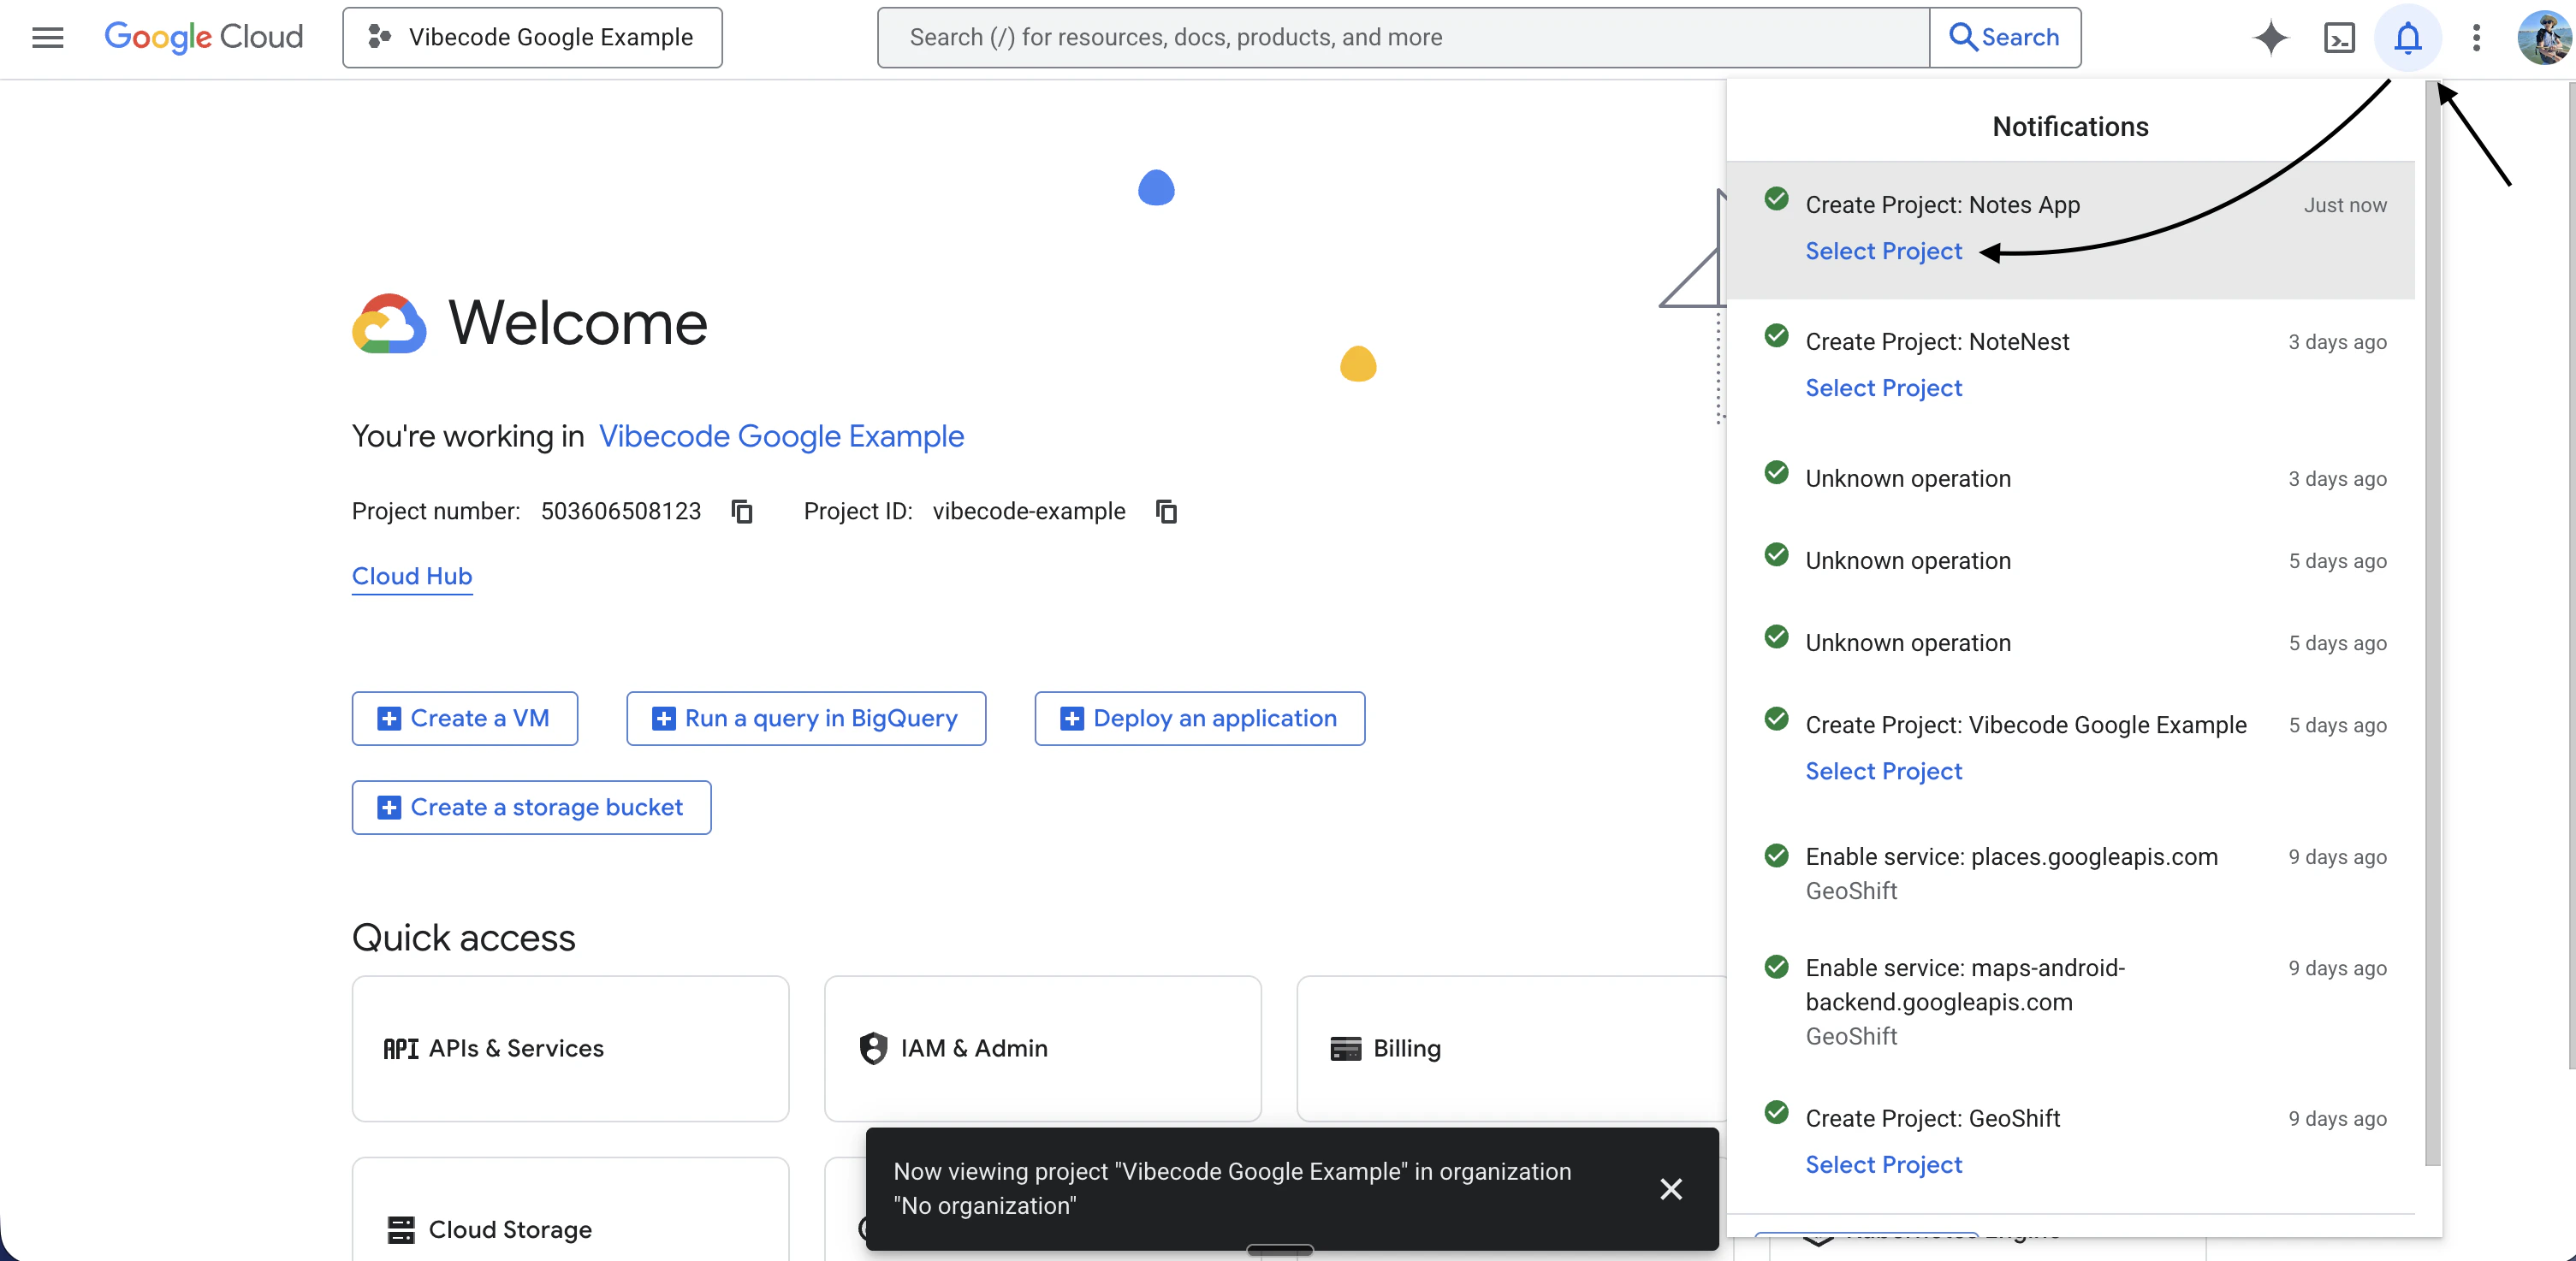
6. Check your notifications (bell icon) — when the project is ready, click **Select project**
7. You should now be viewing your project
 ***
## Step 2: Go to Credentials
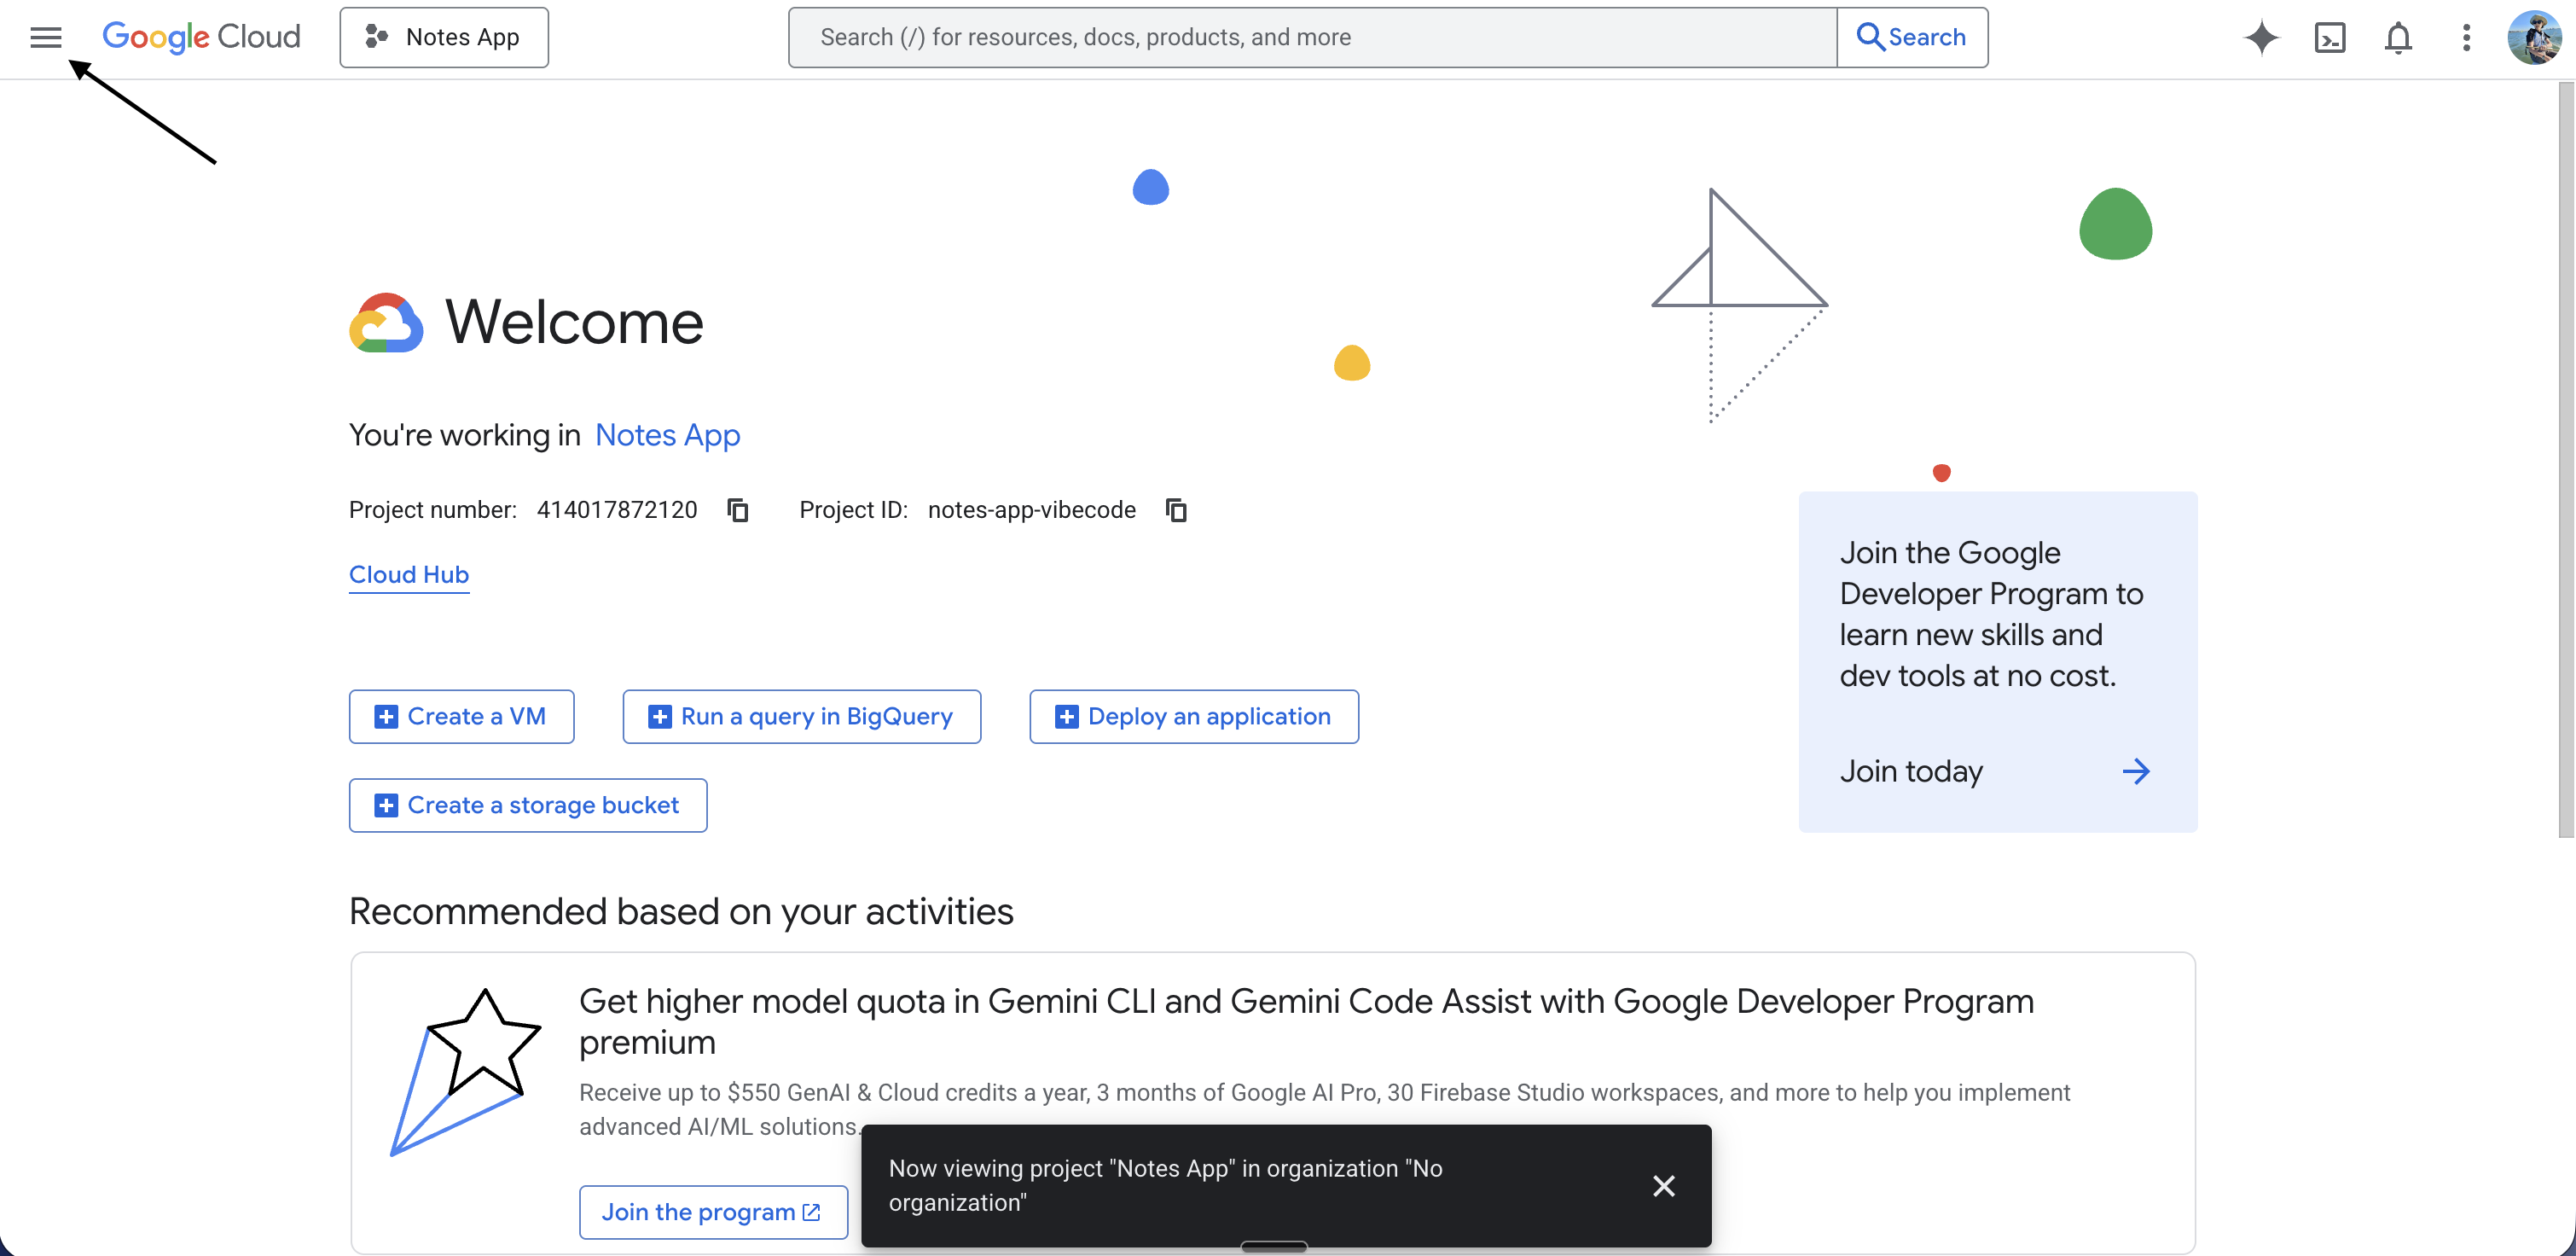
1. In the top left corner, click the **hamburger menu** (three horizontal lines)
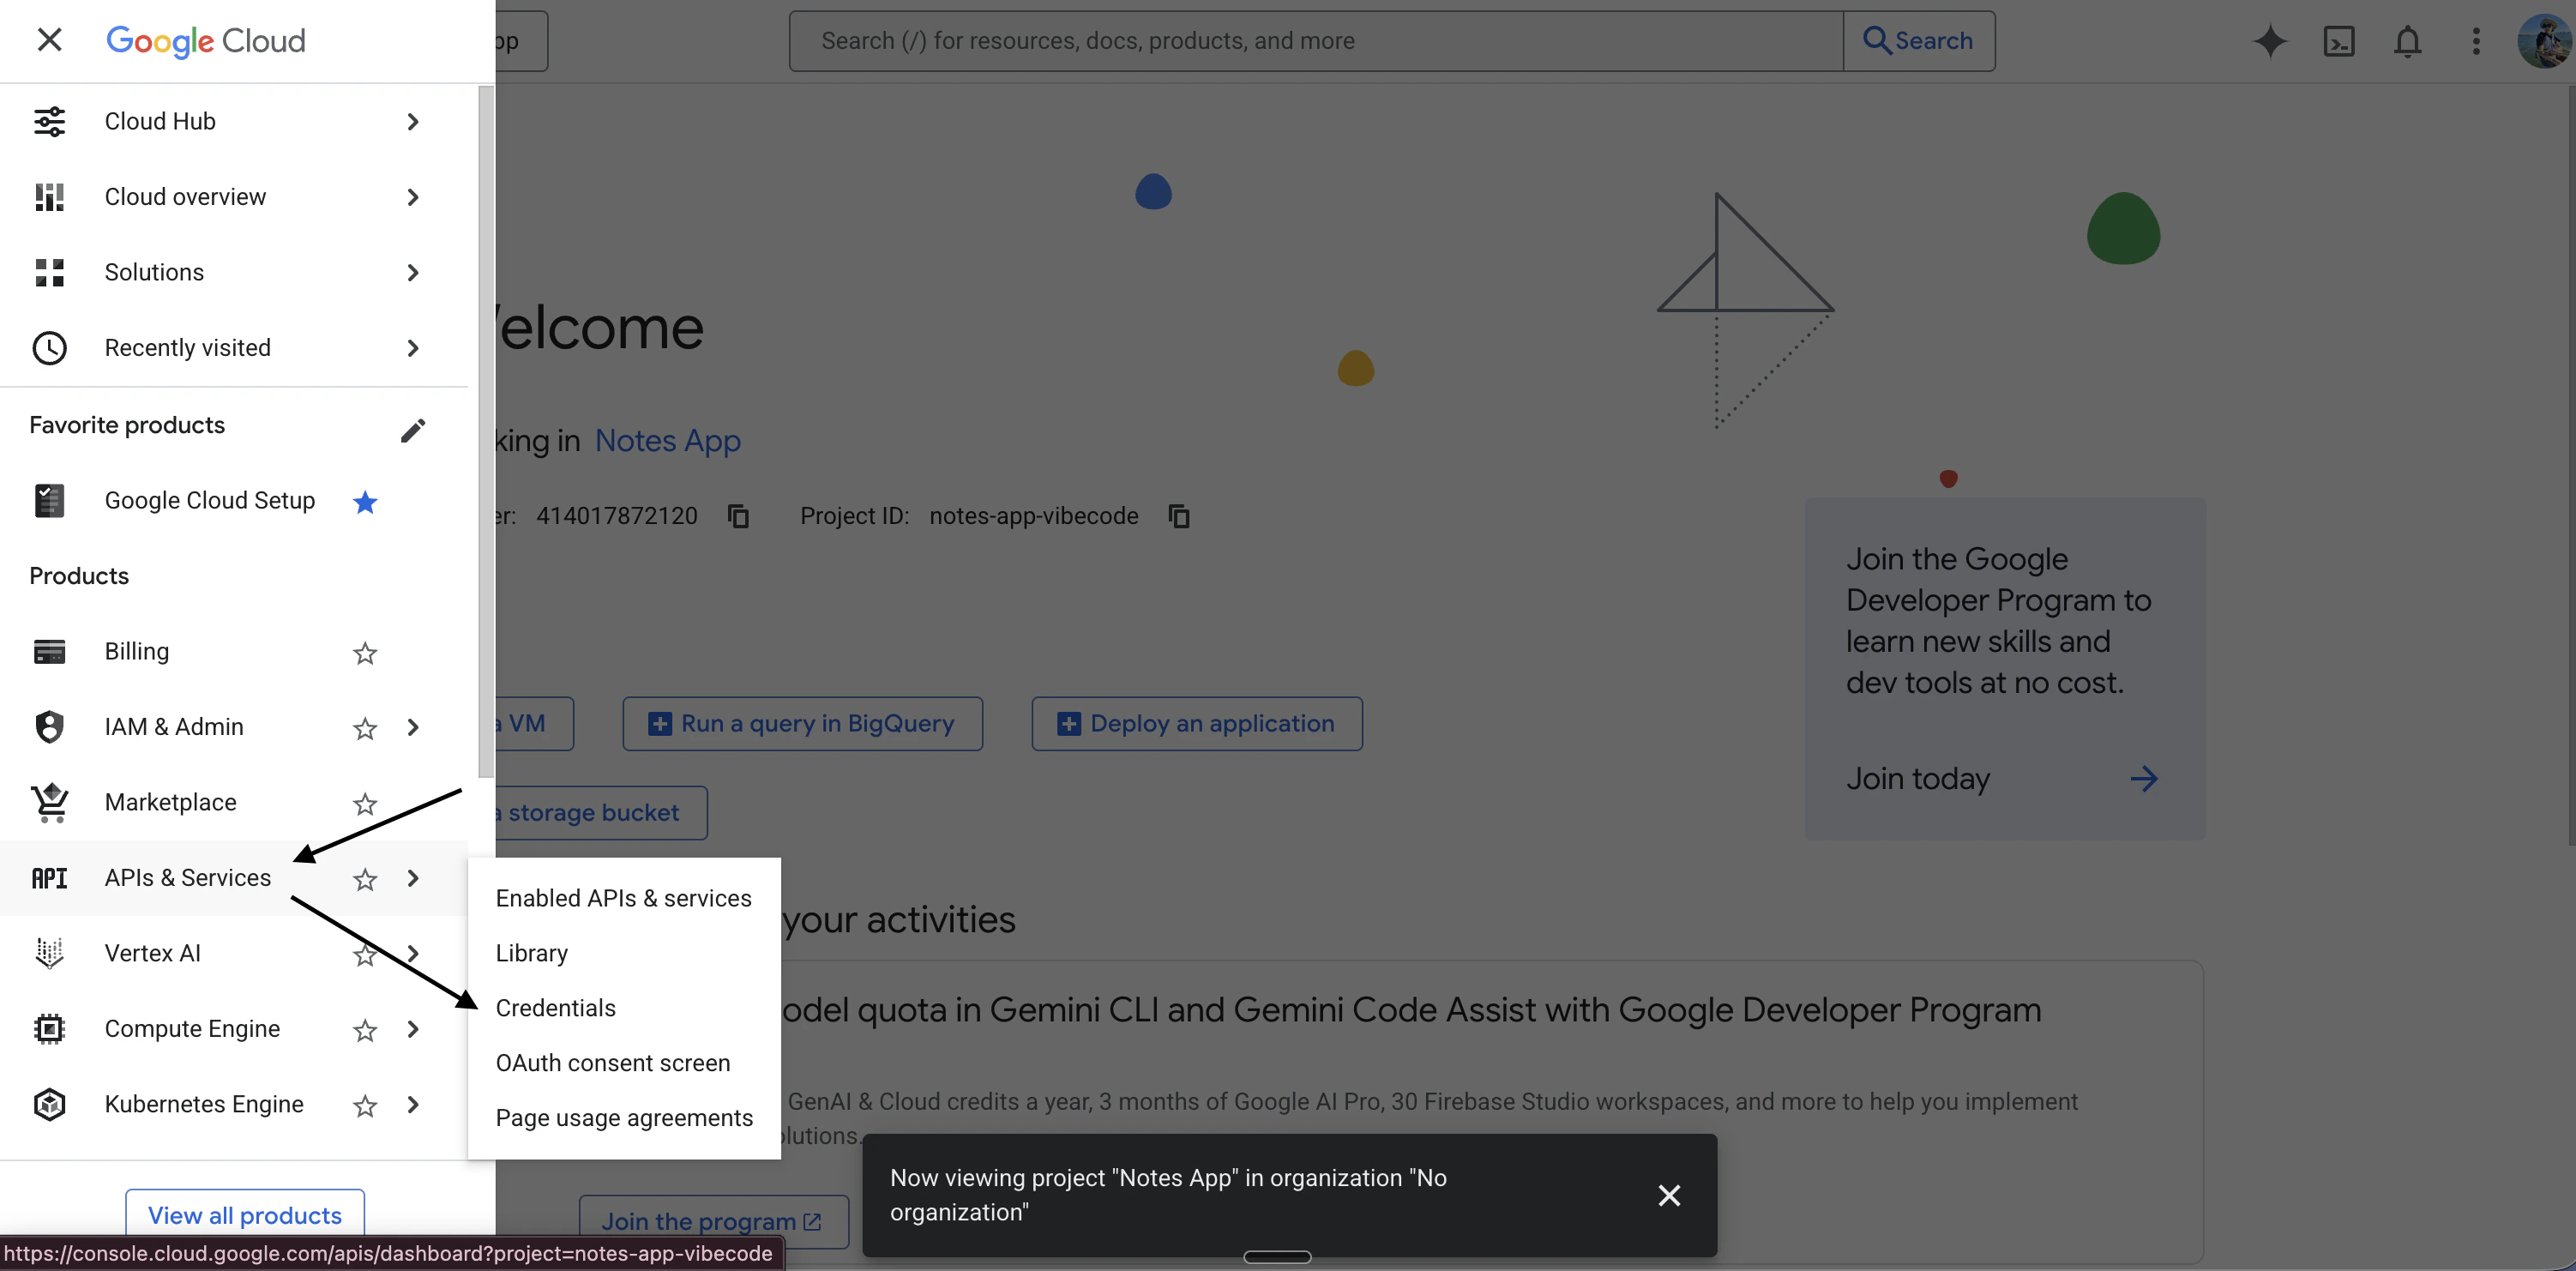
2. Scroll down to **APIs & Services**
3. Click **Credentials**
You must configure the OAuth consent screen before you can create an OAuth client ID. The next steps will guide you there.
***
## Step 2: Go to Credentials
1. In the top left corner, click the **hamburger menu** (three horizontal lines)
2. Scroll down to **APIs & Services**
3. Click **Credentials**
You must configure the OAuth consent screen before you can create an OAuth client ID. The next steps will guide you there.
 ***
## Step 3: Configure the OAuth Consent Screen
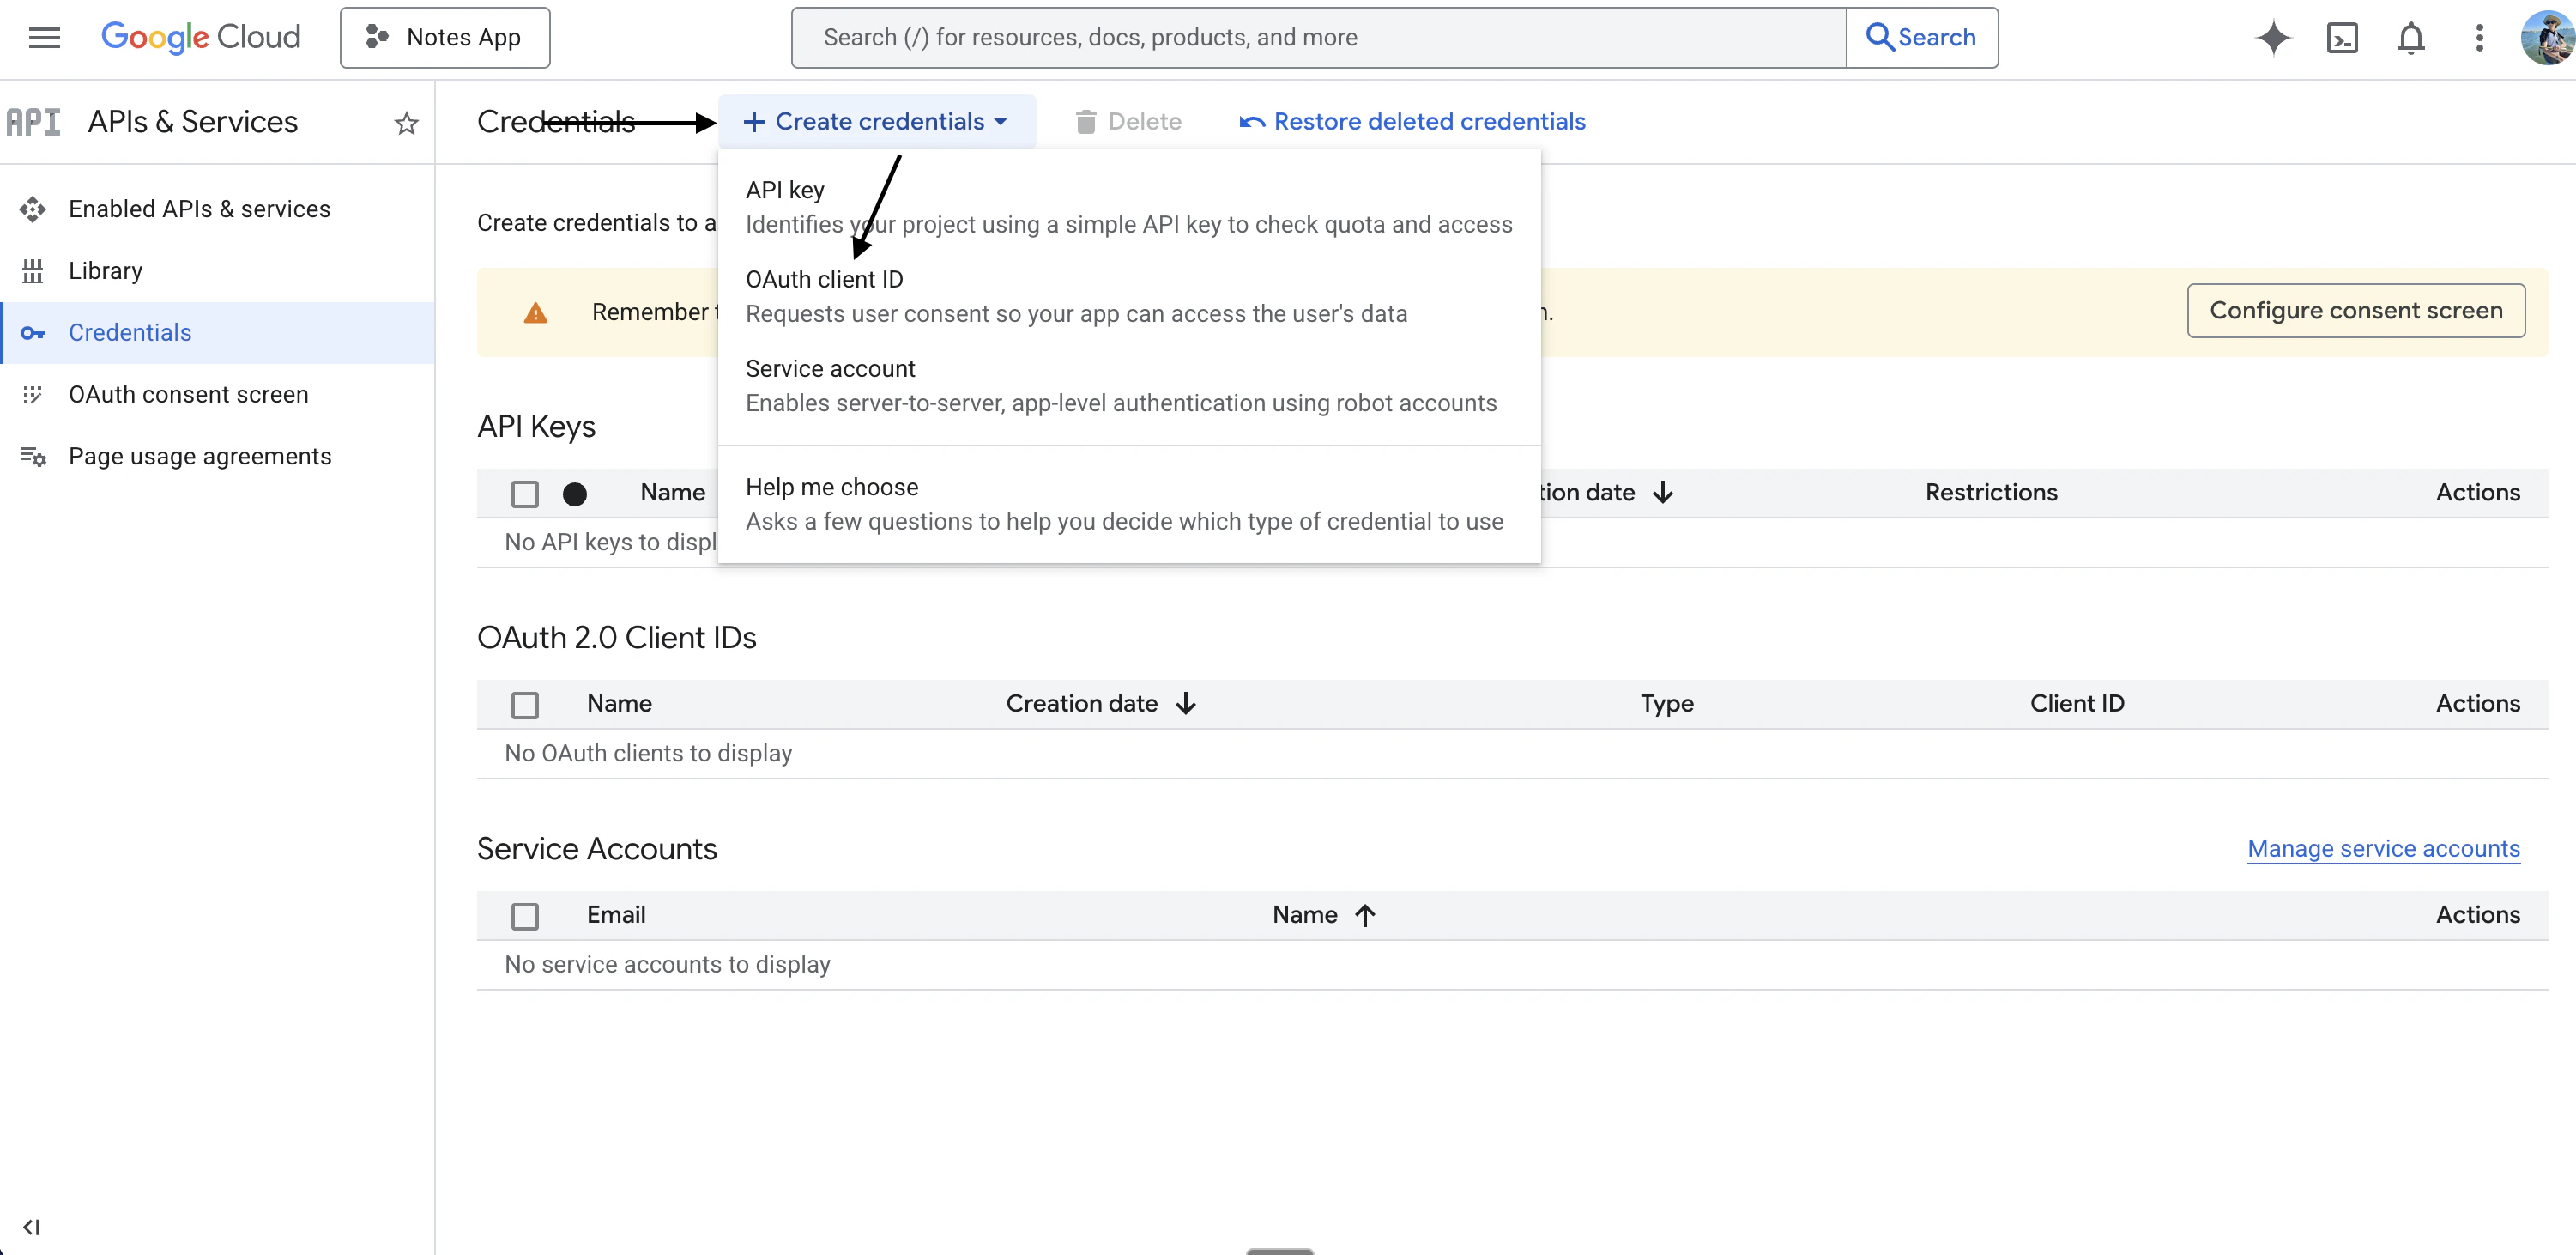
1. Click **Create credentials**
2. Click **OAuth client ID**
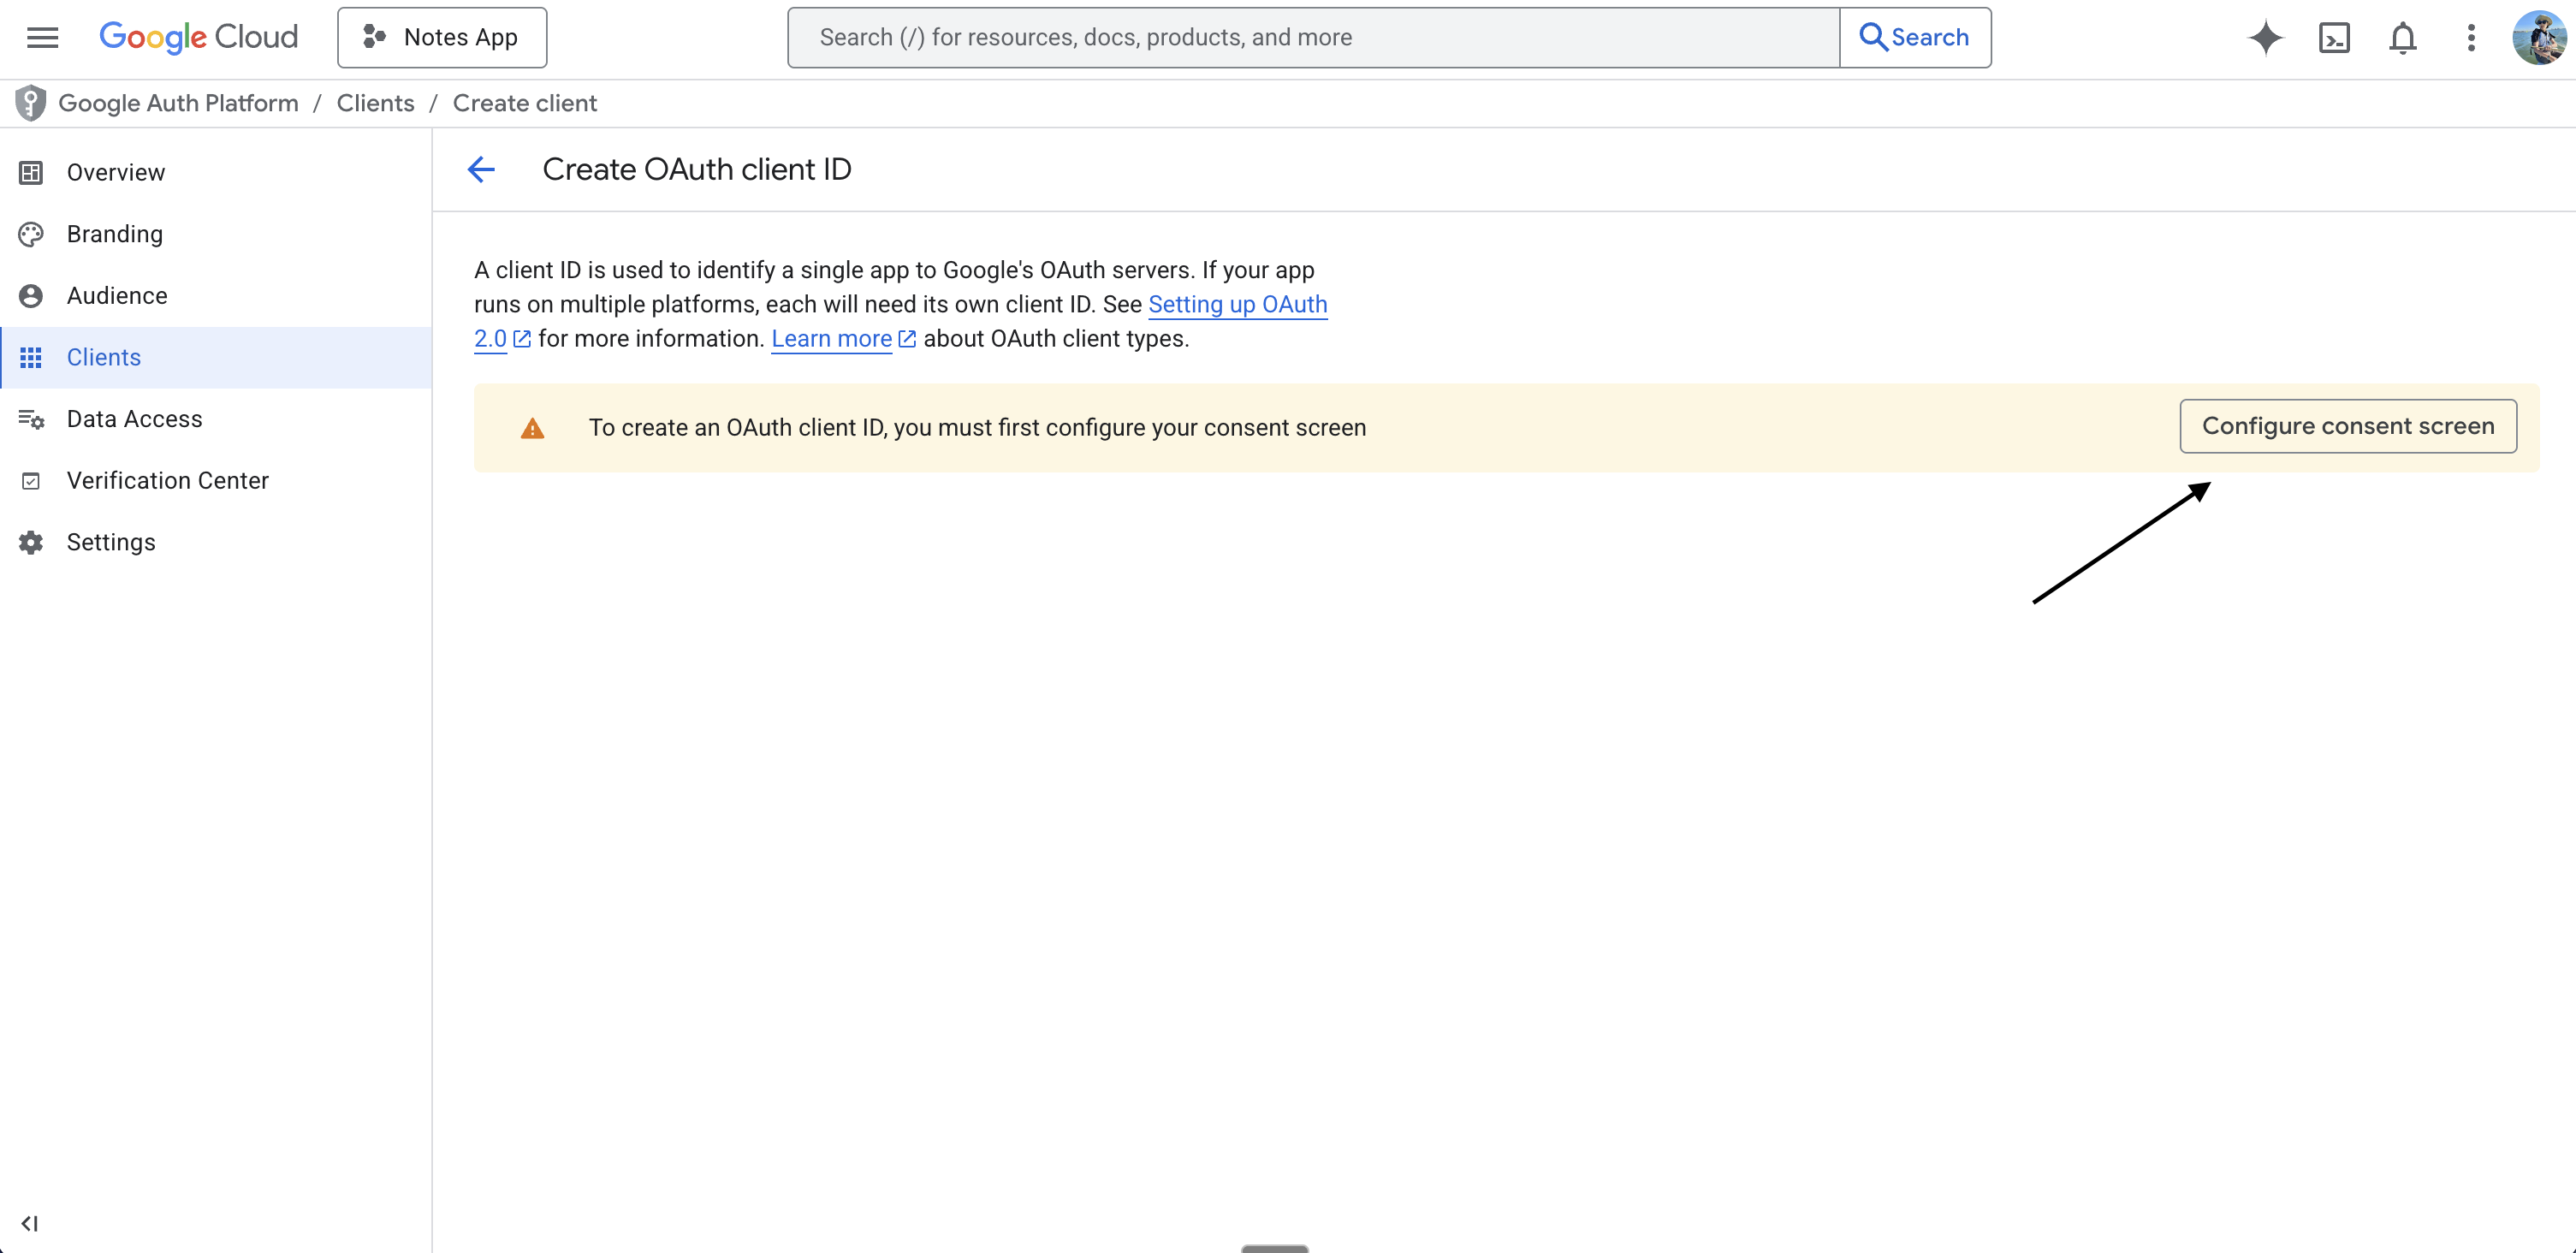
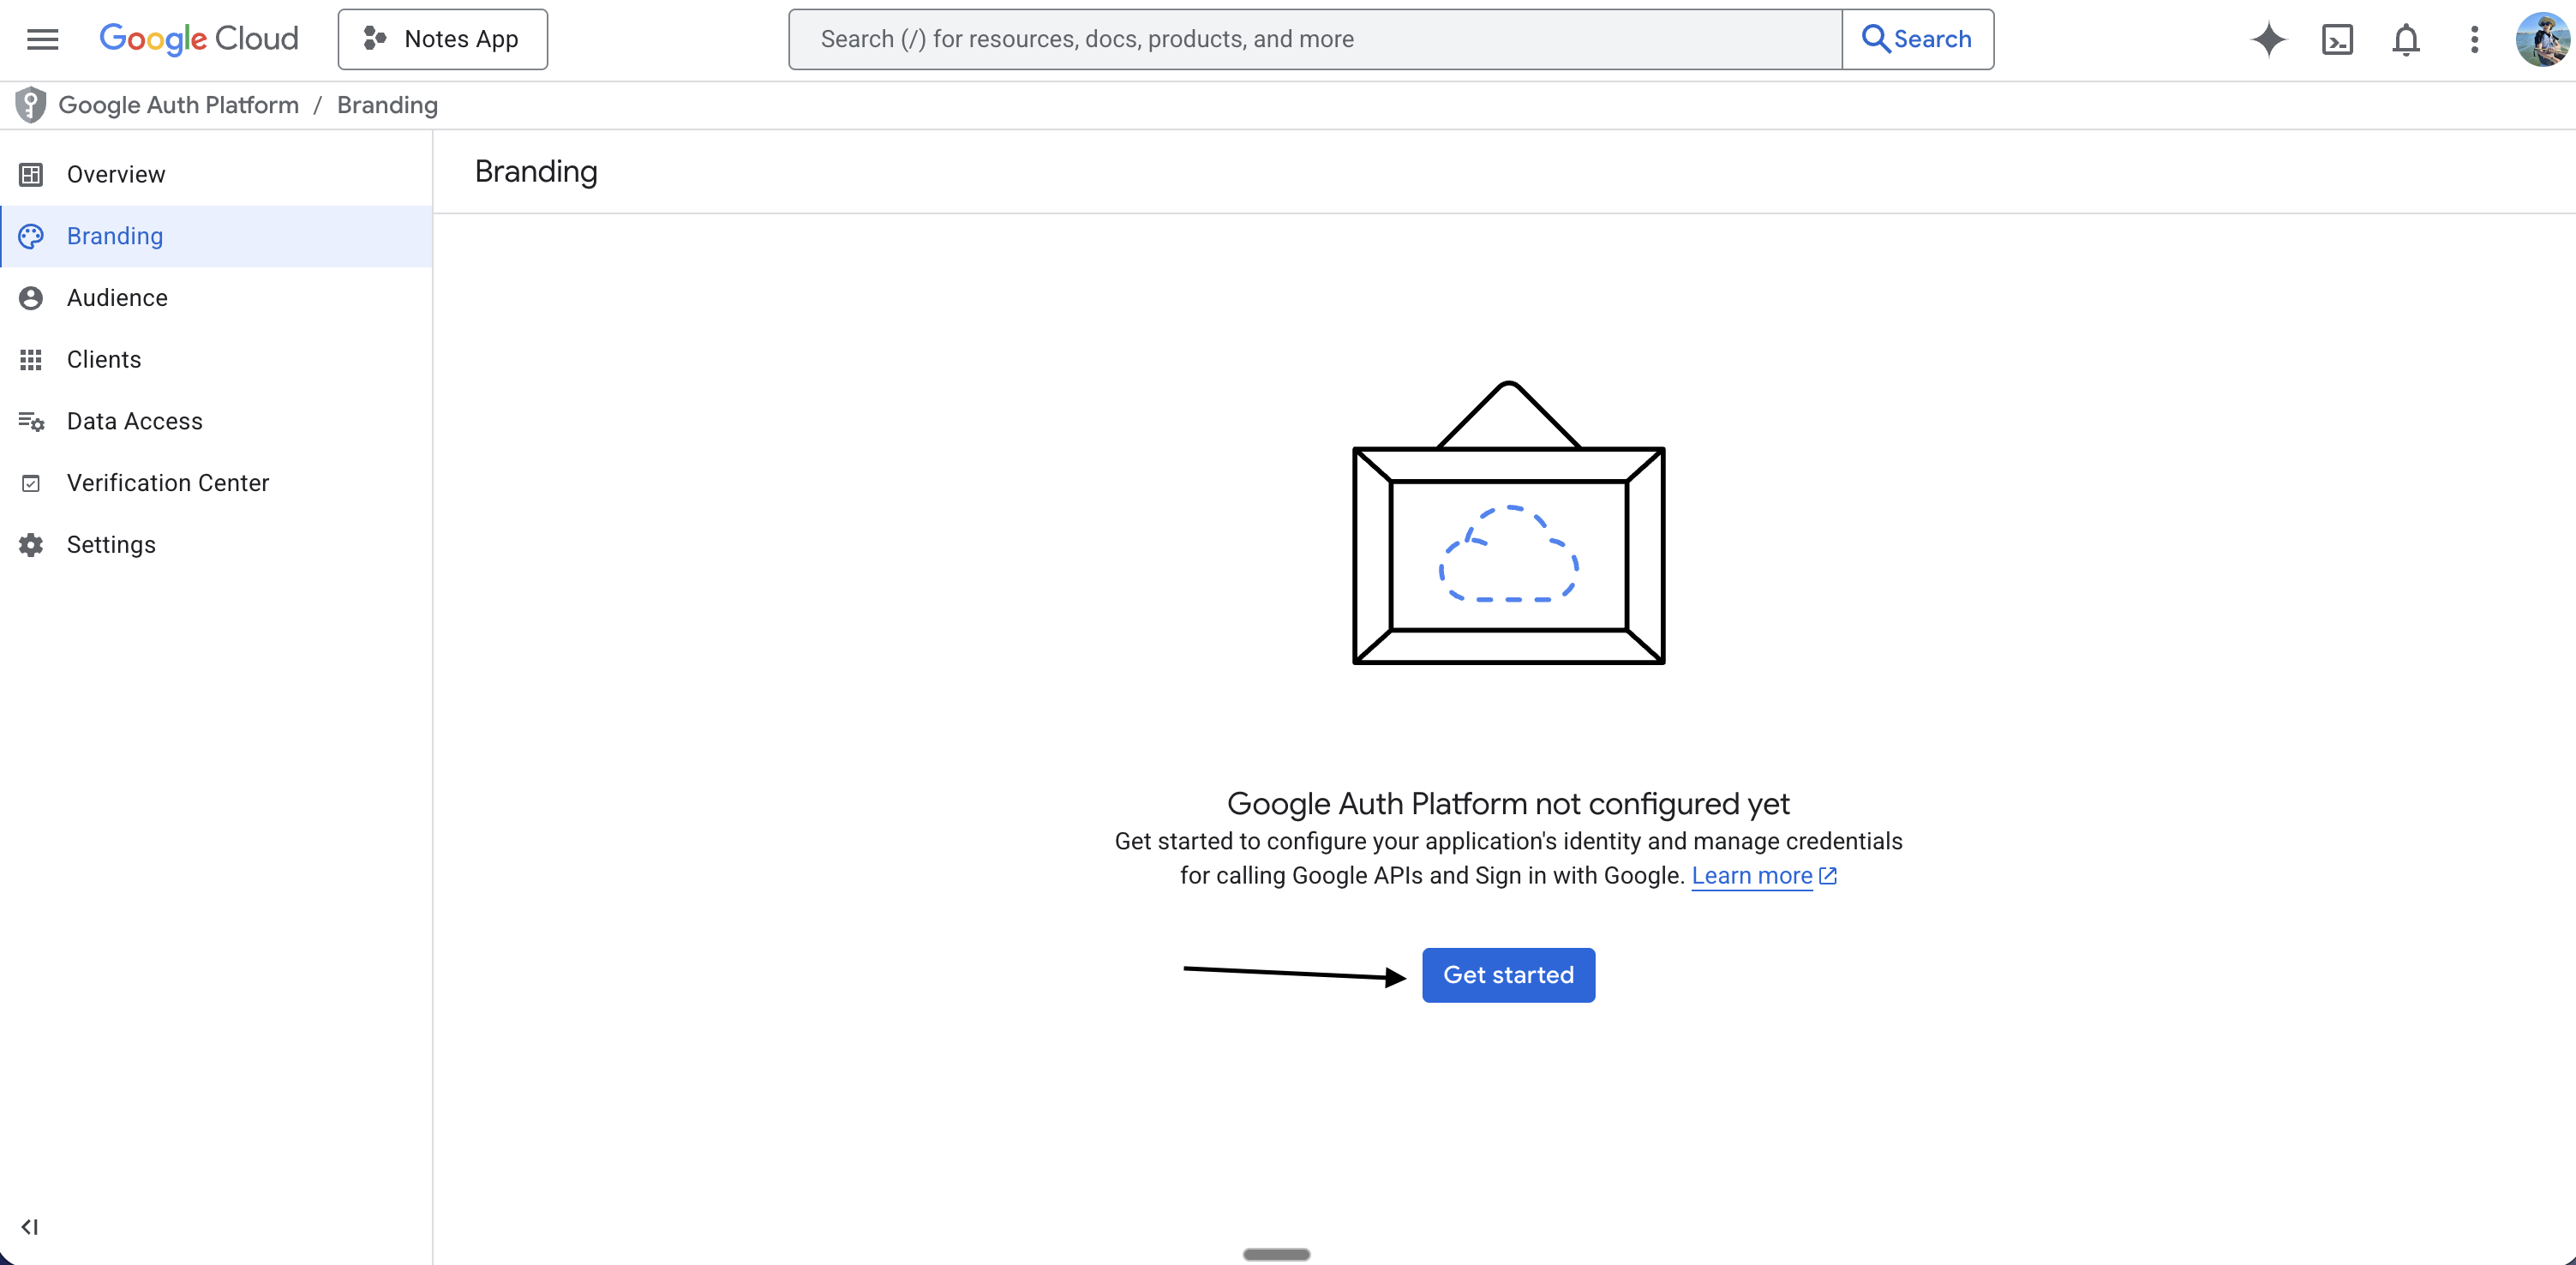
3. If you see a message that you need to configure the consent screen, click **Configure consent screen**
4. Click **Get started**
***
## Step 3: Configure the OAuth Consent Screen
1. Click **Create credentials**
2. Click **OAuth client ID**
3. If you see a message that you need to configure the consent screen, click **Configure consent screen**
4. Click **Get started**
 ***
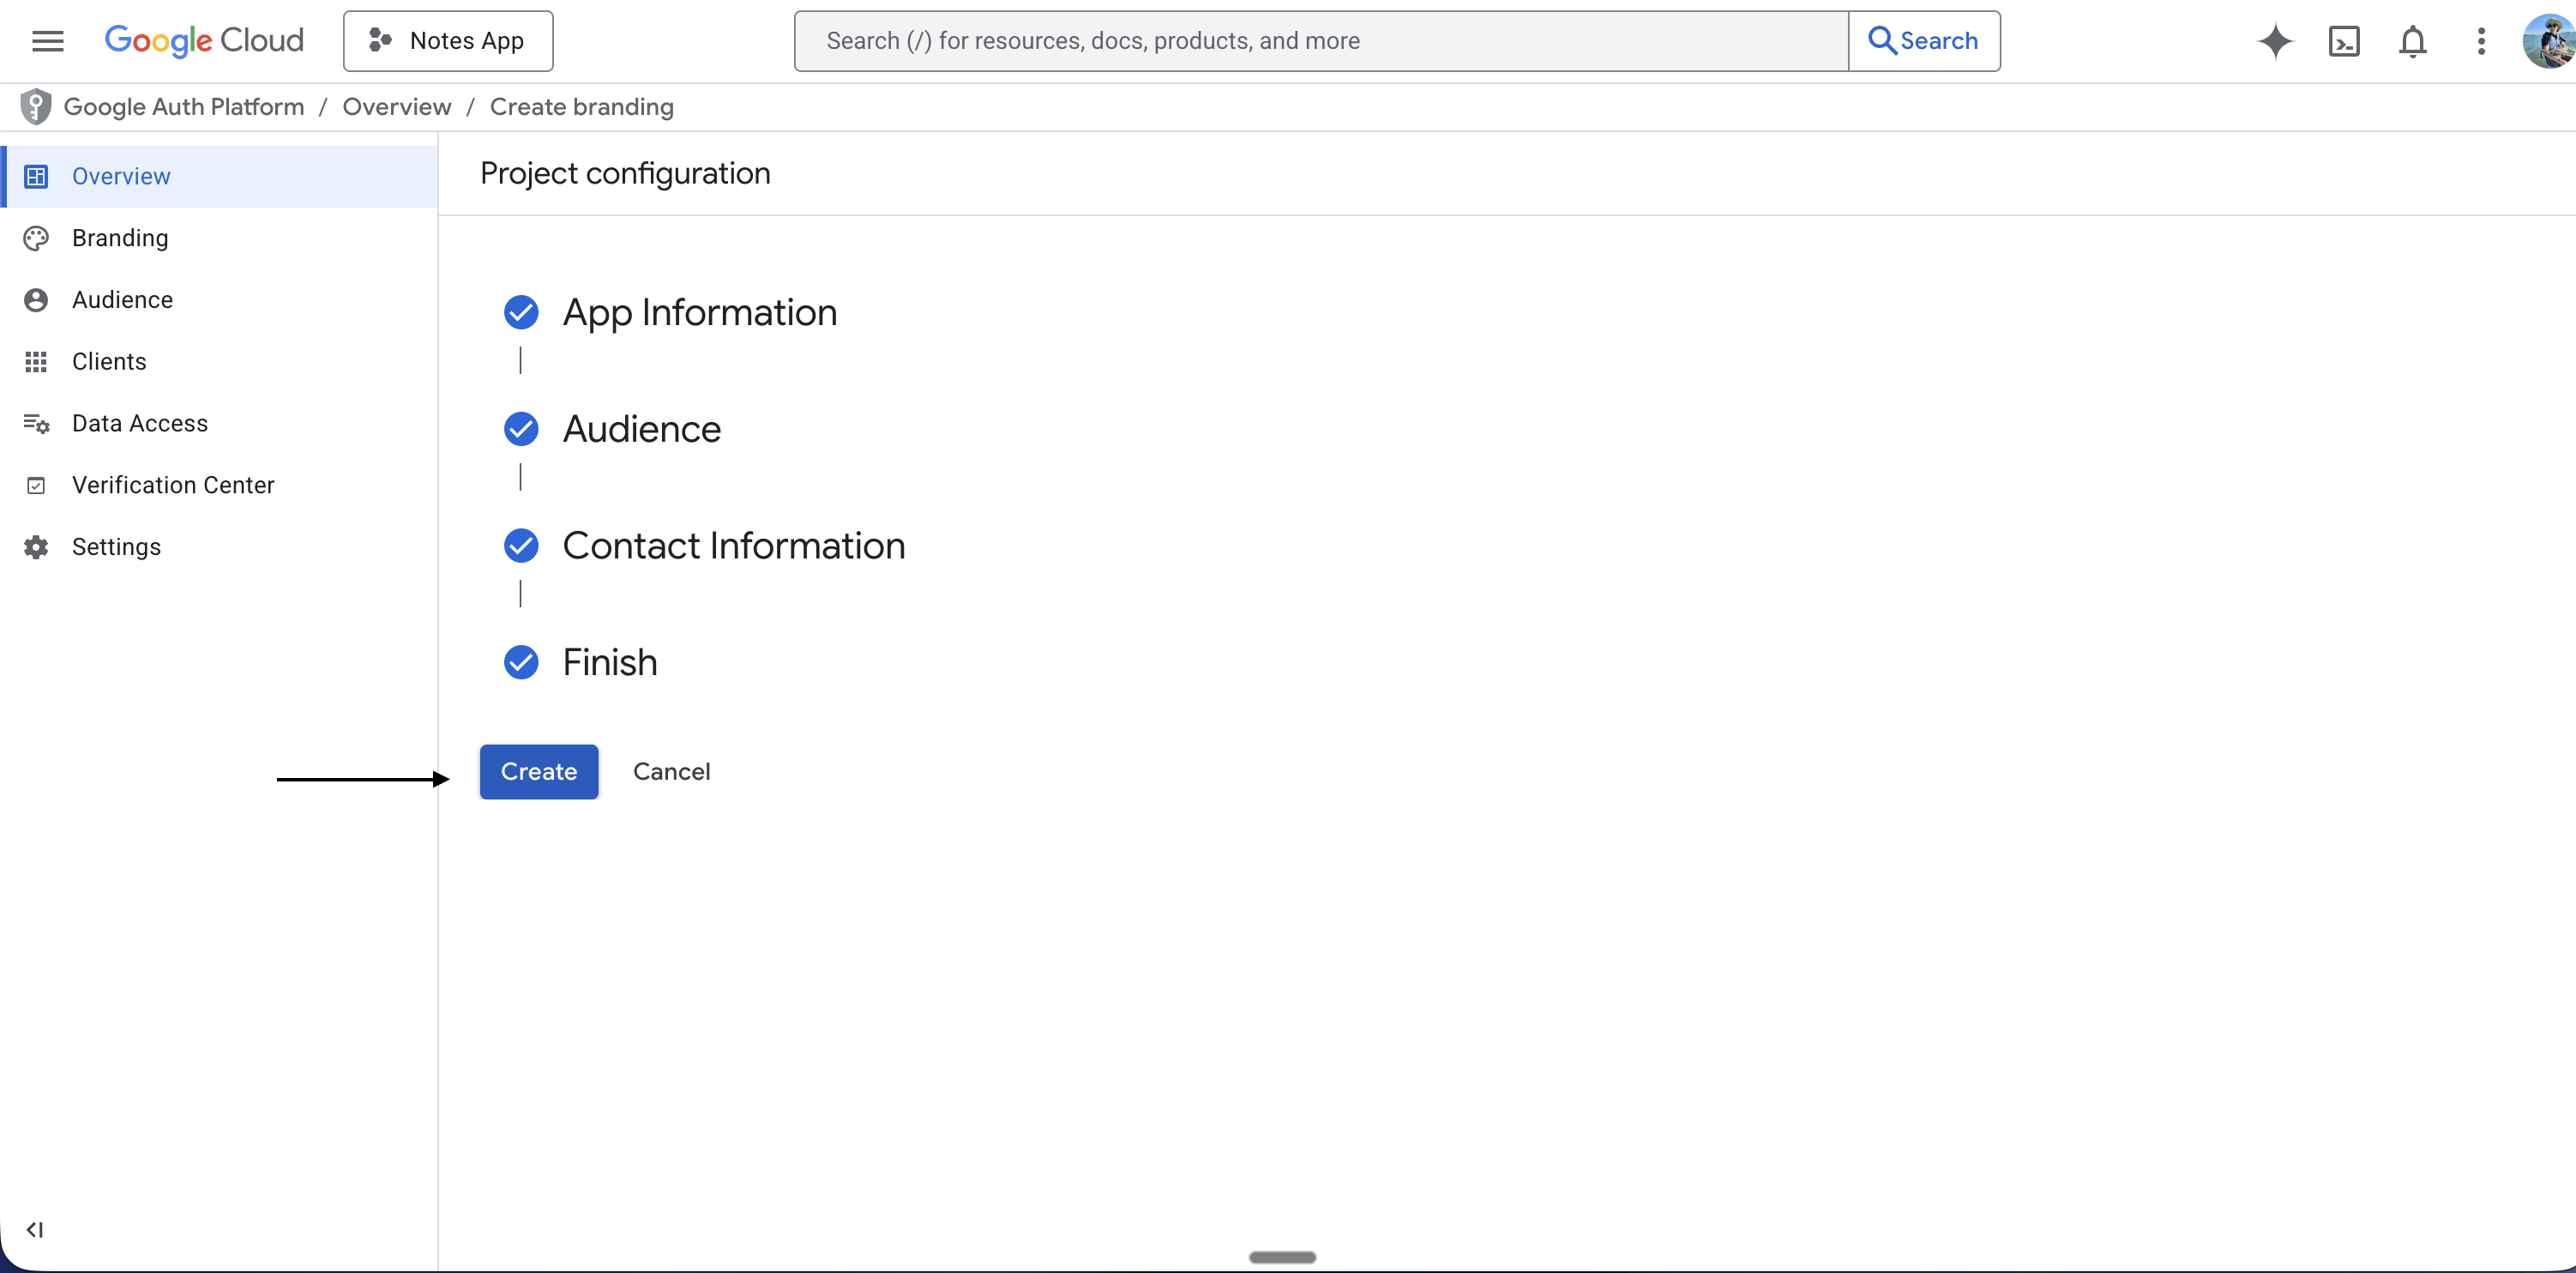
## Step 4: Fill In Your App Information
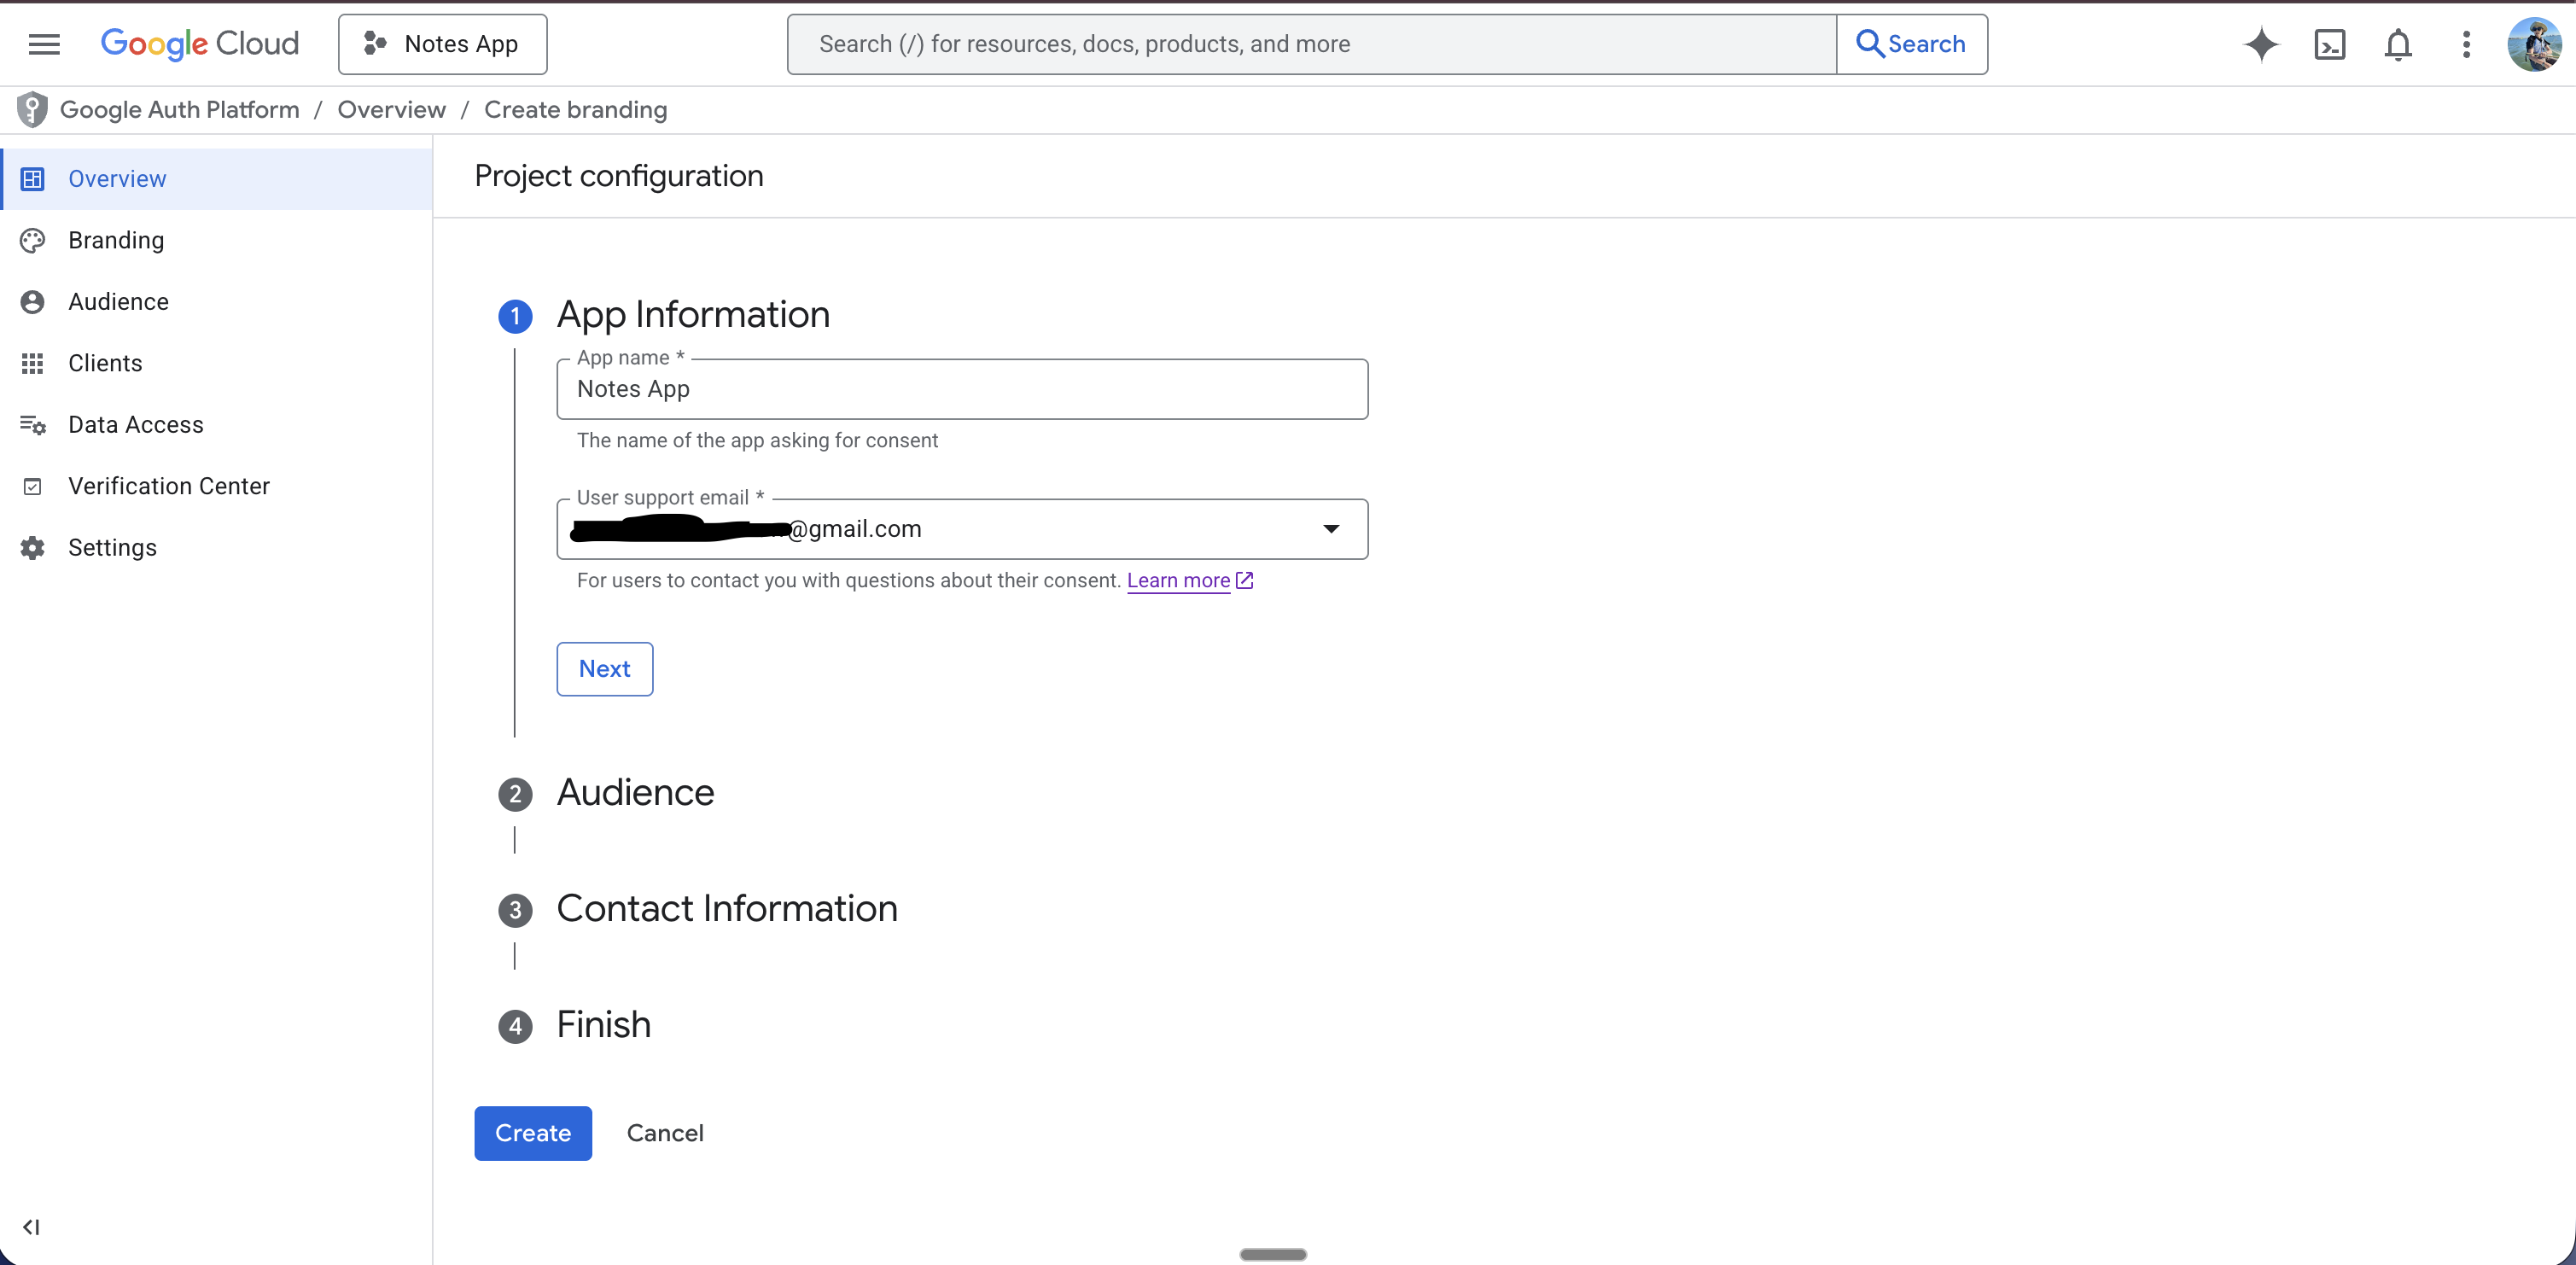
1. Fill in:
* **App name** — name users will see when signing in with Google
* **User support email** — your email
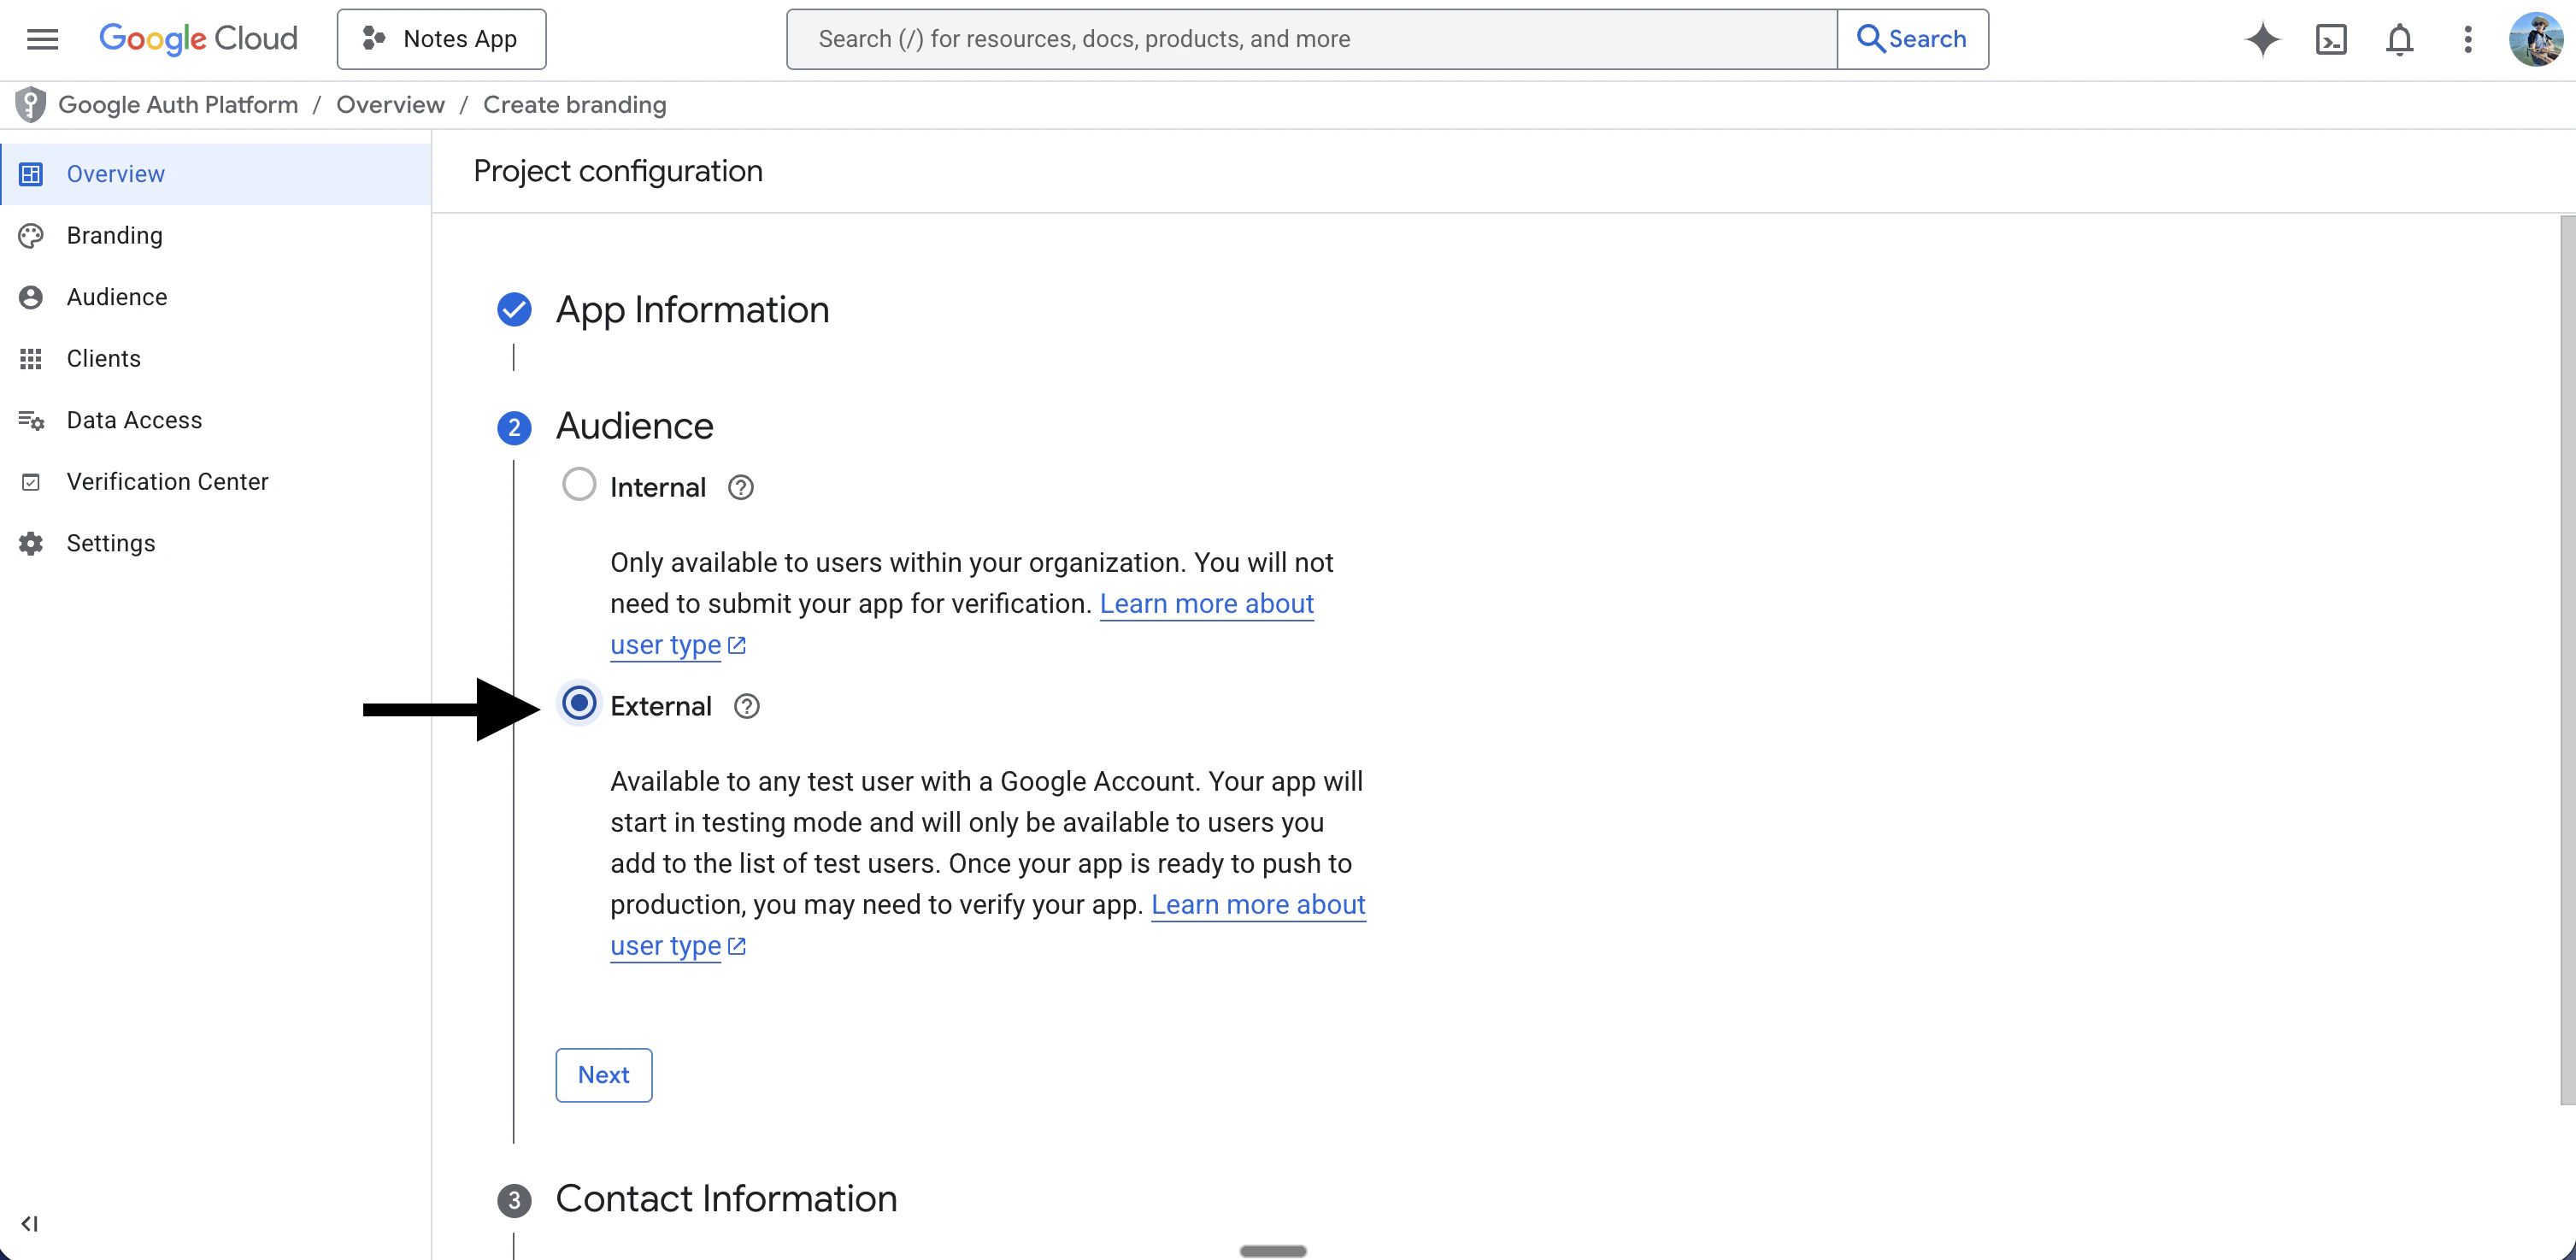
* For **User type / Audience**, select **External**
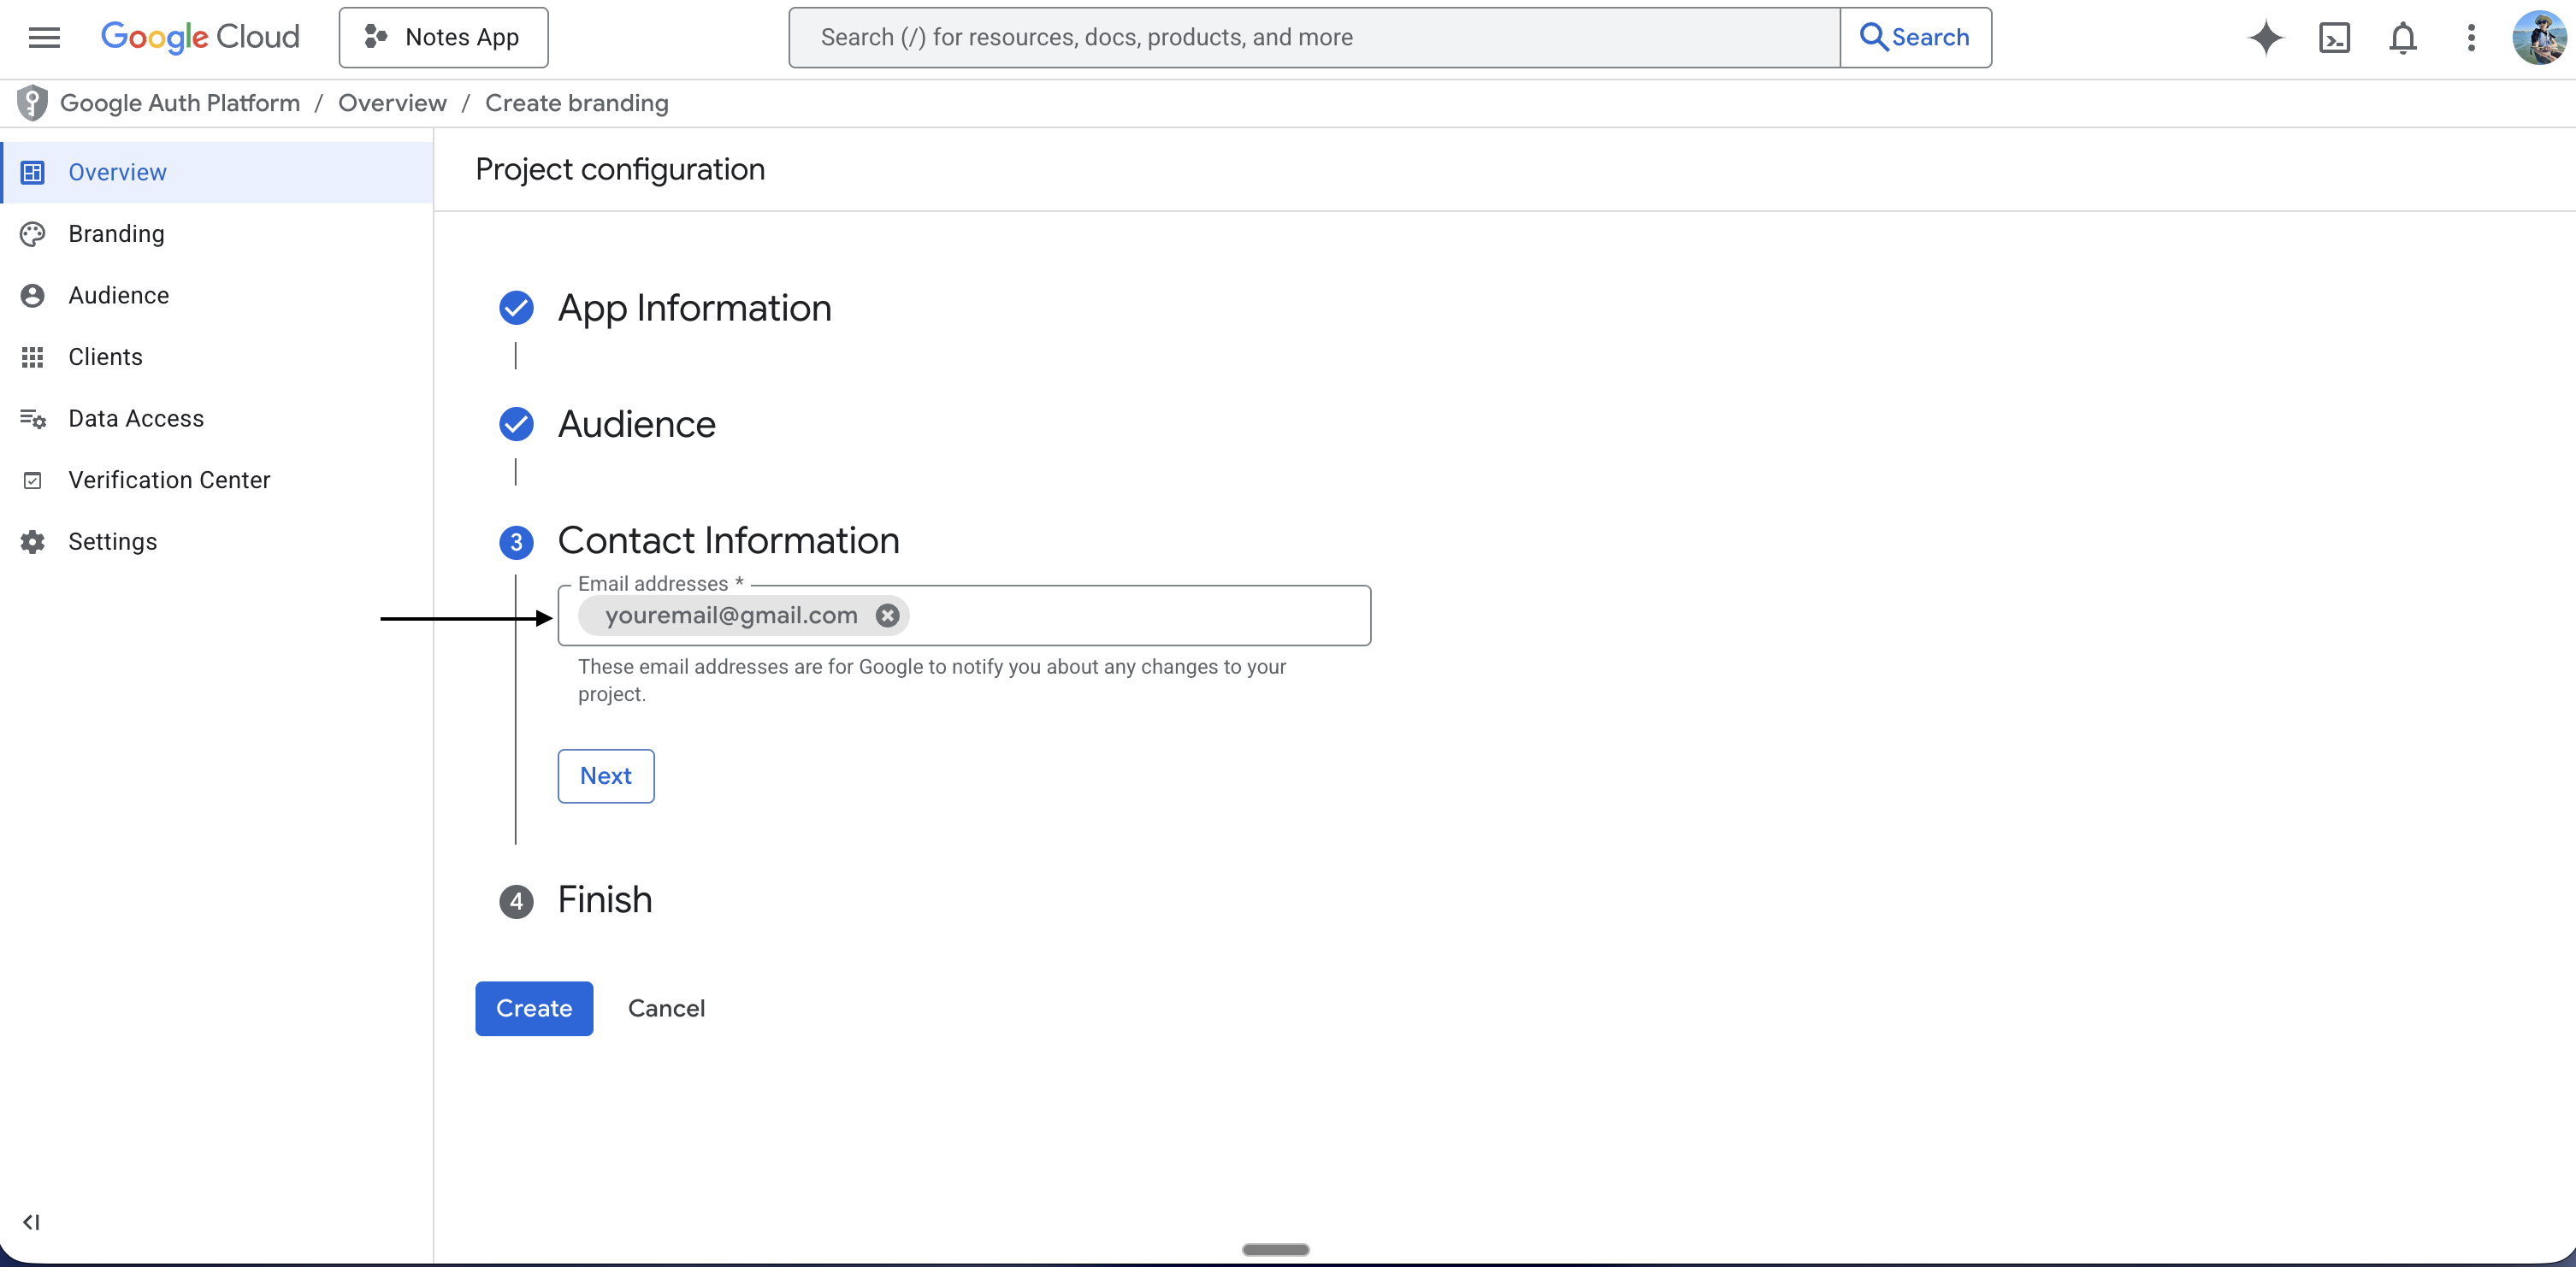
* **Developer contact information** — your email
2. Agree to the terms and conditions if shown
3. Click **Create** (or **Save and Continue**)
***
## Step 4: Fill In Your App Information
1. Fill in:
* **App name** — name users will see when signing in with Google
* **User support email** — your email
* For **User type / Audience**, select **External**
* **Developer contact information** — your email
2. Agree to the terms and conditions if shown
3. Click **Create** (or **Save and Continue**)
 ***
## Step 5: Deploy Your App and Copy the Backend URL
Do this before creating the OAuth client so you can paste the real URL into Google Cloud once.
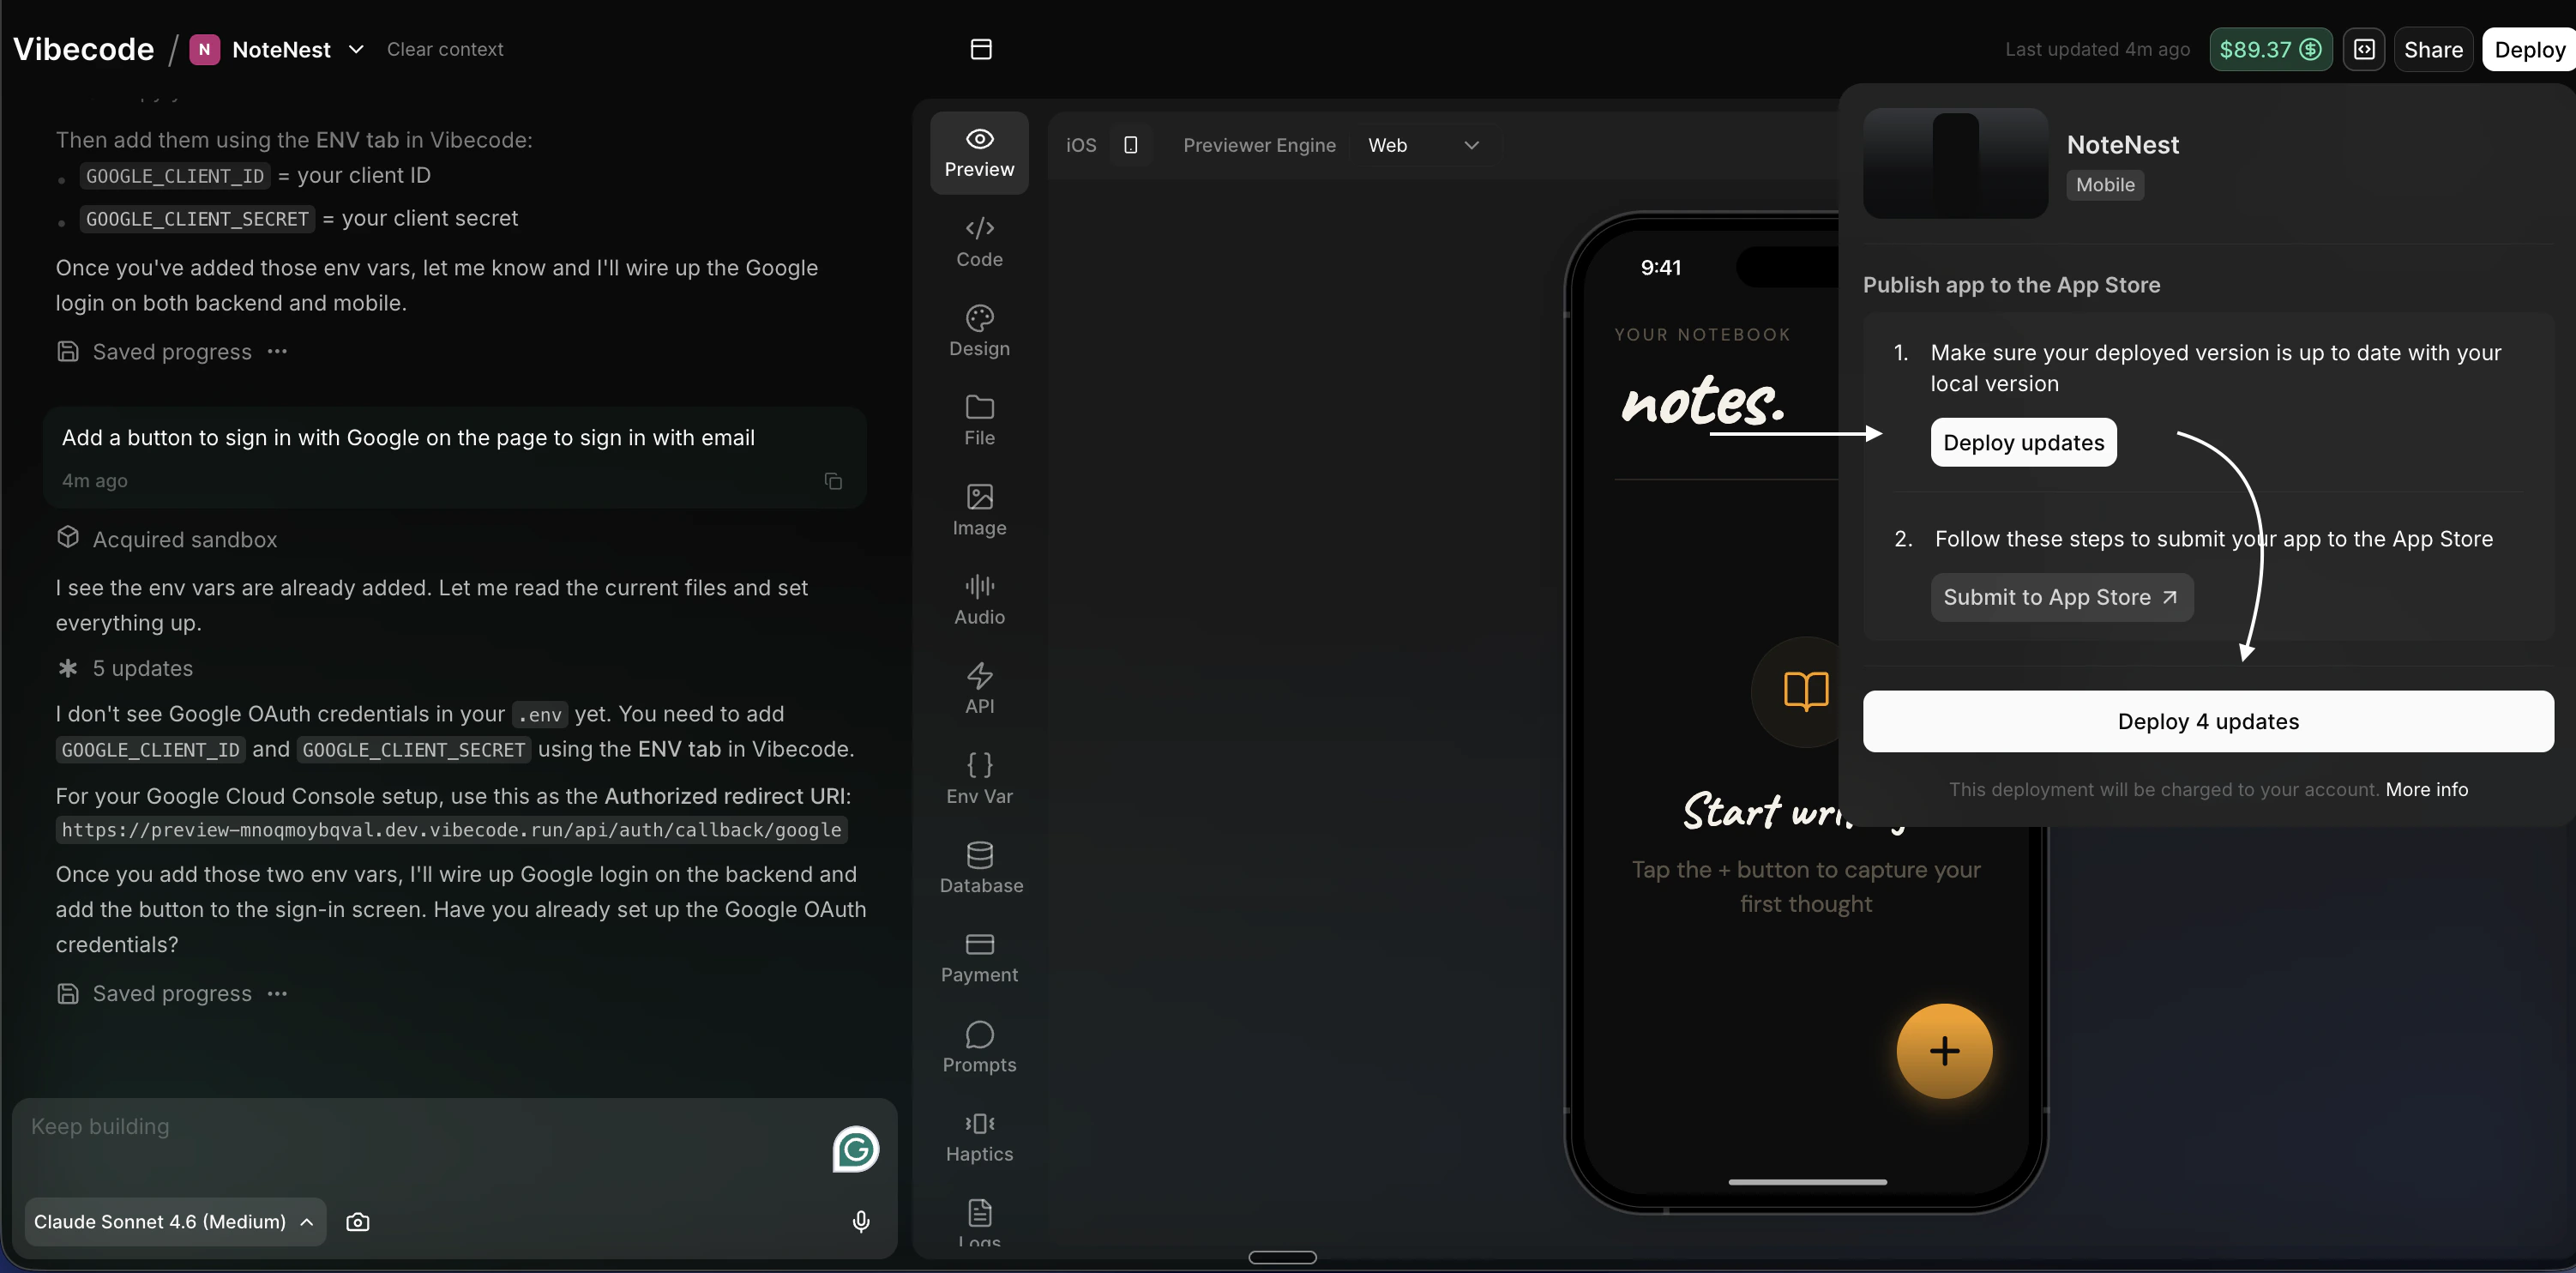
1. Open the **Vibecode** app and your project
2. In the top right corner, click **Deploy**
3. Click **Deploy Updates**
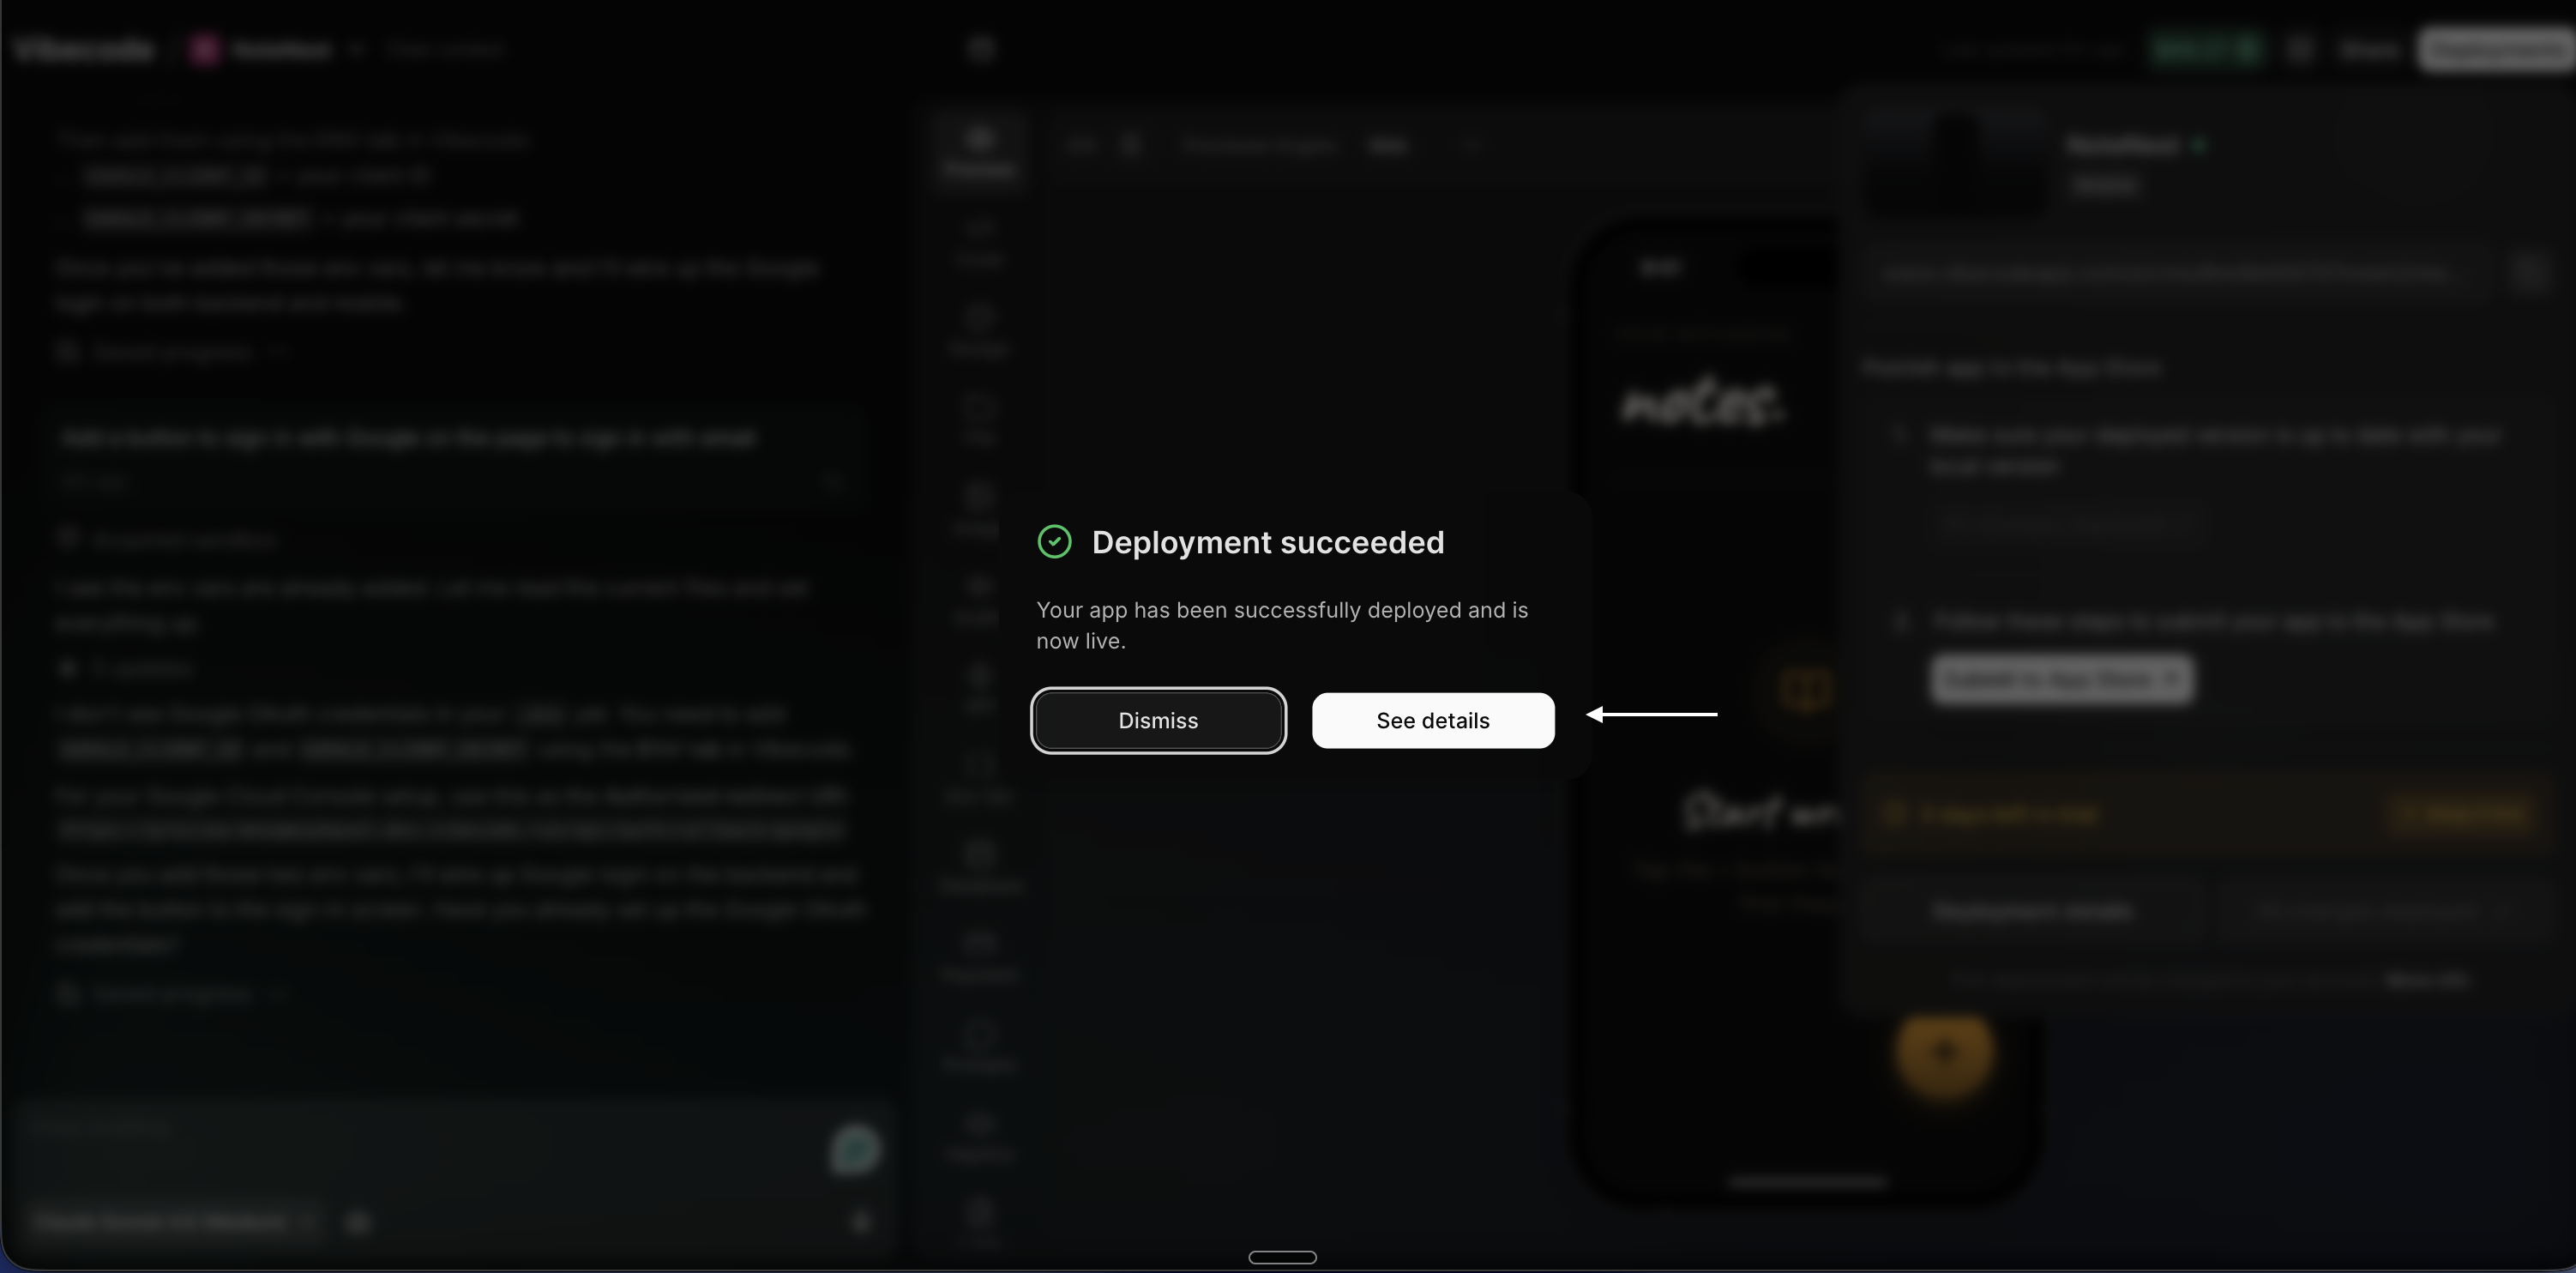
4. Wait for the deploy to finish — it may take a few minutes
5. When it's done, click **See details**
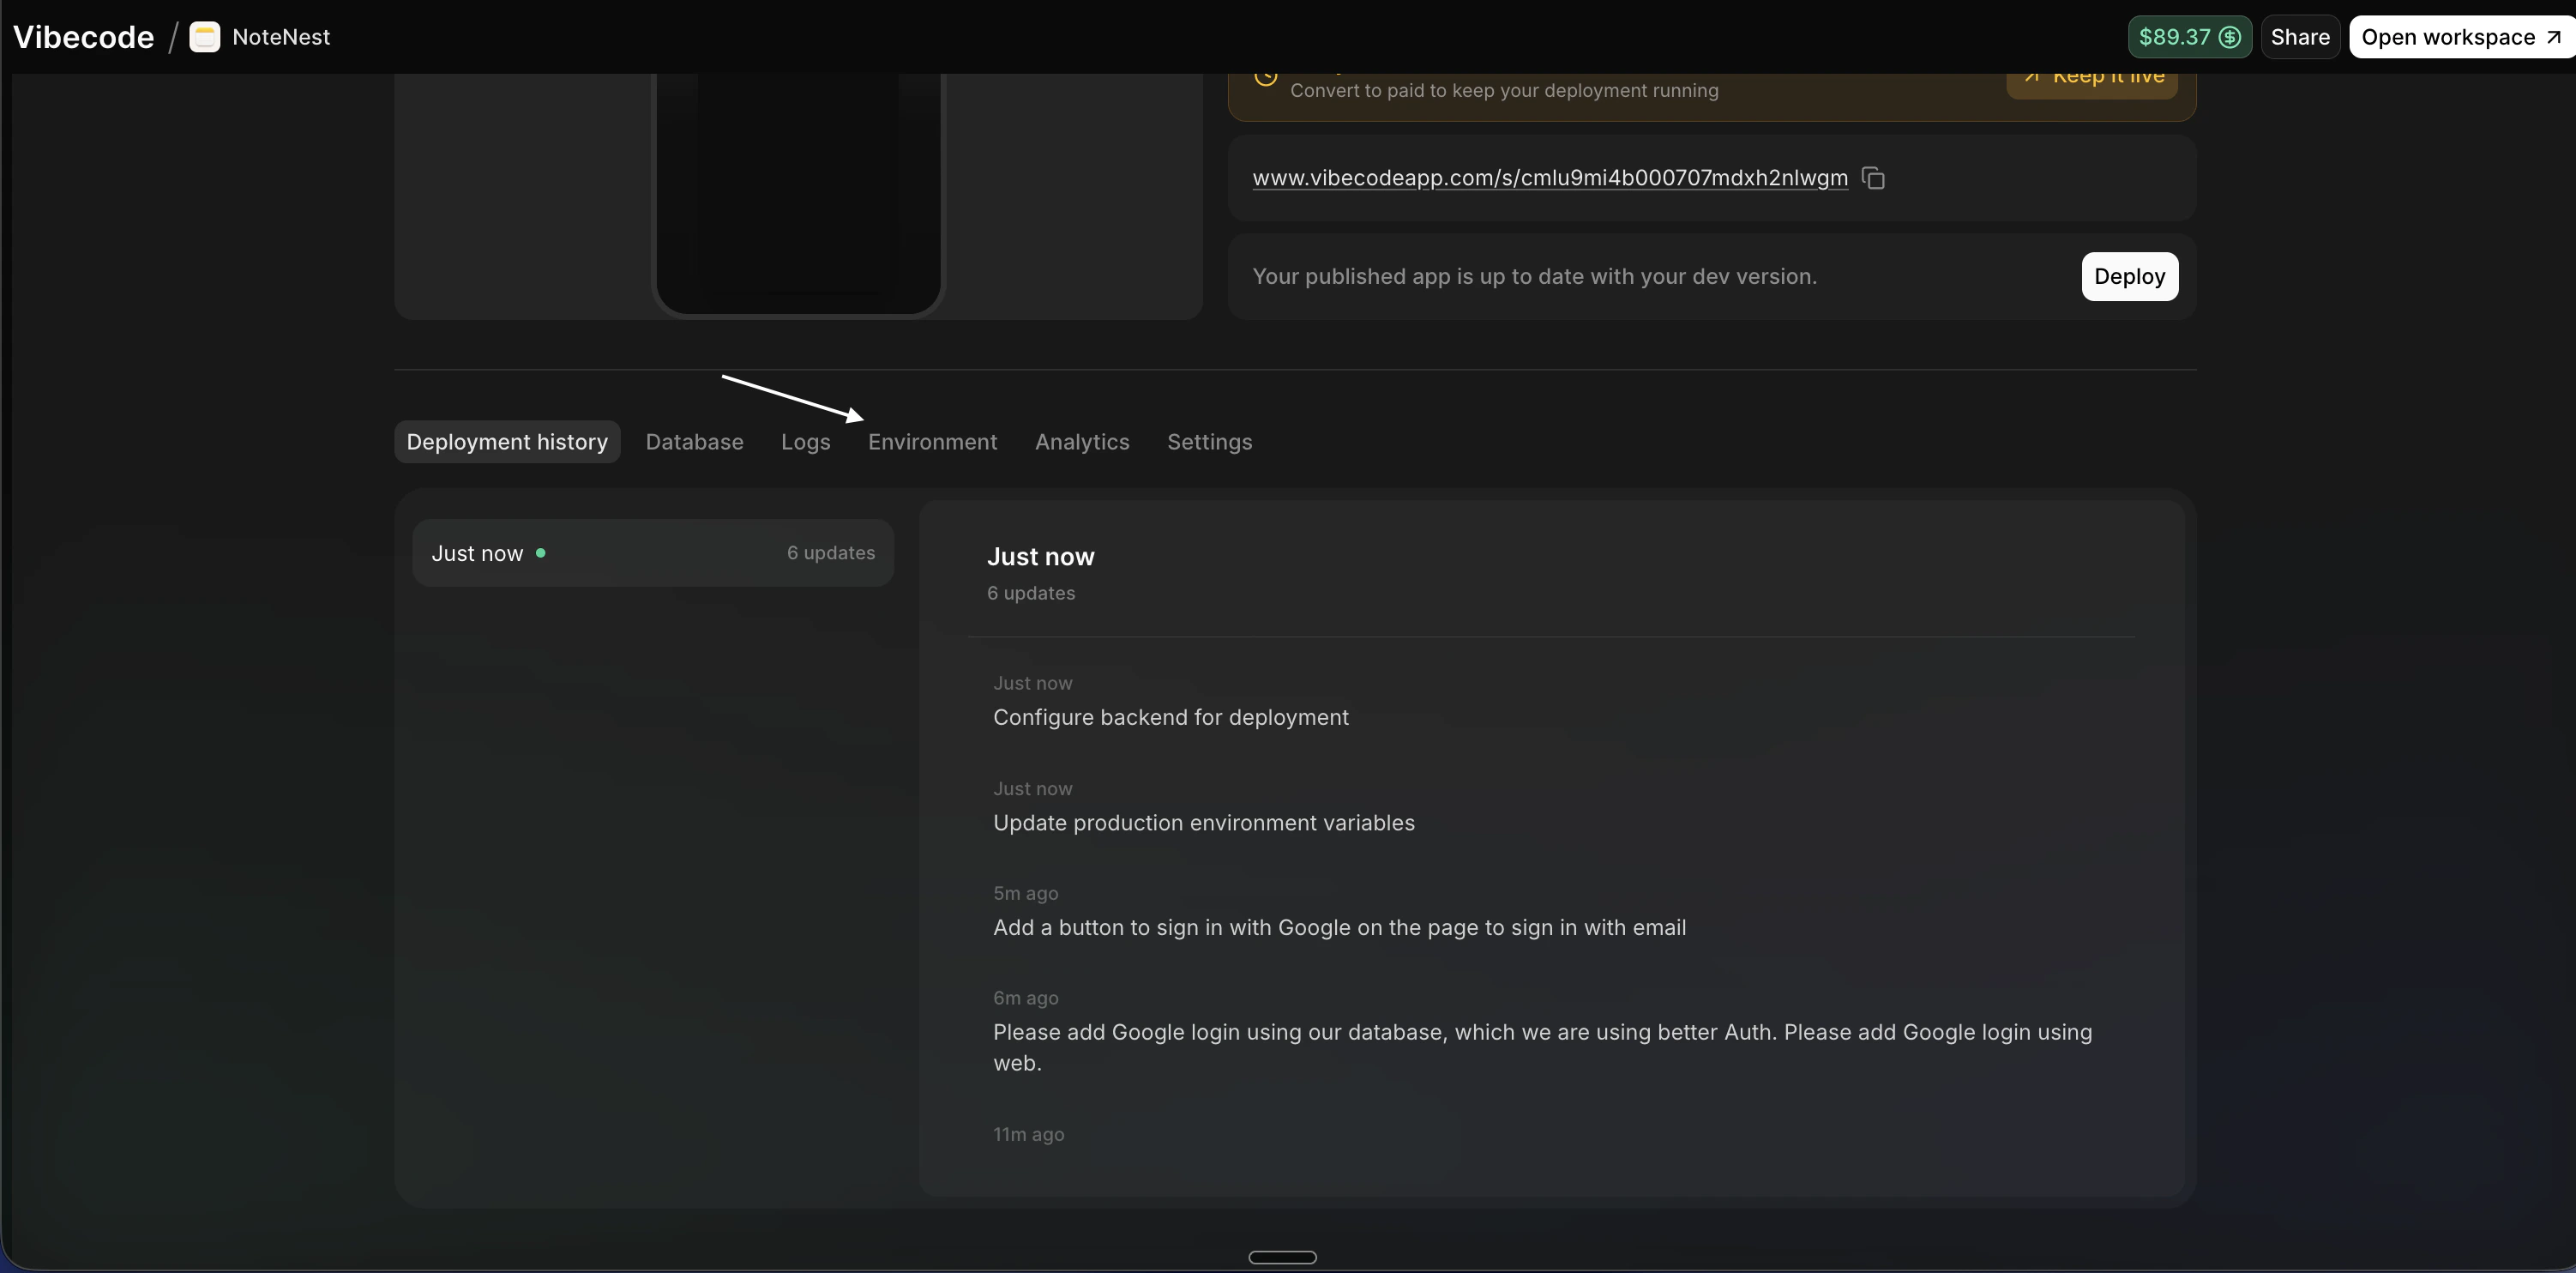
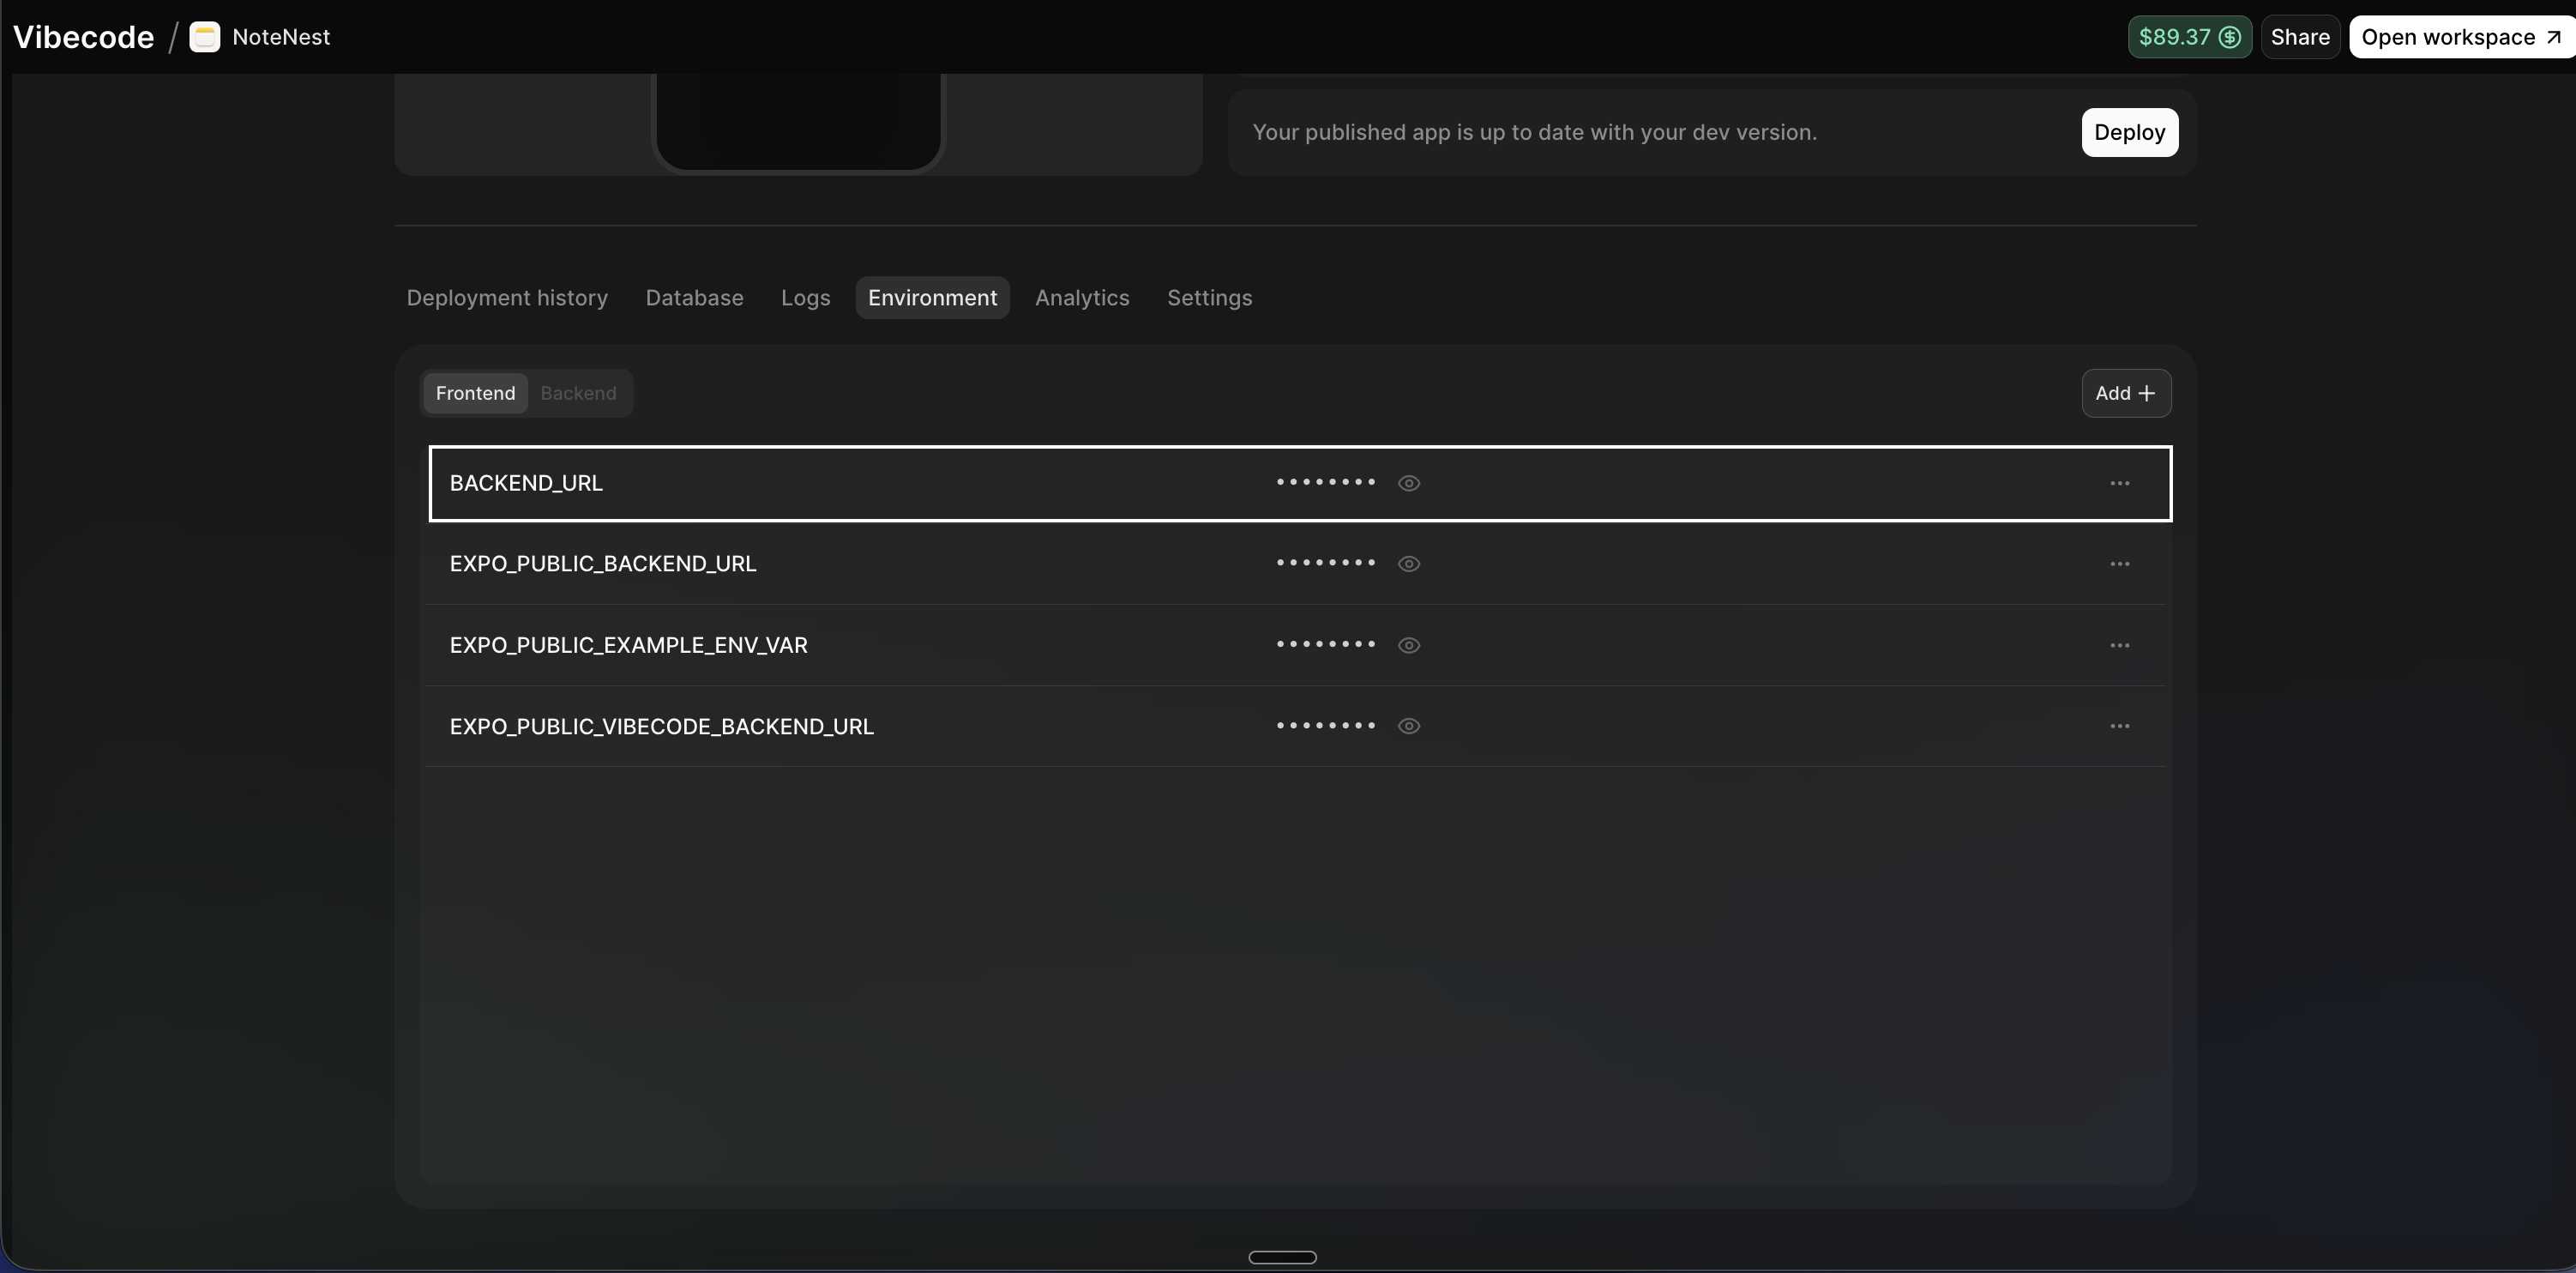
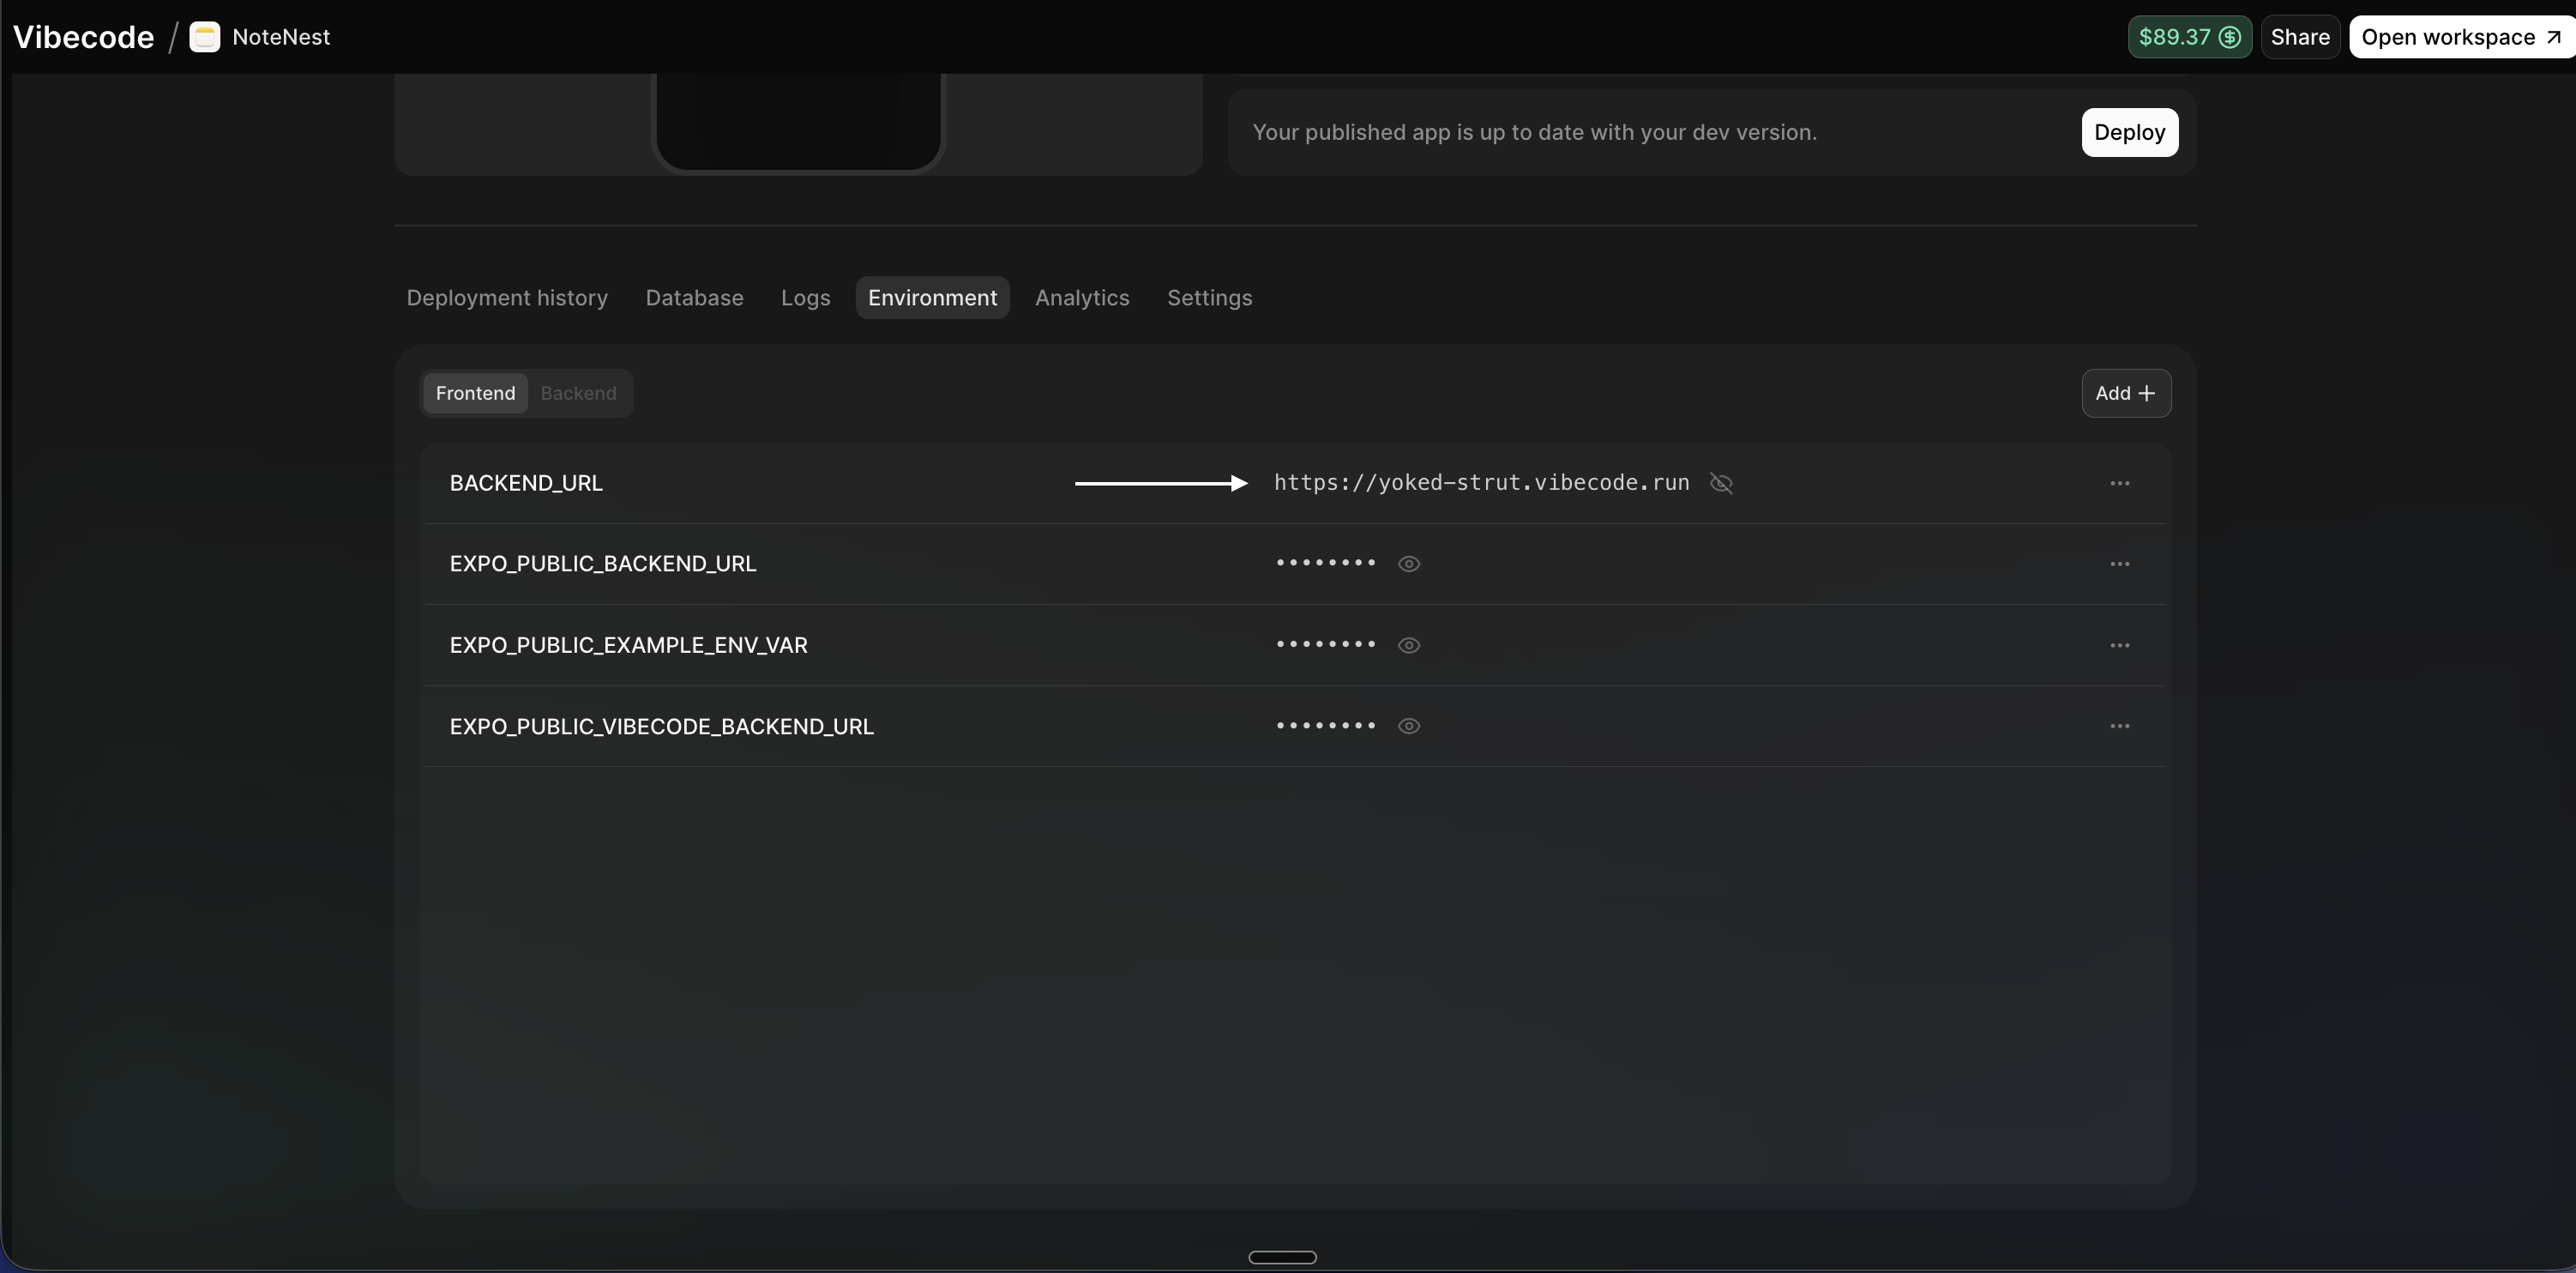
6. Go to the **Environment** tab (or **ENV**)
7. Find **BACKEND\_URL** (the URL that looks like `something.vibecode.run`)
8. Copy that URL — you will paste it into Google Cloud in the next step. Do not add a trailing slash.
***
## Step 5: Deploy Your App and Copy the Backend URL
Do this before creating the OAuth client so you can paste the real URL into Google Cloud once.
1. Open the **Vibecode** app and your project
2. In the top right corner, click **Deploy**
3. Click **Deploy Updates**
4. Wait for the deploy to finish — it may take a few minutes
5. When it's done, click **See details**
6. Go to the **Environment** tab (or **ENV**)
7. Find **BACKEND\_URL** (the URL that looks like `something.vibecode.run`)
8. Copy that URL — you will paste it into Google Cloud in the next step. Do not add a trailing slash.
 ***
## Step 6: Create the OAuth Client (Web Application)
1. Go back to **Google Cloud Console**
2. Go to **APIs & Services** → **Credentials** (hamburger menu if needed)
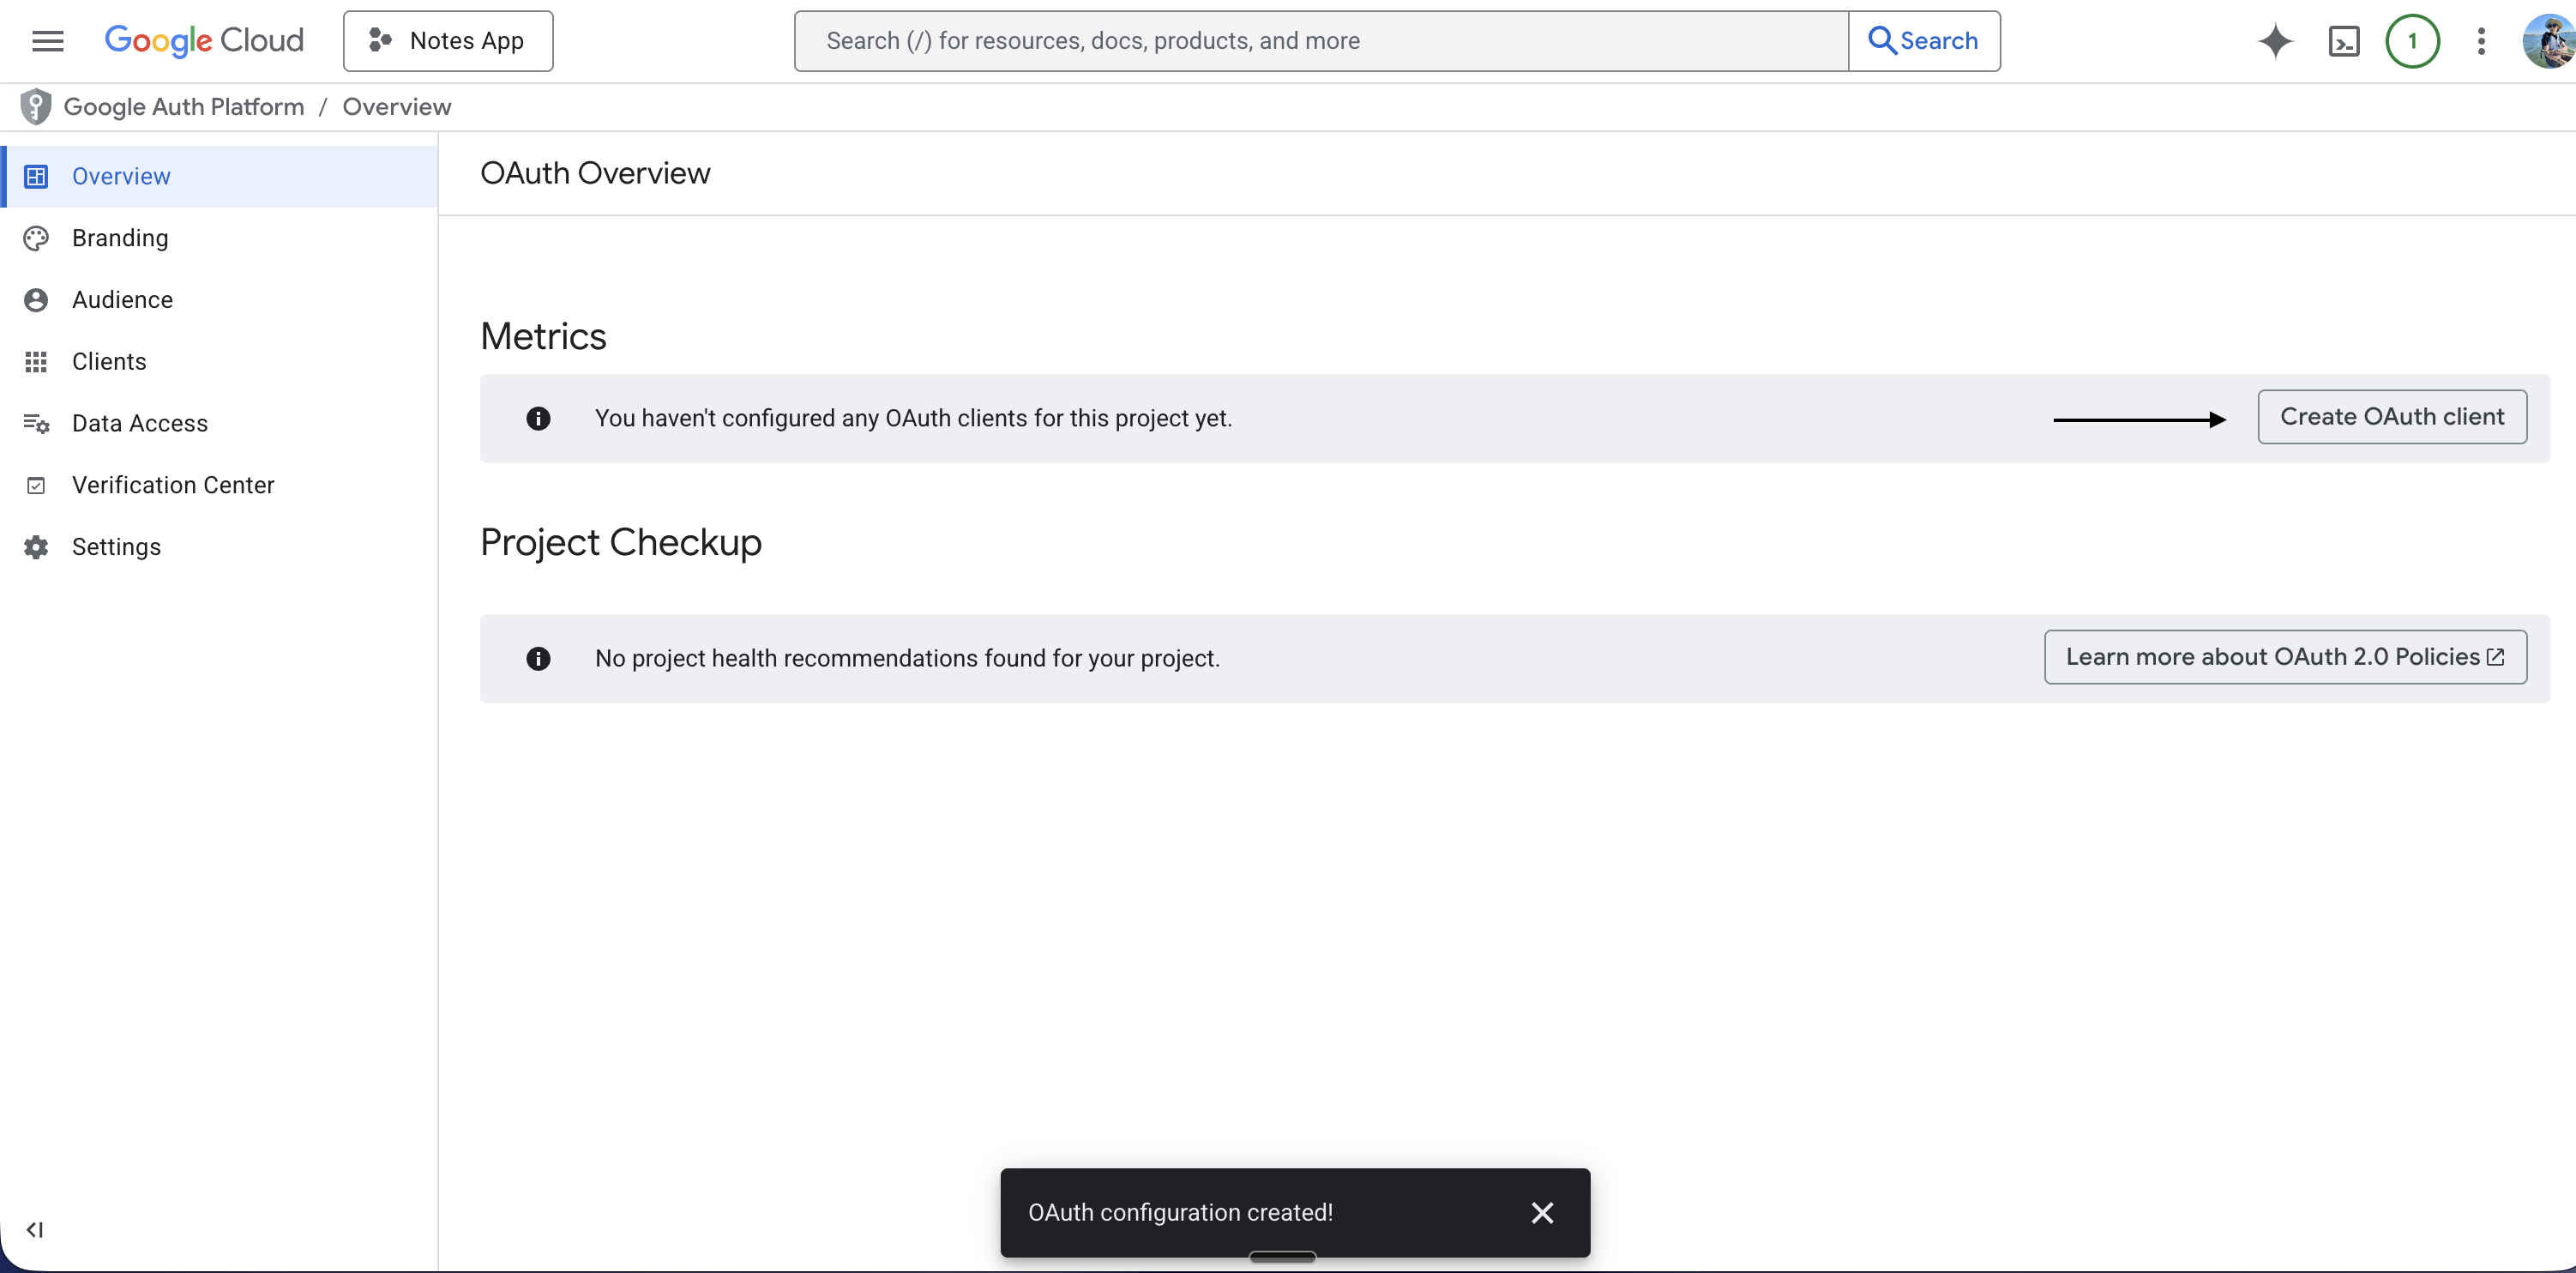
3. Click **Create credentials**
4. Click **OAuth client ID**
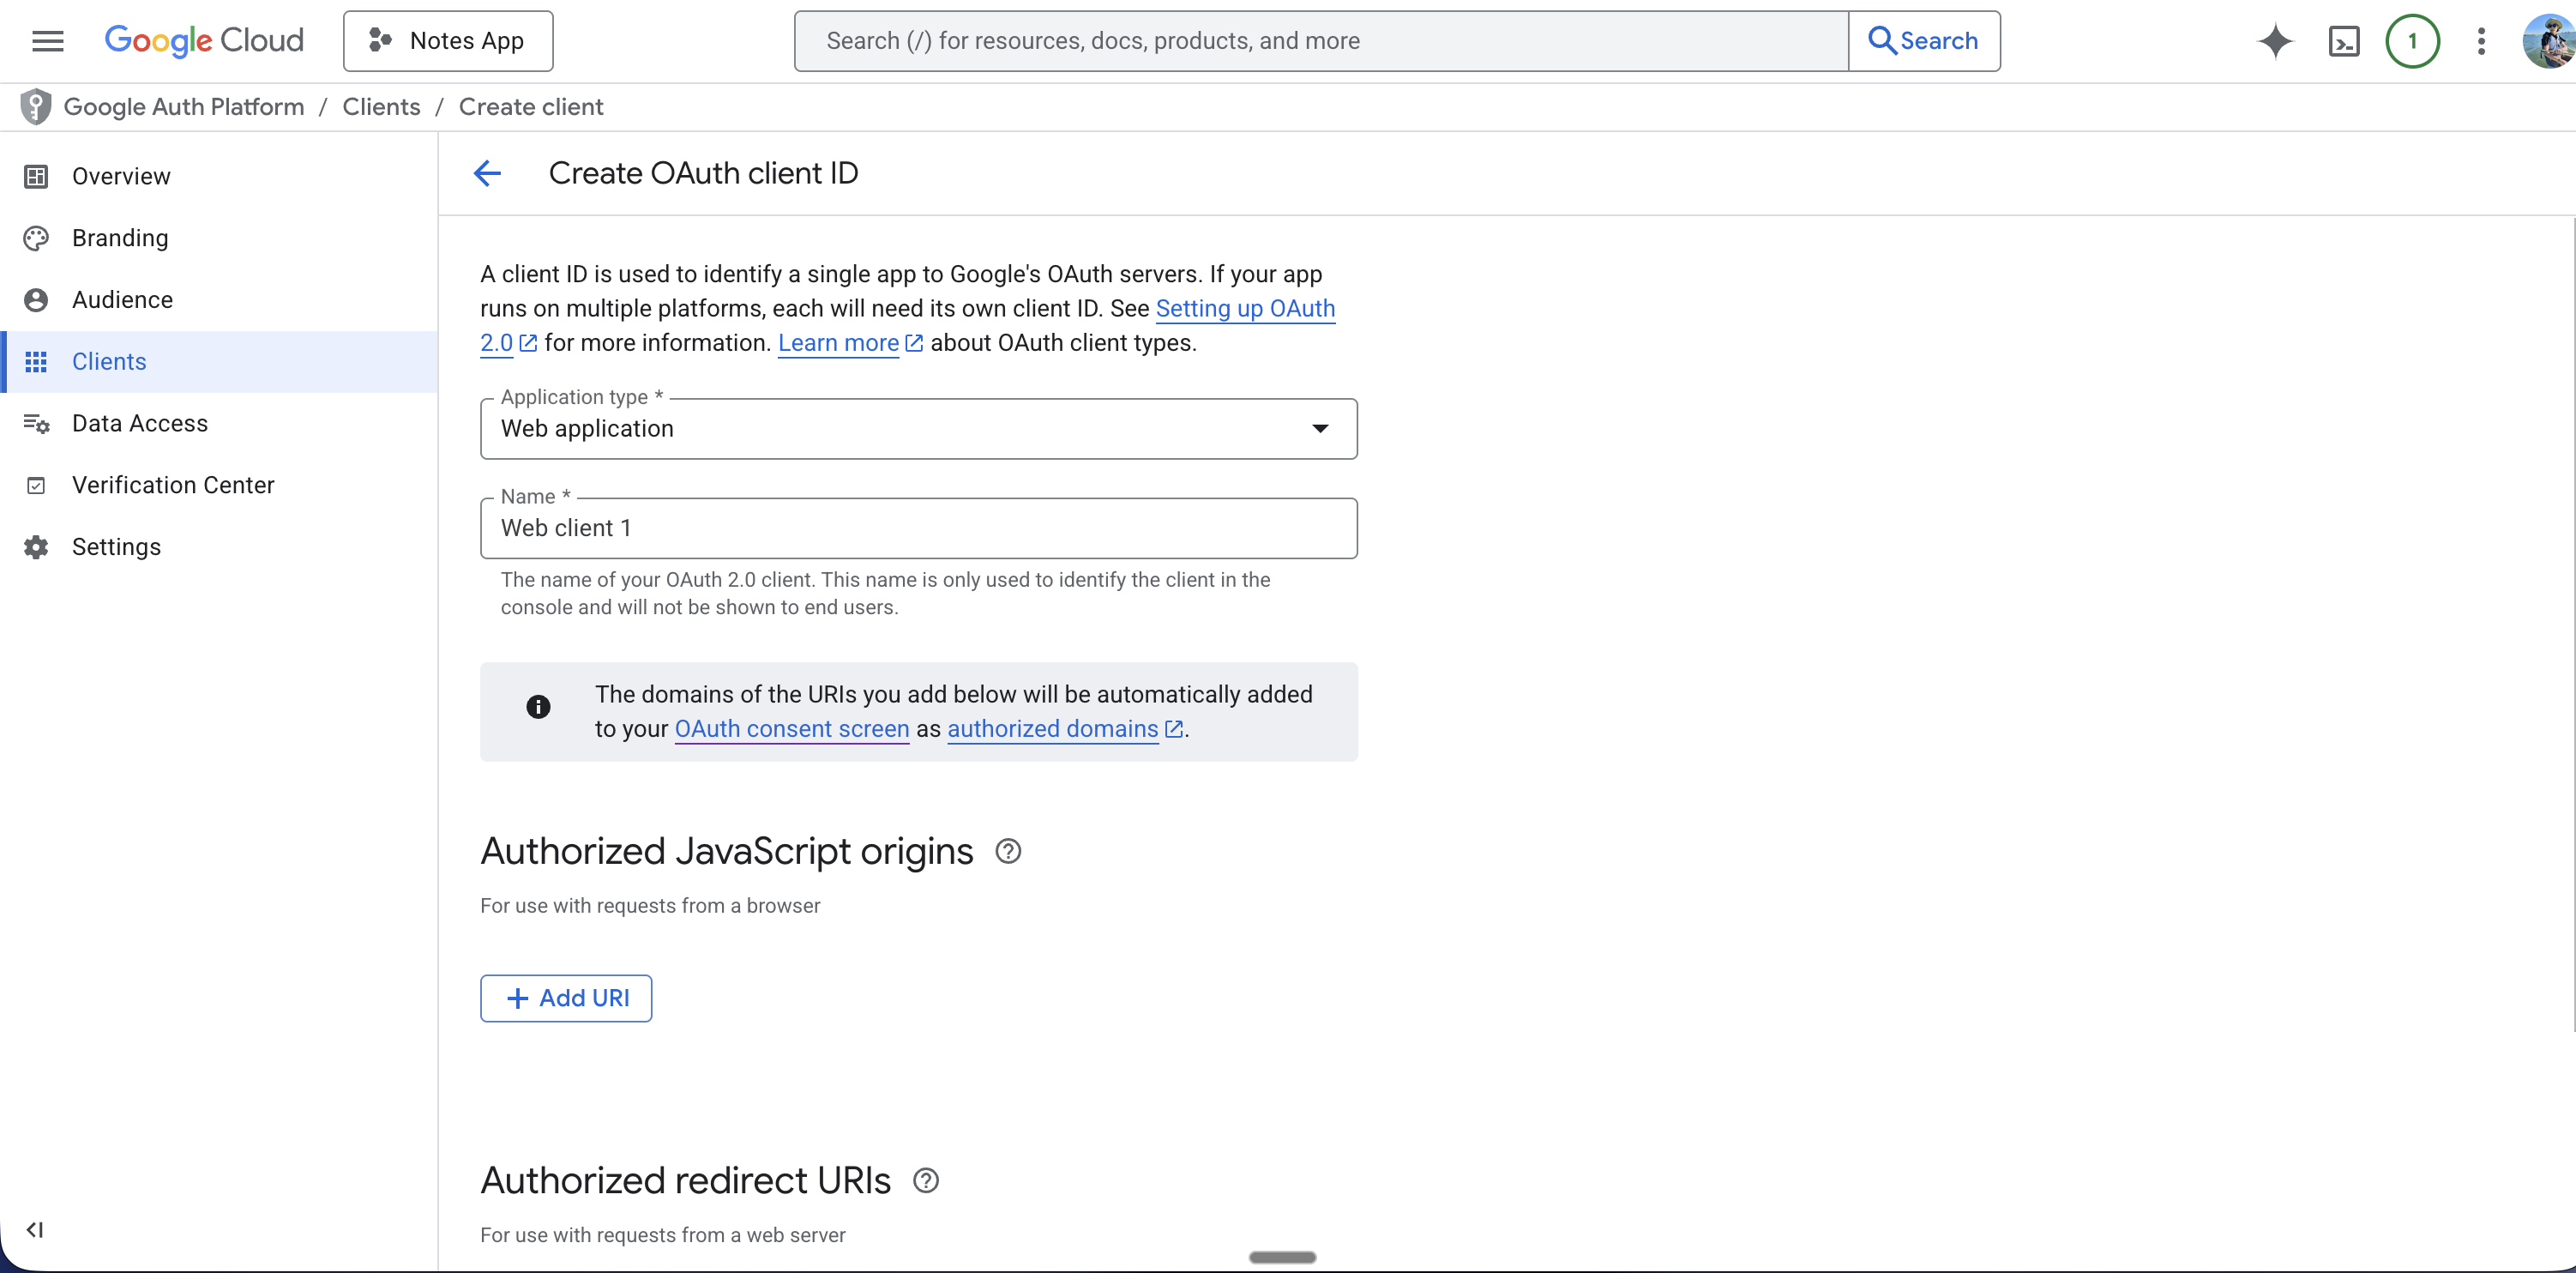
5. For **Application type**, choose **Web application** (not iOS or Android — Better Auth uses the web flow)
6. You can name the web application if you want (e.g. "Vibecode Web Client")
***
## Step 6: Create the OAuth Client (Web Application)
1. Go back to **Google Cloud Console**
2. Go to **APIs & Services** → **Credentials** (hamburger menu if needed)
3. Click **Create credentials**
4. Click **OAuth client ID**
5. For **Application type**, choose **Web application** (not iOS or Android — Better Auth uses the web flow)
6. You can name the web application if you want (e.g. "Vibecode Web Client")
 ***
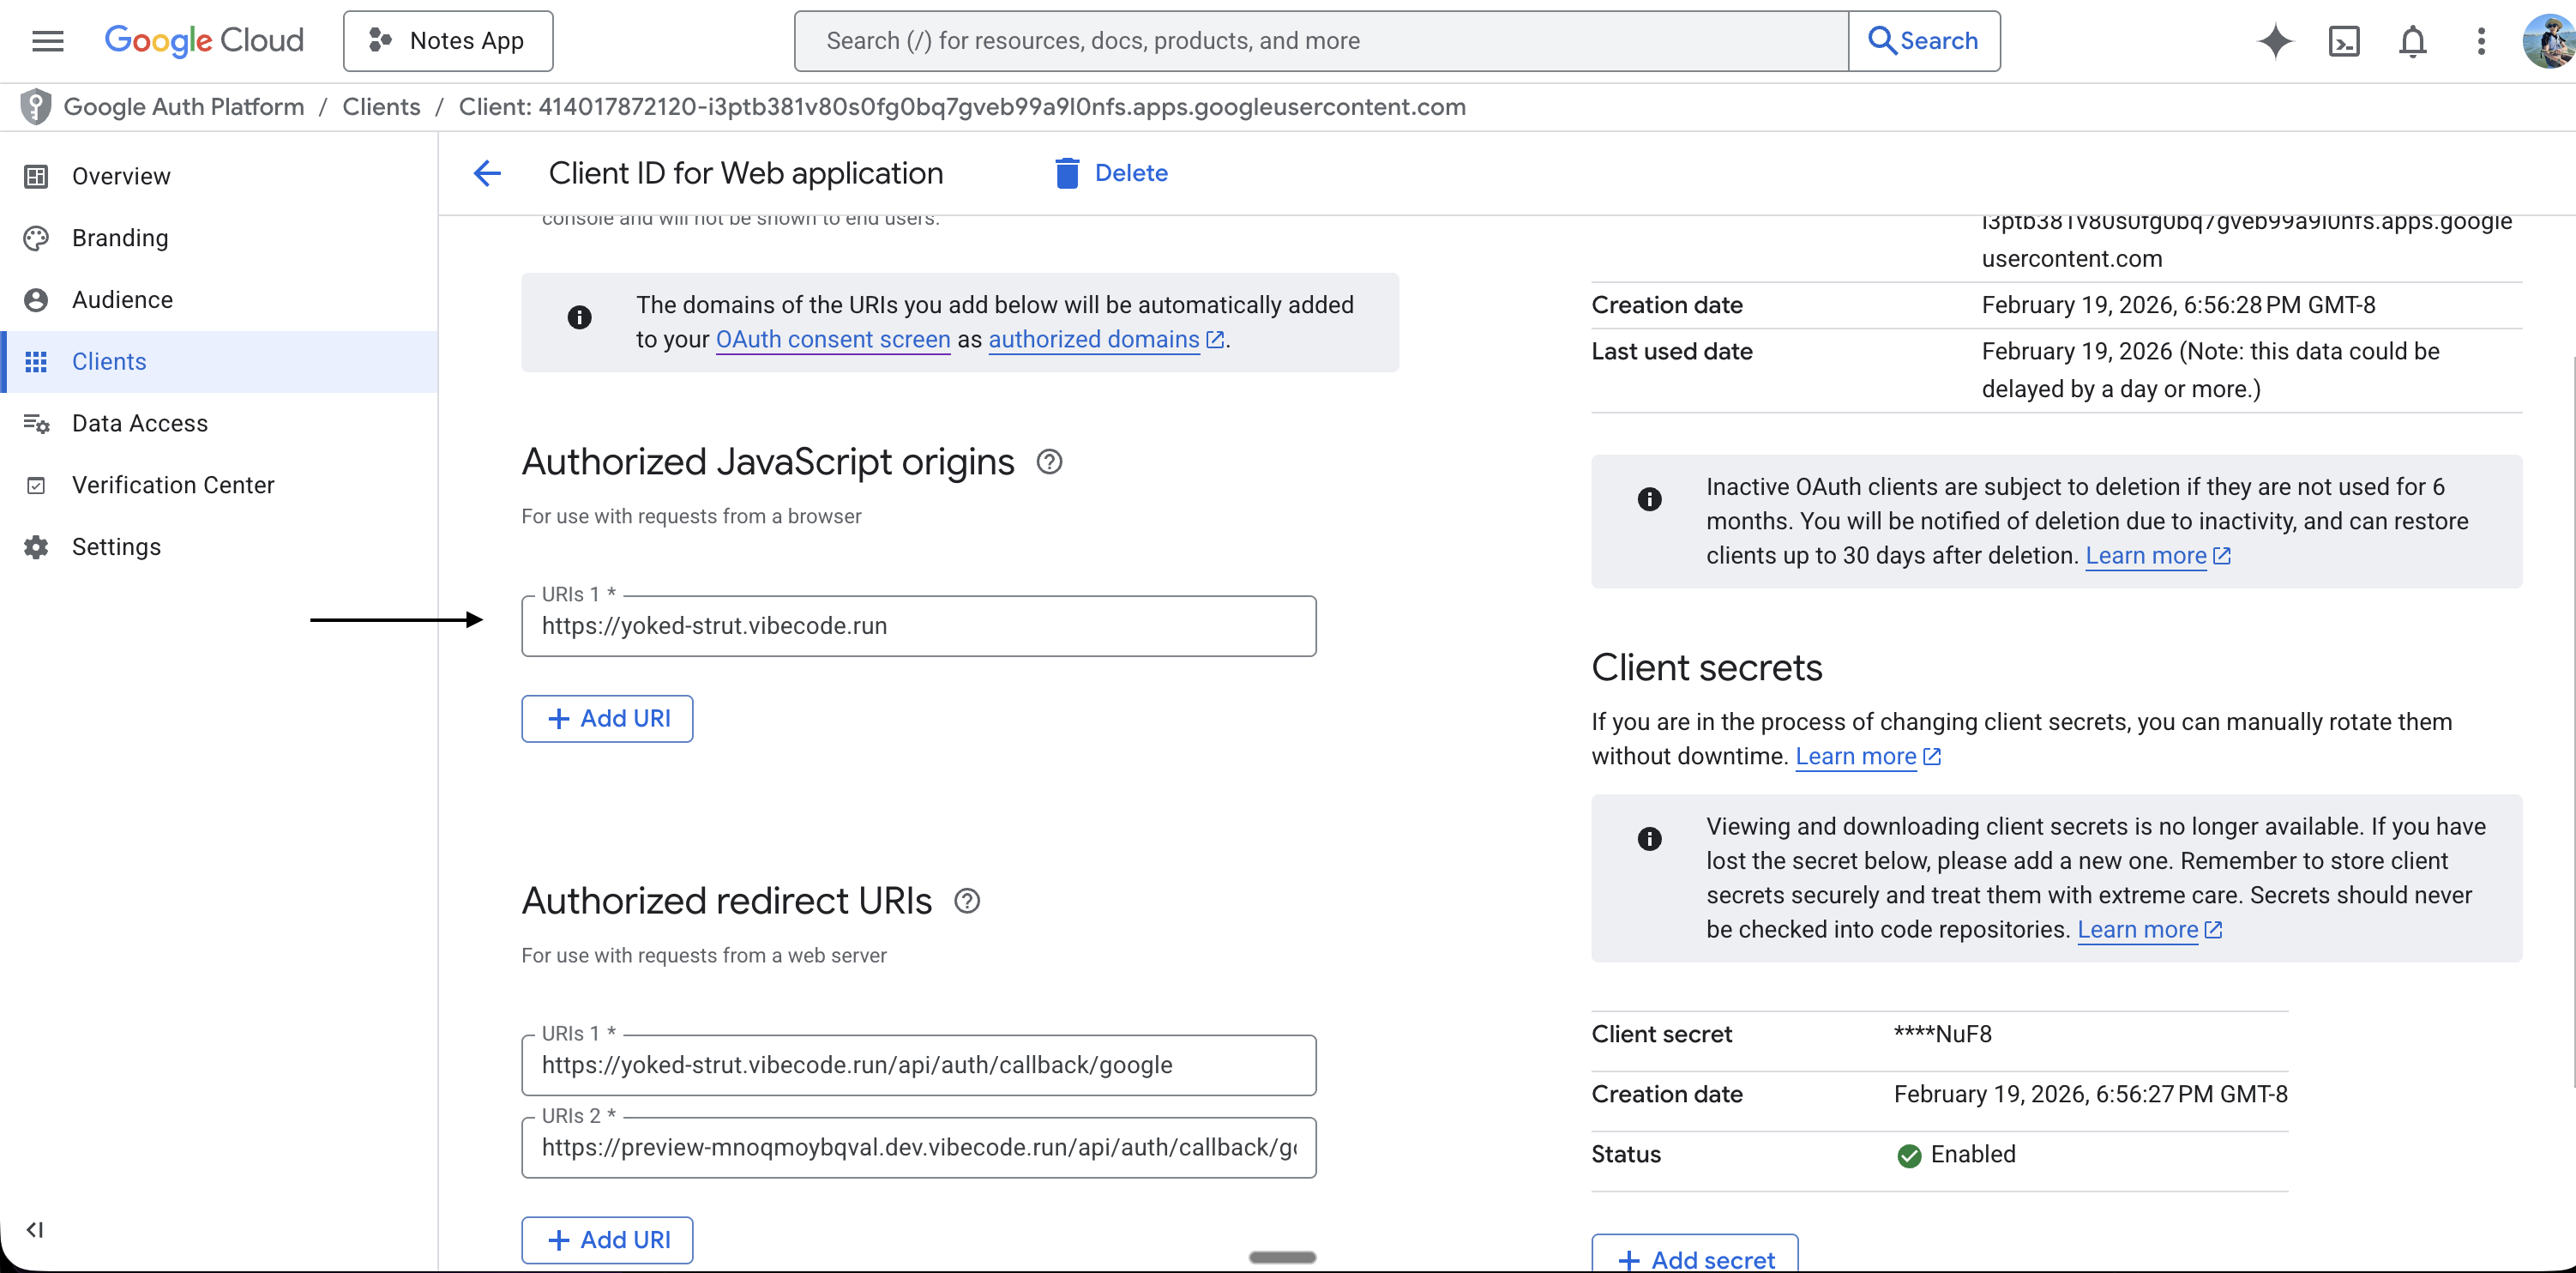
## Step 7: Add the Authorized JavaScript origin
Google requires an **Authorized JavaScript origin** in addition to the redirect URI. If this is missing, Google will return `origin_mismatch` and sign-in will fail.
1. In the same OAuth client form, find **Authorized JavaScript origins**
2. Click **Add URI**
3. Paste your backend URL **exactly** as it appears in Vibecode (from Step 5)
**Example:** `https://your-backend.vibecode.run`
**Important:**
* Do **not** add `/api` or any path
* Do **not** add a trailing slash
* It must exactly match your deployed backend URL
* If you use a preview backend, add that preview domain here as well (e.g. `https://preview-XXXXX.dev.vibecode.run`)
***
## Step 7: Add the Authorized JavaScript origin
Google requires an **Authorized JavaScript origin** in addition to the redirect URI. If this is missing, Google will return `origin_mismatch` and sign-in will fail.
1. In the same OAuth client form, find **Authorized JavaScript origins**
2. Click **Add URI**
3. Paste your backend URL **exactly** as it appears in Vibecode (from Step 5)
**Example:** `https://your-backend.vibecode.run`
**Important:**
* Do **not** add `/api` or any path
* Do **not** add a trailing slash
* It must exactly match your deployed backend URL
* If you use a preview backend, add that preview domain here as well (e.g. `https://preview-XXXXX.dev.vibecode.run`)
 ***
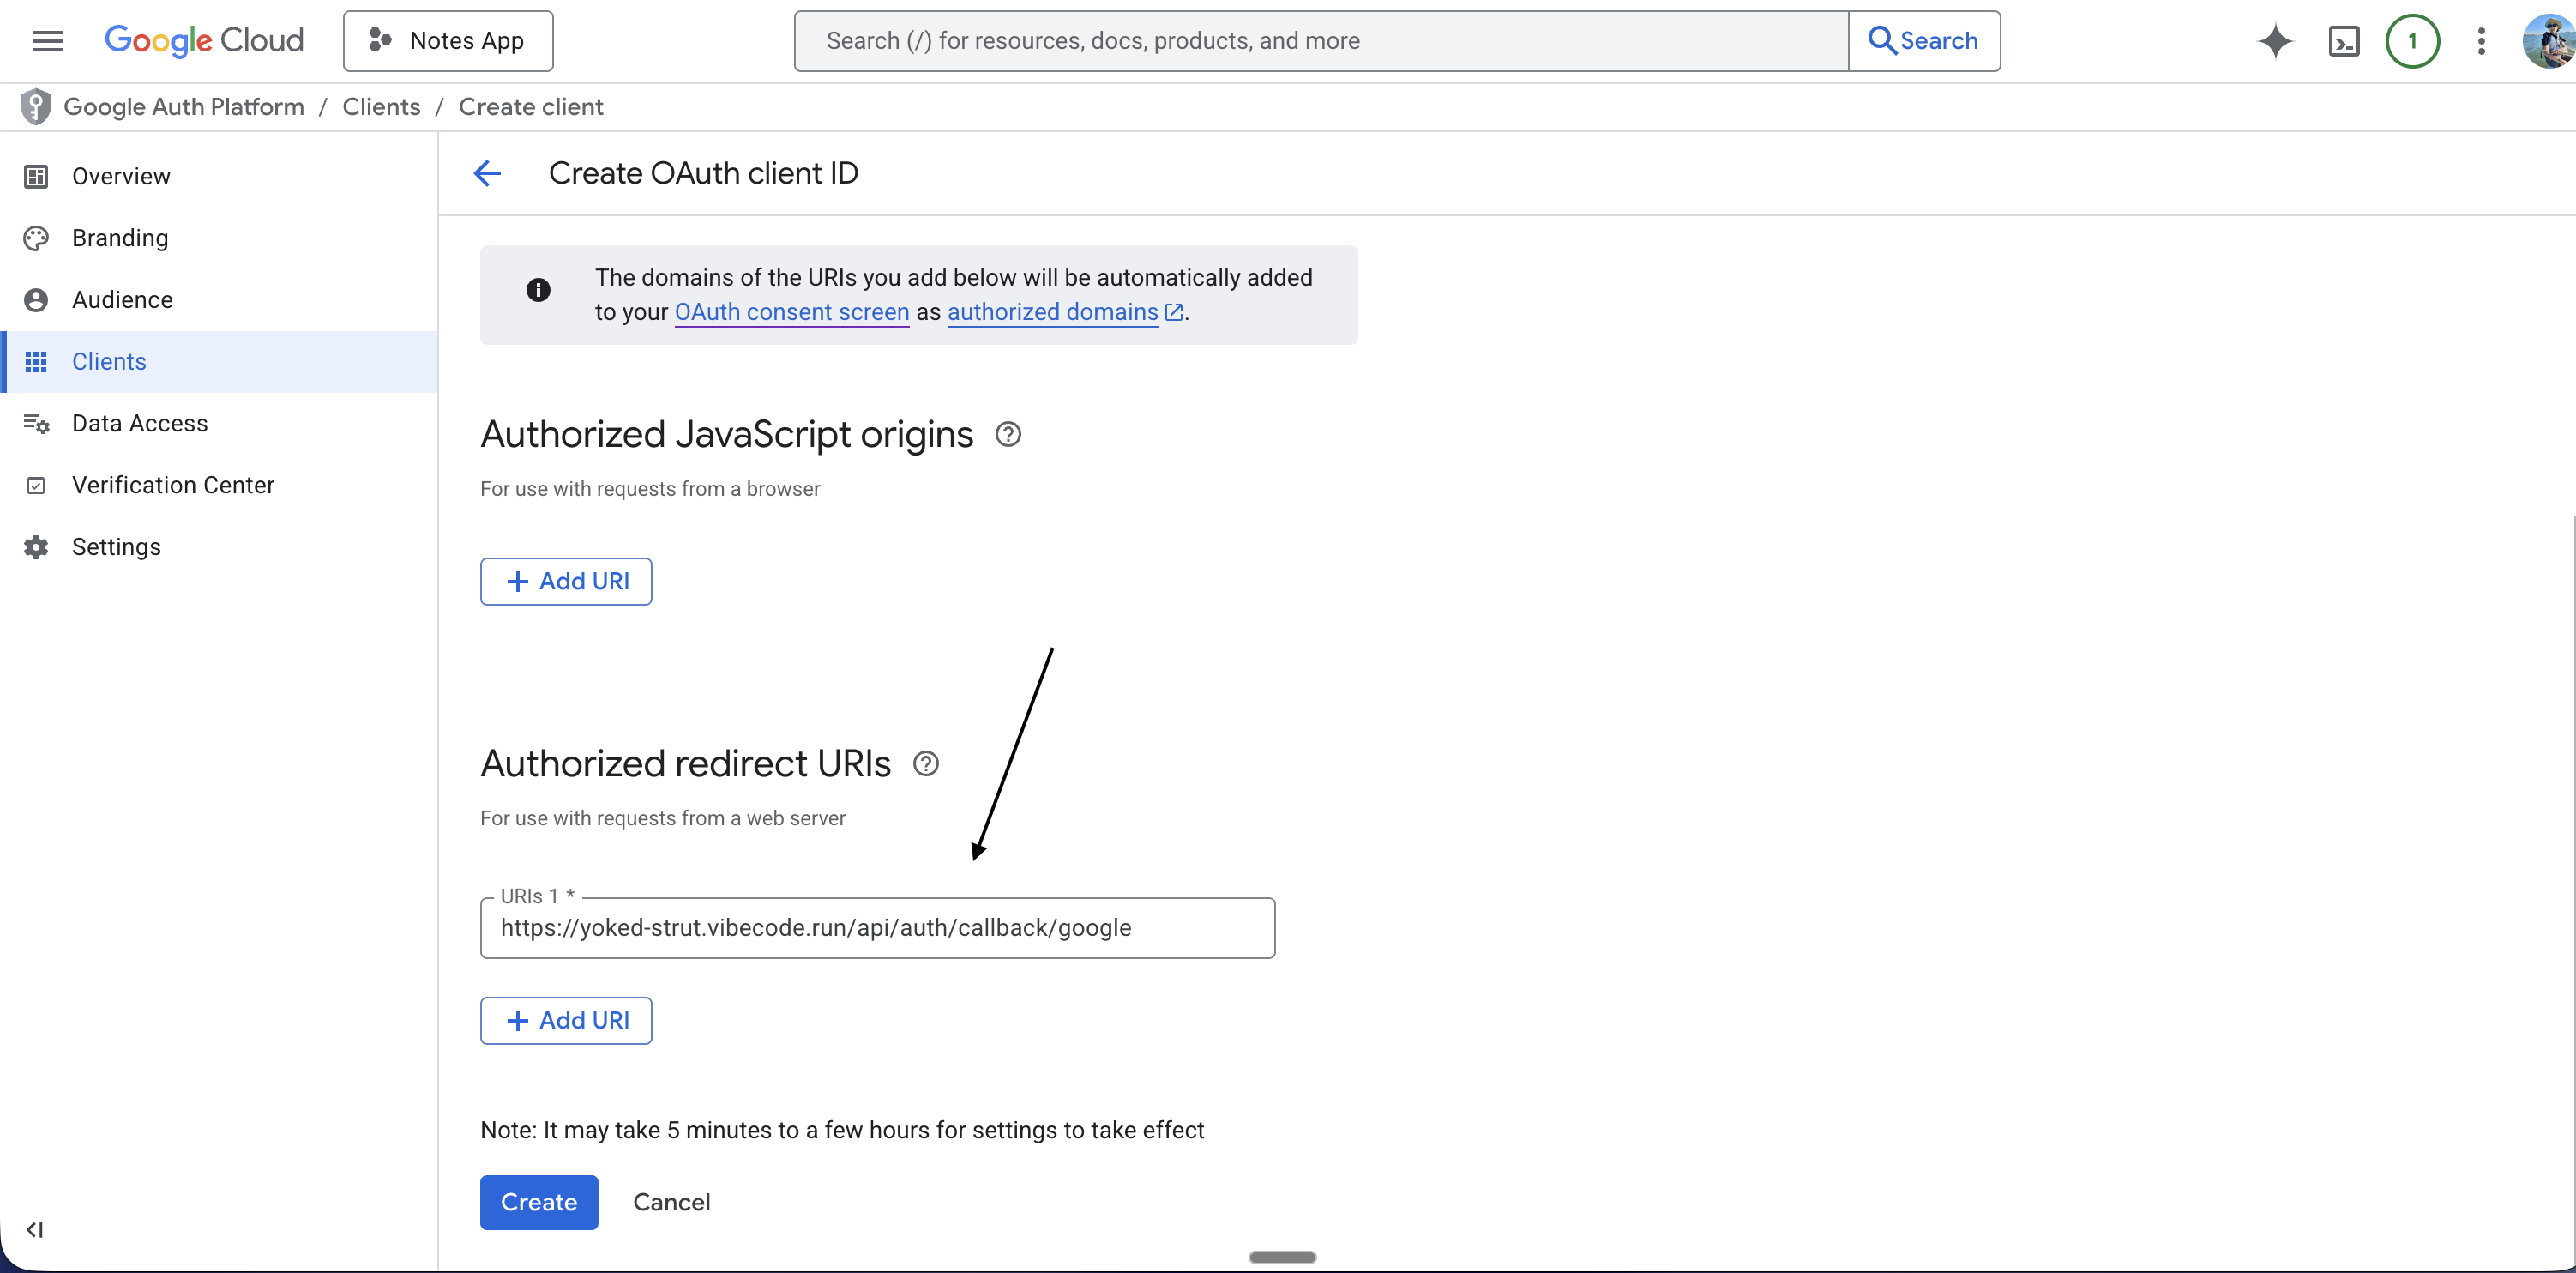
## Step 8: Add the Authorized Redirect URI
1. In the same form, find **Authorized redirect URIs**
2. Click **Add URI**
3. Paste your backend URL from Step 5
4. Add exactly this path after the URL: `/api/auth/callback/google`
The full redirect URI should look like: `https://your-backend.vibecode.run/api/auth/callback/google` (use your actual URL; no trailing slash before the path).
***
## Step 8: Add the Authorized Redirect URI
1. In the same form, find **Authorized redirect URIs**
2. Click **Add URI**
3. Paste your backend URL from Step 5
4. Add exactly this path after the URL: `/api/auth/callback/google`
The full redirect URI should look like: `https://your-backend.vibecode.run/api/auth/callback/google` (use your actual URL; no trailing slash before the path).
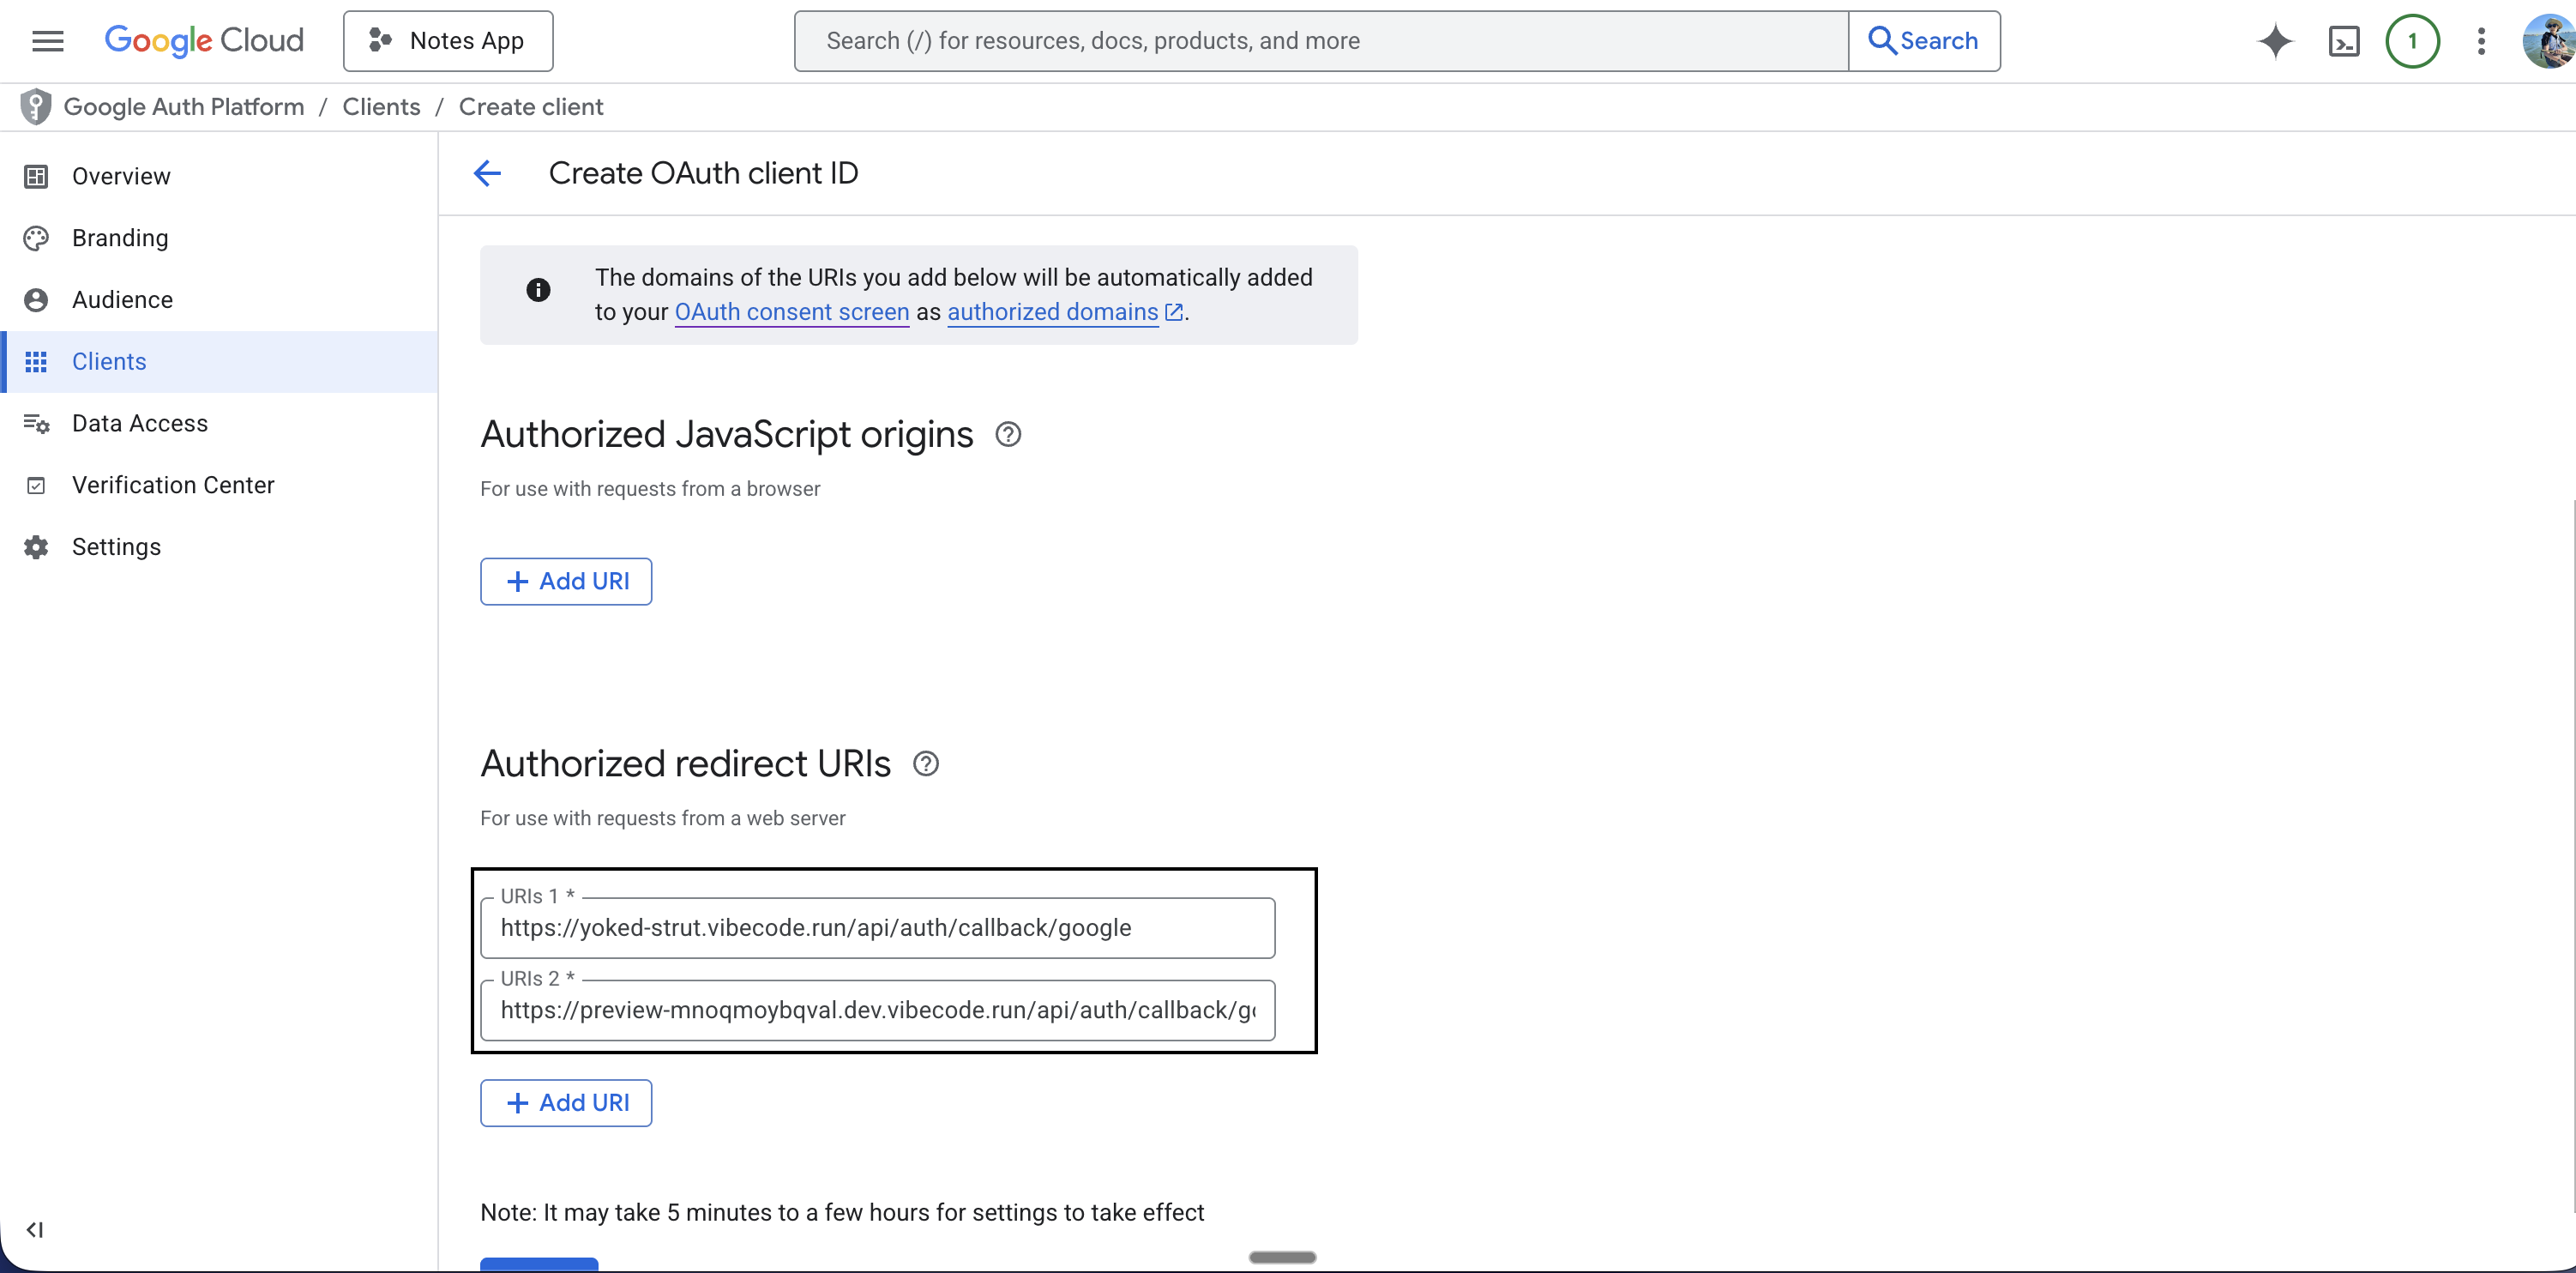 ***
### If you want to test inside the Vibecode app (preview)
You can add a preview URL so sign-in works when you preview the app in Vibecode.
1. In Vibecode, ask the agent for the **preview URL** or find it in the Environment tab (e.g. `https://preview-XXXXX.dev.vibecode.run`)
2. In Google Cloud, in **Authorized redirect URIs**, click **Add URI** again and add: `https://YOUR-PREVIEW-URL/api/auth/callback/google`
**Note:** The preview URL can change every time you reload your app. If sign-in stops working in preview, add the new preview URL to Google Cloud.
***
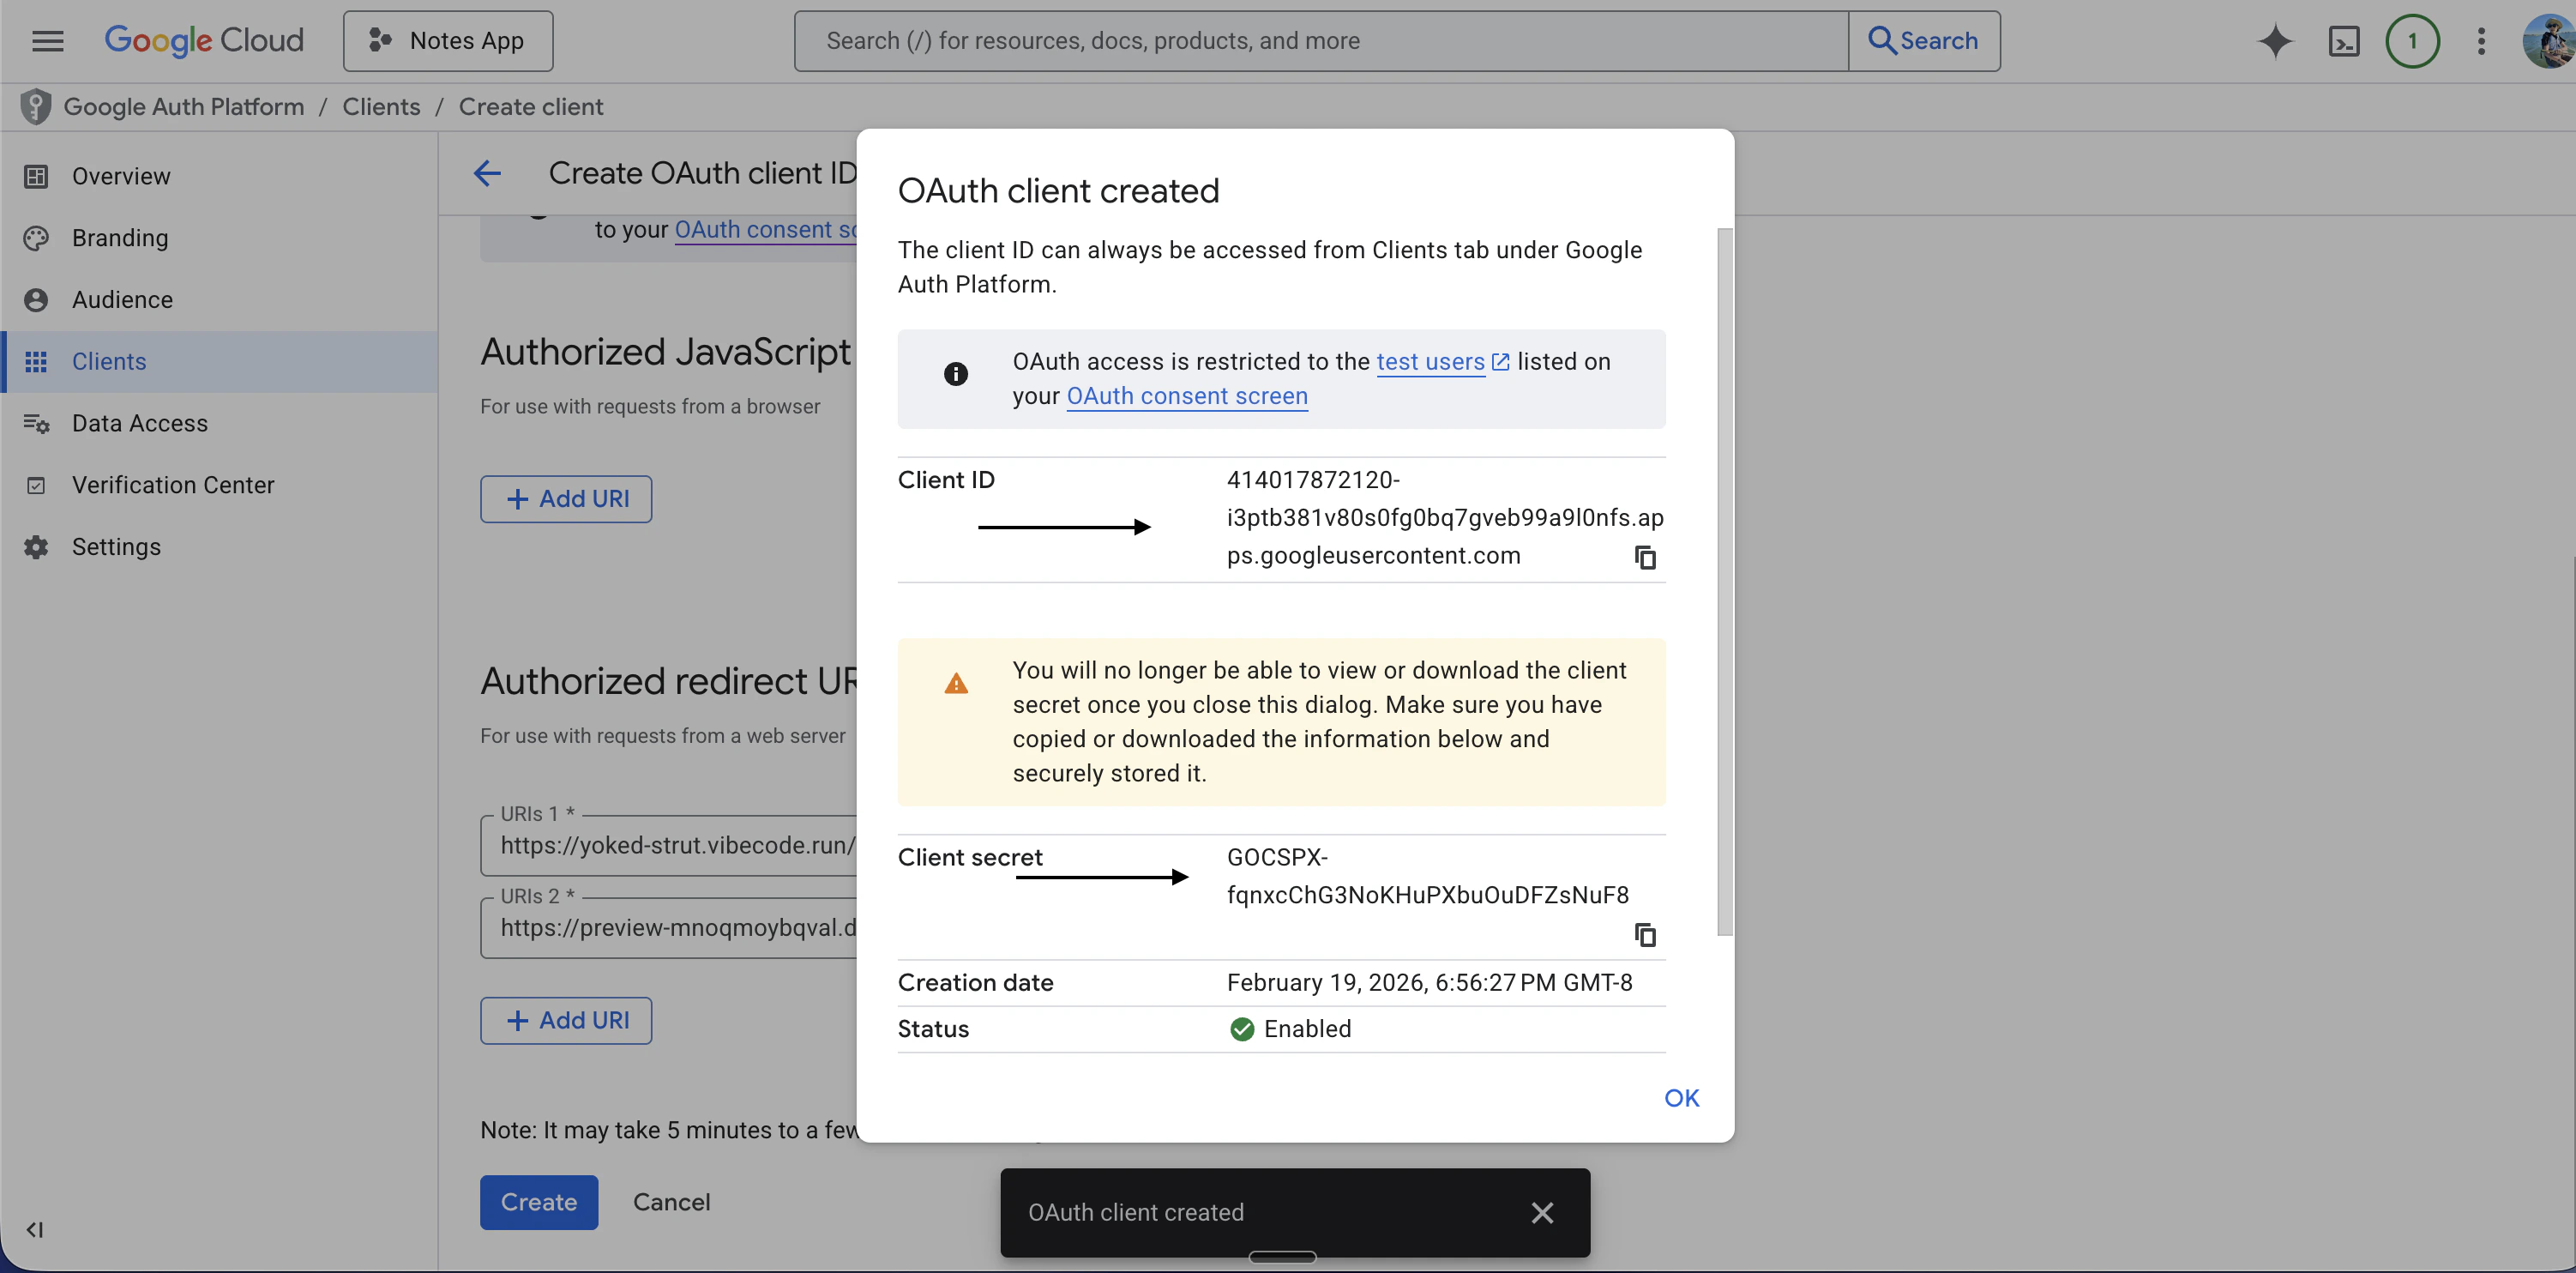
## Step 9: Save, Create, and Copy Your Credentials
1. Click **Save** if there is a Save button on the form
2. Click **Create**
3. A pop-up appears: **OAuth client created**. It shows your **Client ID** and **Client secret**
4. Copy both values now. You will add them to Vibecode in the next step.
**Warning:** Never share your Client secret. Do not close the pop-up before copying — once you close it, you cannot see the client secret again.
***
### If you want to test inside the Vibecode app (preview)
You can add a preview URL so sign-in works when you preview the app in Vibecode.
1. In Vibecode, ask the agent for the **preview URL** or find it in the Environment tab (e.g. `https://preview-XXXXX.dev.vibecode.run`)
2. In Google Cloud, in **Authorized redirect URIs**, click **Add URI** again and add: `https://YOUR-PREVIEW-URL/api/auth/callback/google`
**Note:** The preview URL can change every time you reload your app. If sign-in stops working in preview, add the new preview URL to Google Cloud.
***
## Step 9: Save, Create, and Copy Your Credentials
1. Click **Save** if there is a Save button on the form
2. Click **Create**
3. A pop-up appears: **OAuth client created**. It shows your **Client ID** and **Client secret**
4. Copy both values now. You will add them to Vibecode in the next step.
**Warning:** Never share your Client secret. Do not close the pop-up before copying — once you close it, you cannot see the client secret again.
 ***
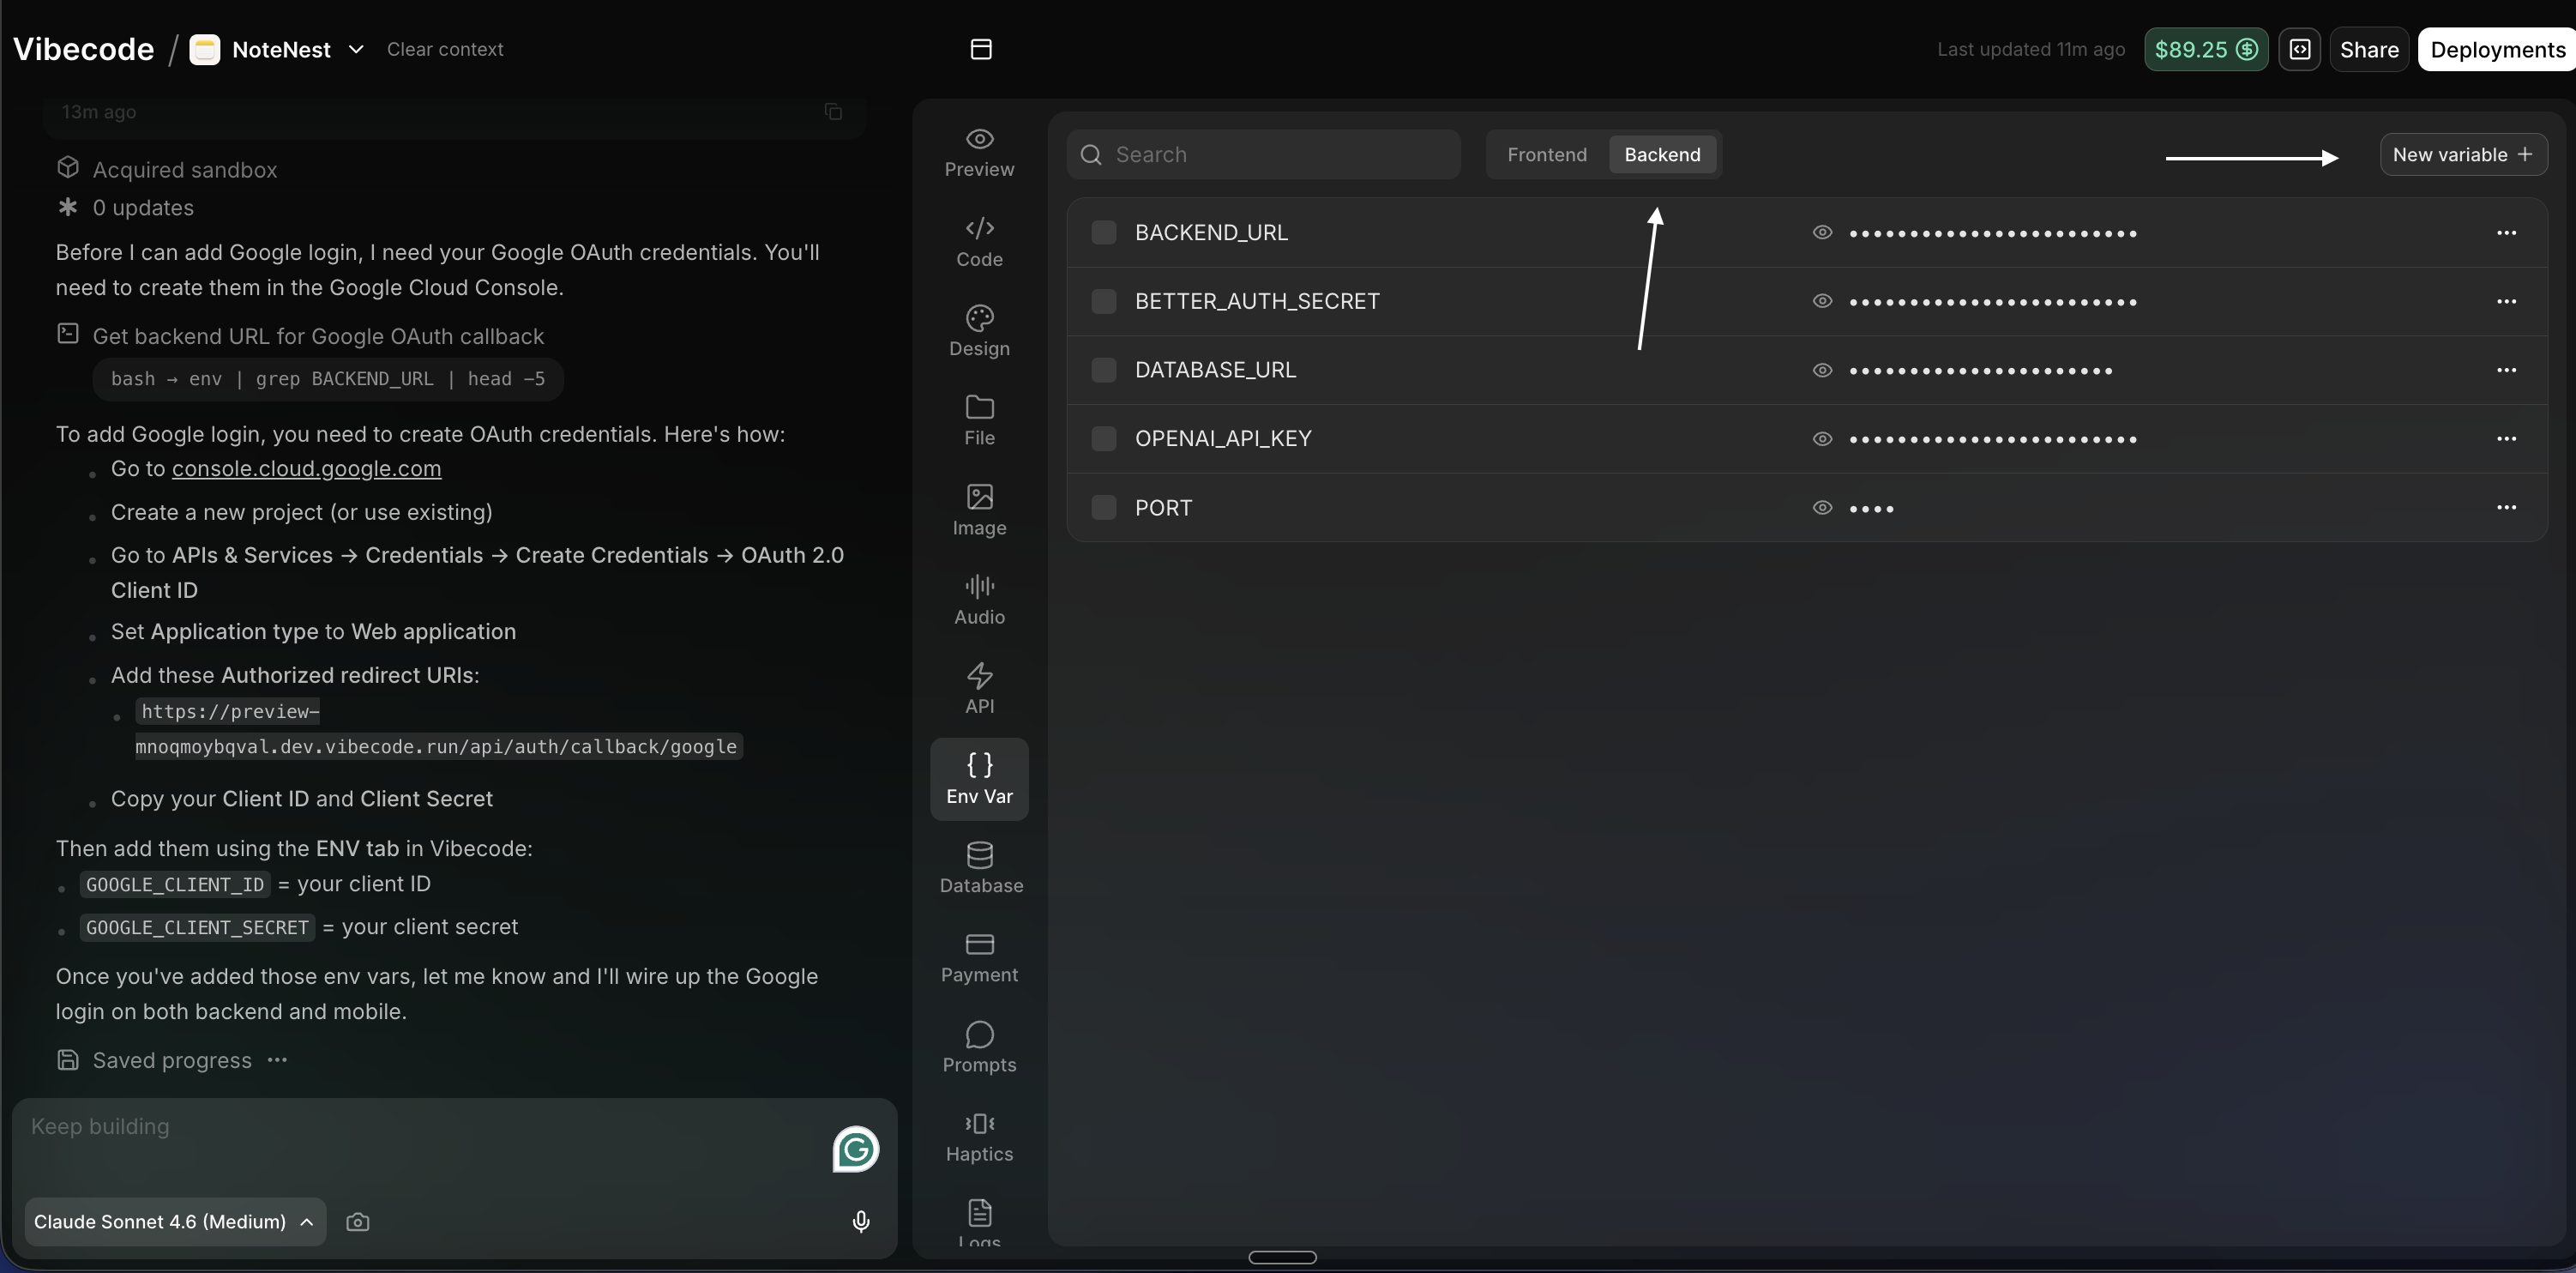
## Step 10: Add Environment Variables in Vibecode
1. Open the **Vibecode** app
2. Go to the **Environment variables** tab (or **ENV** tab)
3. Click **Backend** — add both variables in the **Backend** section, not Frontend
4. Click **New variable** (or **Add variable**)
5. Add two variables:
* Key: `GOOGLE_CLIENT_ID` — Value: your Client ID from Step 9
* Key: `GOOGLE_CLIENT_SECRET` — Value: your Client secret from Step 9
6. Save (make sure you save after adding both)
***
## Step 10: Add Environment Variables in Vibecode
1. Open the **Vibecode** app
2. Go to the **Environment variables** tab (or **ENV** tab)
3. Click **Backend** — add both variables in the **Backend** section, not Frontend
4. Click **New variable** (or **Add variable**)
5. Add two variables:
* Key: `GOOGLE_CLIENT_ID` — Value: your Client ID from Step 9
* Key: `GOOGLE_CLIENT_SECRET` — Value: your Client secret from Step 9
6. Save (make sure you save after adding both)
 ***
## Important: Update the scheme only when you publish your app
The **Vibecode scheme** (e.g. `vibecode`) will work when you test **inside the Vibecode app**. You do not need to change it for that.
**As soon as you publish your real app** (e.g. to the App Store or Play Store), you need to update the scheme to match your app’s own bundle identifier/scheme. Otherwise, when Google redirects back after sign-in, the deep link may open the wrong app or fail.
**When you publish, update the scheme in all of these places so they match exactly:**
| Where | What to update |
| ----------------- | ---------------------------------------------------------------------------------------- |
| `app.json` | `expo.scheme` |
| `auth-client.ts` | `expoClient({ scheme })` and `expoClient({ storagePrefix })` |
| Sign-in handler | `SecureStore.setItemAsync("yourscheme_cookie", ...)` and `callbackURL` = `yourscheme://` |
| Backend `auth.ts` | `trustedOrigins`: include `yourscheme://`, `yourscheme://*` |
**Google Cloud Console:** The redirect URI does **not** change when you update the scheme. It stays `https://YOUR_BACKEND_URL/api/auth/callback/google`. The scheme is only used for the final redirect from your backend back to your native app.
***
## Step 11: Ask the Vibecode Agent to Set Up Google Sign-In
You've added the Google Client ID and Client Secret to the backend environment variables. Copy and paste the **entire** prompt below into the Vibecode agent so it has full context and can implement Google Sign-In correctly.
Copy and paste this **entire block** into the Vibecode agent:
```
I've added GOOGLE_CLIENT_ID and GOOGLE_CLIENT_SECRET to the backend environment variables (Backend section). Please set up Google Sign-In with Better Auth for my app by implementing the following exactly. Use the default scheme (e.g. "vibecode") for the setup — that will work when testing inside the Vibecode app.
After setup, tell the user: "The Vibecode scheme will work inside the Vibecode app. When you publish your real app, you must update the scheme to match your app's bundle identifier in: app.json (expo.scheme), auth-client.ts (expoClient scheme and storagePrefix), the sign-in handler (SecureStore key = scheme_cookie, callbackURL = scheme://), and backend auth.ts (trustedOrigins). Google Console redirect URI does not need to change."
---
BACKEND — backend/src/auth.ts
Replace or update the file so it uses this Better Auth config. Keep any existing emailOTP plugin if present. Use env.GOOGLE_CLIENT_ID and env.GOOGLE_CLIENT_SECRET. CRITICAL: plugins: [expo()] from @better-auth/expo, account: { skipStateCookieCheck: true, accountLinking: { enabled: true } }, disableCSRFCheck: true at the top level, and trustedOrigins including my app scheme (e.g. "vibecode://", "vibecode://*", "vibecode:///*") plus exp://* and my backend domains. basePath: "/api/auth". advanced: useSecureCookies, defaultCookieAttributes (sameSite: "none", secure: true, partitioned: true), crossSubDomainCookies, trustedProxyHeaders.
Full example (use "vibecode" for now; user updates to their app scheme when they publish):
import { betterAuth } from "better-auth";
import { expo } from "@better-auth/expo";
import { prismaAdapter } from "better-auth/adapters/prisma";
import { prisma } from "./prisma";
import { env } from "./env";
export const auth = betterAuth({
database: prismaAdapter(prisma, { provider: "sqlite" }),
baseURL: env.BACKEND_URL,
basePath: "/api/auth",
secret: env.BETTER_AUTH_SECRET,
socialProviders: {
google: {
clientId: env.GOOGLE_CLIENT_ID || "",
clientSecret: env.GOOGLE_CLIENT_SECRET || "",
},
},
account: {
skipStateCookieCheck: true,
accountLinking: { enabled: true },
},
plugins: [expo()],
disableCSRFCheck: true,
trustedOrigins: [
"vibecode://", "vibecode://*", "vibecode:///*",
"exp://*", "http://localhost:*", "http://127.0.0.1:*",
"https://*.dev.vibecode.run", "https://*.vibecode.run", "https://vibecode.dev",
],
advanced: {
useSecureCookies: true,
defaultCookieAttributes: { sameSite: "none", secure: true, partitioned: true },
crossSubDomainCookies: { enabled: true },
trustedProxyHeaders: true,
disableCSRFCheck: true,
},
});
---
BACKEND — backend/src/env.ts
Add to the Zod schema:
GOOGLE_CLIENT_ID: z.string().min(1, "GOOGLE_CLIENT_ID is required"),
GOOGLE_CLIENT_SECRET: z.string().min(1, "GOOGLE_CLIENT_SECRET is required"),
---
MOBILE — src/lib/auth/auth-client.ts
Use createAuthClient with baseURL from EXPO_PUBLIC_BACKEND_URL. CRITICAL: import "expo-web-browser" at top (required even if unused). Use expoClient from @better-auth/expo/client with scheme and storagePrefix matching app.json (e.g. "vibecode"), and storage: SecureStore.
Example:
import { createAuthClient } from "better-auth/react";
import { expoClient } from "@better-auth/expo/client";
import * as SecureStore from "expo-secure-store";
import "expo-web-browser";
export const authClient = createAuthClient({
baseURL: process.env.EXPO_PUBLIC_BACKEND_URL! as string,
plugins: [
expoClient({
scheme: "vibecode",
storagePrefix: "vibecode",
storage: SecureStore,
}),
],
});
---
MOBILE — Sign-in screen: Google Sign-In button handler
MUST have WebBrowser.maybeCompleteAuthSession() at the top of the file, outside the component. Then implement handleGoogleSignIn that:
1. POST to BACKEND_URL/api/auth/sign-in/social with body { provider: "google", callbackURL }. callbackURL = "vibecode://" on native (or my scheme), or window.location.origin on web.
2. On web: window.location.href = data.url and return.
3. On native: WebBrowser.openAuthSessionAsync(data.url, callbackURL). On success, parse callback URL for cookie param, extract __Secure-better-auth.session_token, decode, build cookieJson with value and expires (e.g. 7 days), then SecureStore.setItemAsync("vibecode_cookie", cookieJson). Key must be storagePrefix + "_cookie". Then call invalidateSession().
4. Also add useEffect in the component for web: if Platform.OS === "web" and URL has code or session, call invalidateSession().
Use BACKEND_URL = process.env.EXPO_PUBLIC_BACKEND_URL. Headers: Content-Type application/json, Origin BACKEND_URL. credentials: "include".
---
app.json
Ensure expo.scheme is set, e.g. "vibecode", and that this value is used consistently everywhere (auth client scheme, storagePrefix, callbackURL, trustedOrigins).
---
CHECKLIST — these must all match:
- app.json "scheme" = e.g. vibecode
- expoClient({ scheme }) = same
- expoClient({ storagePrefix }) = same
- SecureStore key = storagePrefix + "_cookie" (e.g. vibecode_cookie)
- callbackURL on native = scheme + "://" (e.g. vibecode://)
- trustedOrigins on backend includes scheme:// and scheme://*
- Google Console Redirect URI = https://YOUR_BACKEND_URL/api/auth/callback/google
- Google Console JavaScript origin = https://YOUR_BACKEND_URL
---
Most common reasons for Google login not to initialize:
- Missing skipStateCookieCheck: true in account on backend
- Missing plugins: [expo()] on backend
- disableCSRFCheck: true not at top level of betterAuth
- import "expo-web-browser" missing from auth-client.ts
- storagePrefix not matching SecureStore key (e.g. vibecode_cookie)
- callbackURL not in trustedOrigins on backend
- Google Console missing Authorized JavaScript origin or Redirect URI
My backend is already deployed and I've added the correct redirect URI and JavaScript origin in Google Cloud Console.
```
Need help? Use Vibecode support or visit [Google Cloud OAuth documentation](https://developers.google.com/identity/protocols/oauth2).
***
## Important: Update the scheme only when you publish your app
The **Vibecode scheme** (e.g. `vibecode`) will work when you test **inside the Vibecode app**. You do not need to change it for that.
**As soon as you publish your real app** (e.g. to the App Store or Play Store), you need to update the scheme to match your app’s own bundle identifier/scheme. Otherwise, when Google redirects back after sign-in, the deep link may open the wrong app or fail.
**When you publish, update the scheme in all of these places so they match exactly:**
| Where | What to update |
| ----------------- | ---------------------------------------------------------------------------------------- |
| `app.json` | `expo.scheme` |
| `auth-client.ts` | `expoClient({ scheme })` and `expoClient({ storagePrefix })` |
| Sign-in handler | `SecureStore.setItemAsync("yourscheme_cookie", ...)` and `callbackURL` = `yourscheme://` |
| Backend `auth.ts` | `trustedOrigins`: include `yourscheme://`, `yourscheme://*` |
**Google Cloud Console:** The redirect URI does **not** change when you update the scheme. It stays `https://YOUR_BACKEND_URL/api/auth/callback/google`. The scheme is only used for the final redirect from your backend back to your native app.
***
## Step 11: Ask the Vibecode Agent to Set Up Google Sign-In
You've added the Google Client ID and Client Secret to the backend environment variables. Copy and paste the **entire** prompt below into the Vibecode agent so it has full context and can implement Google Sign-In correctly.
Copy and paste this **entire block** into the Vibecode agent:
```
I've added GOOGLE_CLIENT_ID and GOOGLE_CLIENT_SECRET to the backend environment variables (Backend section). Please set up Google Sign-In with Better Auth for my app by implementing the following exactly. Use the default scheme (e.g. "vibecode") for the setup — that will work when testing inside the Vibecode app.
After setup, tell the user: "The Vibecode scheme will work inside the Vibecode app. When you publish your real app, you must update the scheme to match your app's bundle identifier in: app.json (expo.scheme), auth-client.ts (expoClient scheme and storagePrefix), the sign-in handler (SecureStore key = scheme_cookie, callbackURL = scheme://), and backend auth.ts (trustedOrigins). Google Console redirect URI does not need to change."
---
BACKEND — backend/src/auth.ts
Replace or update the file so it uses this Better Auth config. Keep any existing emailOTP plugin if present. Use env.GOOGLE_CLIENT_ID and env.GOOGLE_CLIENT_SECRET. CRITICAL: plugins: [expo()] from @better-auth/expo, account: { skipStateCookieCheck: true, accountLinking: { enabled: true } }, disableCSRFCheck: true at the top level, and trustedOrigins including my app scheme (e.g. "vibecode://", "vibecode://*", "vibecode:///*") plus exp://* and my backend domains. basePath: "/api/auth". advanced: useSecureCookies, defaultCookieAttributes (sameSite: "none", secure: true, partitioned: true), crossSubDomainCookies, trustedProxyHeaders.
Full example (use "vibecode" for now; user updates to their app scheme when they publish):
import { betterAuth } from "better-auth";
import { expo } from "@better-auth/expo";
import { prismaAdapter } from "better-auth/adapters/prisma";
import { prisma } from "./prisma";
import { env } from "./env";
export const auth = betterAuth({
database: prismaAdapter(prisma, { provider: "sqlite" }),
baseURL: env.BACKEND_URL,
basePath: "/api/auth",
secret: env.BETTER_AUTH_SECRET,
socialProviders: {
google: {
clientId: env.GOOGLE_CLIENT_ID || "",
clientSecret: env.GOOGLE_CLIENT_SECRET || "",
},
},
account: {
skipStateCookieCheck: true,
accountLinking: { enabled: true },
},
plugins: [expo()],
disableCSRFCheck: true,
trustedOrigins: [
"vibecode://", "vibecode://*", "vibecode:///*",
"exp://*", "http://localhost:*", "http://127.0.0.1:*",
"https://*.dev.vibecode.run", "https://*.vibecode.run", "https://vibecode.dev",
],
advanced: {
useSecureCookies: true,
defaultCookieAttributes: { sameSite: "none", secure: true, partitioned: true },
crossSubDomainCookies: { enabled: true },
trustedProxyHeaders: true,
disableCSRFCheck: true,
},
});
---
BACKEND — backend/src/env.ts
Add to the Zod schema:
GOOGLE_CLIENT_ID: z.string().min(1, "GOOGLE_CLIENT_ID is required"),
GOOGLE_CLIENT_SECRET: z.string().min(1, "GOOGLE_CLIENT_SECRET is required"),
---
MOBILE — src/lib/auth/auth-client.ts
Use createAuthClient with baseURL from EXPO_PUBLIC_BACKEND_URL. CRITICAL: import "expo-web-browser" at top (required even if unused). Use expoClient from @better-auth/expo/client with scheme and storagePrefix matching app.json (e.g. "vibecode"), and storage: SecureStore.
Example:
import { createAuthClient } from "better-auth/react";
import { expoClient } from "@better-auth/expo/client";
import * as SecureStore from "expo-secure-store";
import "expo-web-browser";
export const authClient = createAuthClient({
baseURL: process.env.EXPO_PUBLIC_BACKEND_URL! as string,
plugins: [
expoClient({
scheme: "vibecode",
storagePrefix: "vibecode",
storage: SecureStore,
}),
],
});
---
MOBILE — Sign-in screen: Google Sign-In button handler
MUST have WebBrowser.maybeCompleteAuthSession() at the top of the file, outside the component. Then implement handleGoogleSignIn that:
1. POST to BACKEND_URL/api/auth/sign-in/social with body { provider: "google", callbackURL }. callbackURL = "vibecode://" on native (or my scheme), or window.location.origin on web.
2. On web: window.location.href = data.url and return.
3. On native: WebBrowser.openAuthSessionAsync(data.url, callbackURL). On success, parse callback URL for cookie param, extract __Secure-better-auth.session_token, decode, build cookieJson with value and expires (e.g. 7 days), then SecureStore.setItemAsync("vibecode_cookie", cookieJson). Key must be storagePrefix + "_cookie". Then call invalidateSession().
4. Also add useEffect in the component for web: if Platform.OS === "web" and URL has code or session, call invalidateSession().
Use BACKEND_URL = process.env.EXPO_PUBLIC_BACKEND_URL. Headers: Content-Type application/json, Origin BACKEND_URL. credentials: "include".
---
app.json
Ensure expo.scheme is set, e.g. "vibecode", and that this value is used consistently everywhere (auth client scheme, storagePrefix, callbackURL, trustedOrigins).
---
CHECKLIST — these must all match:
- app.json "scheme" = e.g. vibecode
- expoClient({ scheme }) = same
- expoClient({ storagePrefix }) = same
- SecureStore key = storagePrefix + "_cookie" (e.g. vibecode_cookie)
- callbackURL on native = scheme + "://" (e.g. vibecode://)
- trustedOrigins on backend includes scheme:// and scheme://*
- Google Console Redirect URI = https://YOUR_BACKEND_URL/api/auth/callback/google
- Google Console JavaScript origin = https://YOUR_BACKEND_URL
---
Most common reasons for Google login not to initialize:
- Missing skipStateCookieCheck: true in account on backend
- Missing plugins: [expo()] on backend
- disableCSRFCheck: true not at top level of betterAuth
- import "expo-web-browser" missing from auth-client.ts
- storagePrefix not matching SecureStore key (e.g. vibecode_cookie)
- callbackURL not in trustedOrigins on backend
- Google Console missing Authorized JavaScript origin or Redirect URI
My backend is already deployed and I've added the correct redirect URI and JavaScript origin in Google Cloud Console.
```
Need help? Use Vibecode support or visit [Google Cloud OAuth documentation](https://developers.google.com/identity/protocols/oauth2).