> ## Documentation Index
> Fetch the complete documentation index at: https://www.vibecodeapp.com/docs/llms.txt
> Use this file to discover all available pages before exploring further.
# Deploying Your App
> Step-by-step guide to deploying your app on Vibecode
You've built something great in Vibecode. Now it's time to share it with the world. This guide walks you through deploying your project so anyone can access it—not just you.
Set up your API keys for production
Pricing, plans, and payment info
## What is Deployment?
When you build an app in Vibecode, it lives inside the Vibecode environment. You can test it, tweak it, and play with it all you want. But if you want other people to use your app—whether that's your friends, your customers, or anyone with your testflight build, your project needs to be **deployed**.
Think of deployment like publishing a book. Writing the book is one thing, but it needs to go to a printer and get distributed before anyone can read it. Deployment is the "printing and distribution" step for your app.
Once deployed, your app gets its own public URL (and API endpoint) that works anywhere -- on any device, any browser, anytime. Your project goes from a private experiment to a live, working product.
**For both web and mobile apps, the backend is deployed first.** When you hit Deploy, Vibecode builds and publishes your backend server before anything else. This means your API endpoints, database, and authentication are live and ready before your frontend connects to them. For mobile apps, the backend is what gets deployed — the app itself is distributed separately via TestFlight or the App Store.
### Why Vibecode Deployments?
You may have heard of AWS, Railway, Render, or others hosting providers, but they come with trade-offs:
* **AWS** is powerful but notoriously complex. It's built for engineers with infrastructure experience.
* **Railway** and **Render** are simpler, but you'll still need to configure environments, manage build pipelines, and troubleshoot on your own.
Vibecode Deployments is built specifically for apps created on our platform. Everything just works—no configuration headaches, no separate accounts, no DevOps knowledge required. Your app goes live in a few clicks.
Now, if you're excited to fully launch your project, find out how by following the step-by-step guide with images below!
## Step 1: Open the Deployment Menu
In your project, look for the **Deploy** button in the top right corner of the screen. Click it to open the deployment dropdown menu.
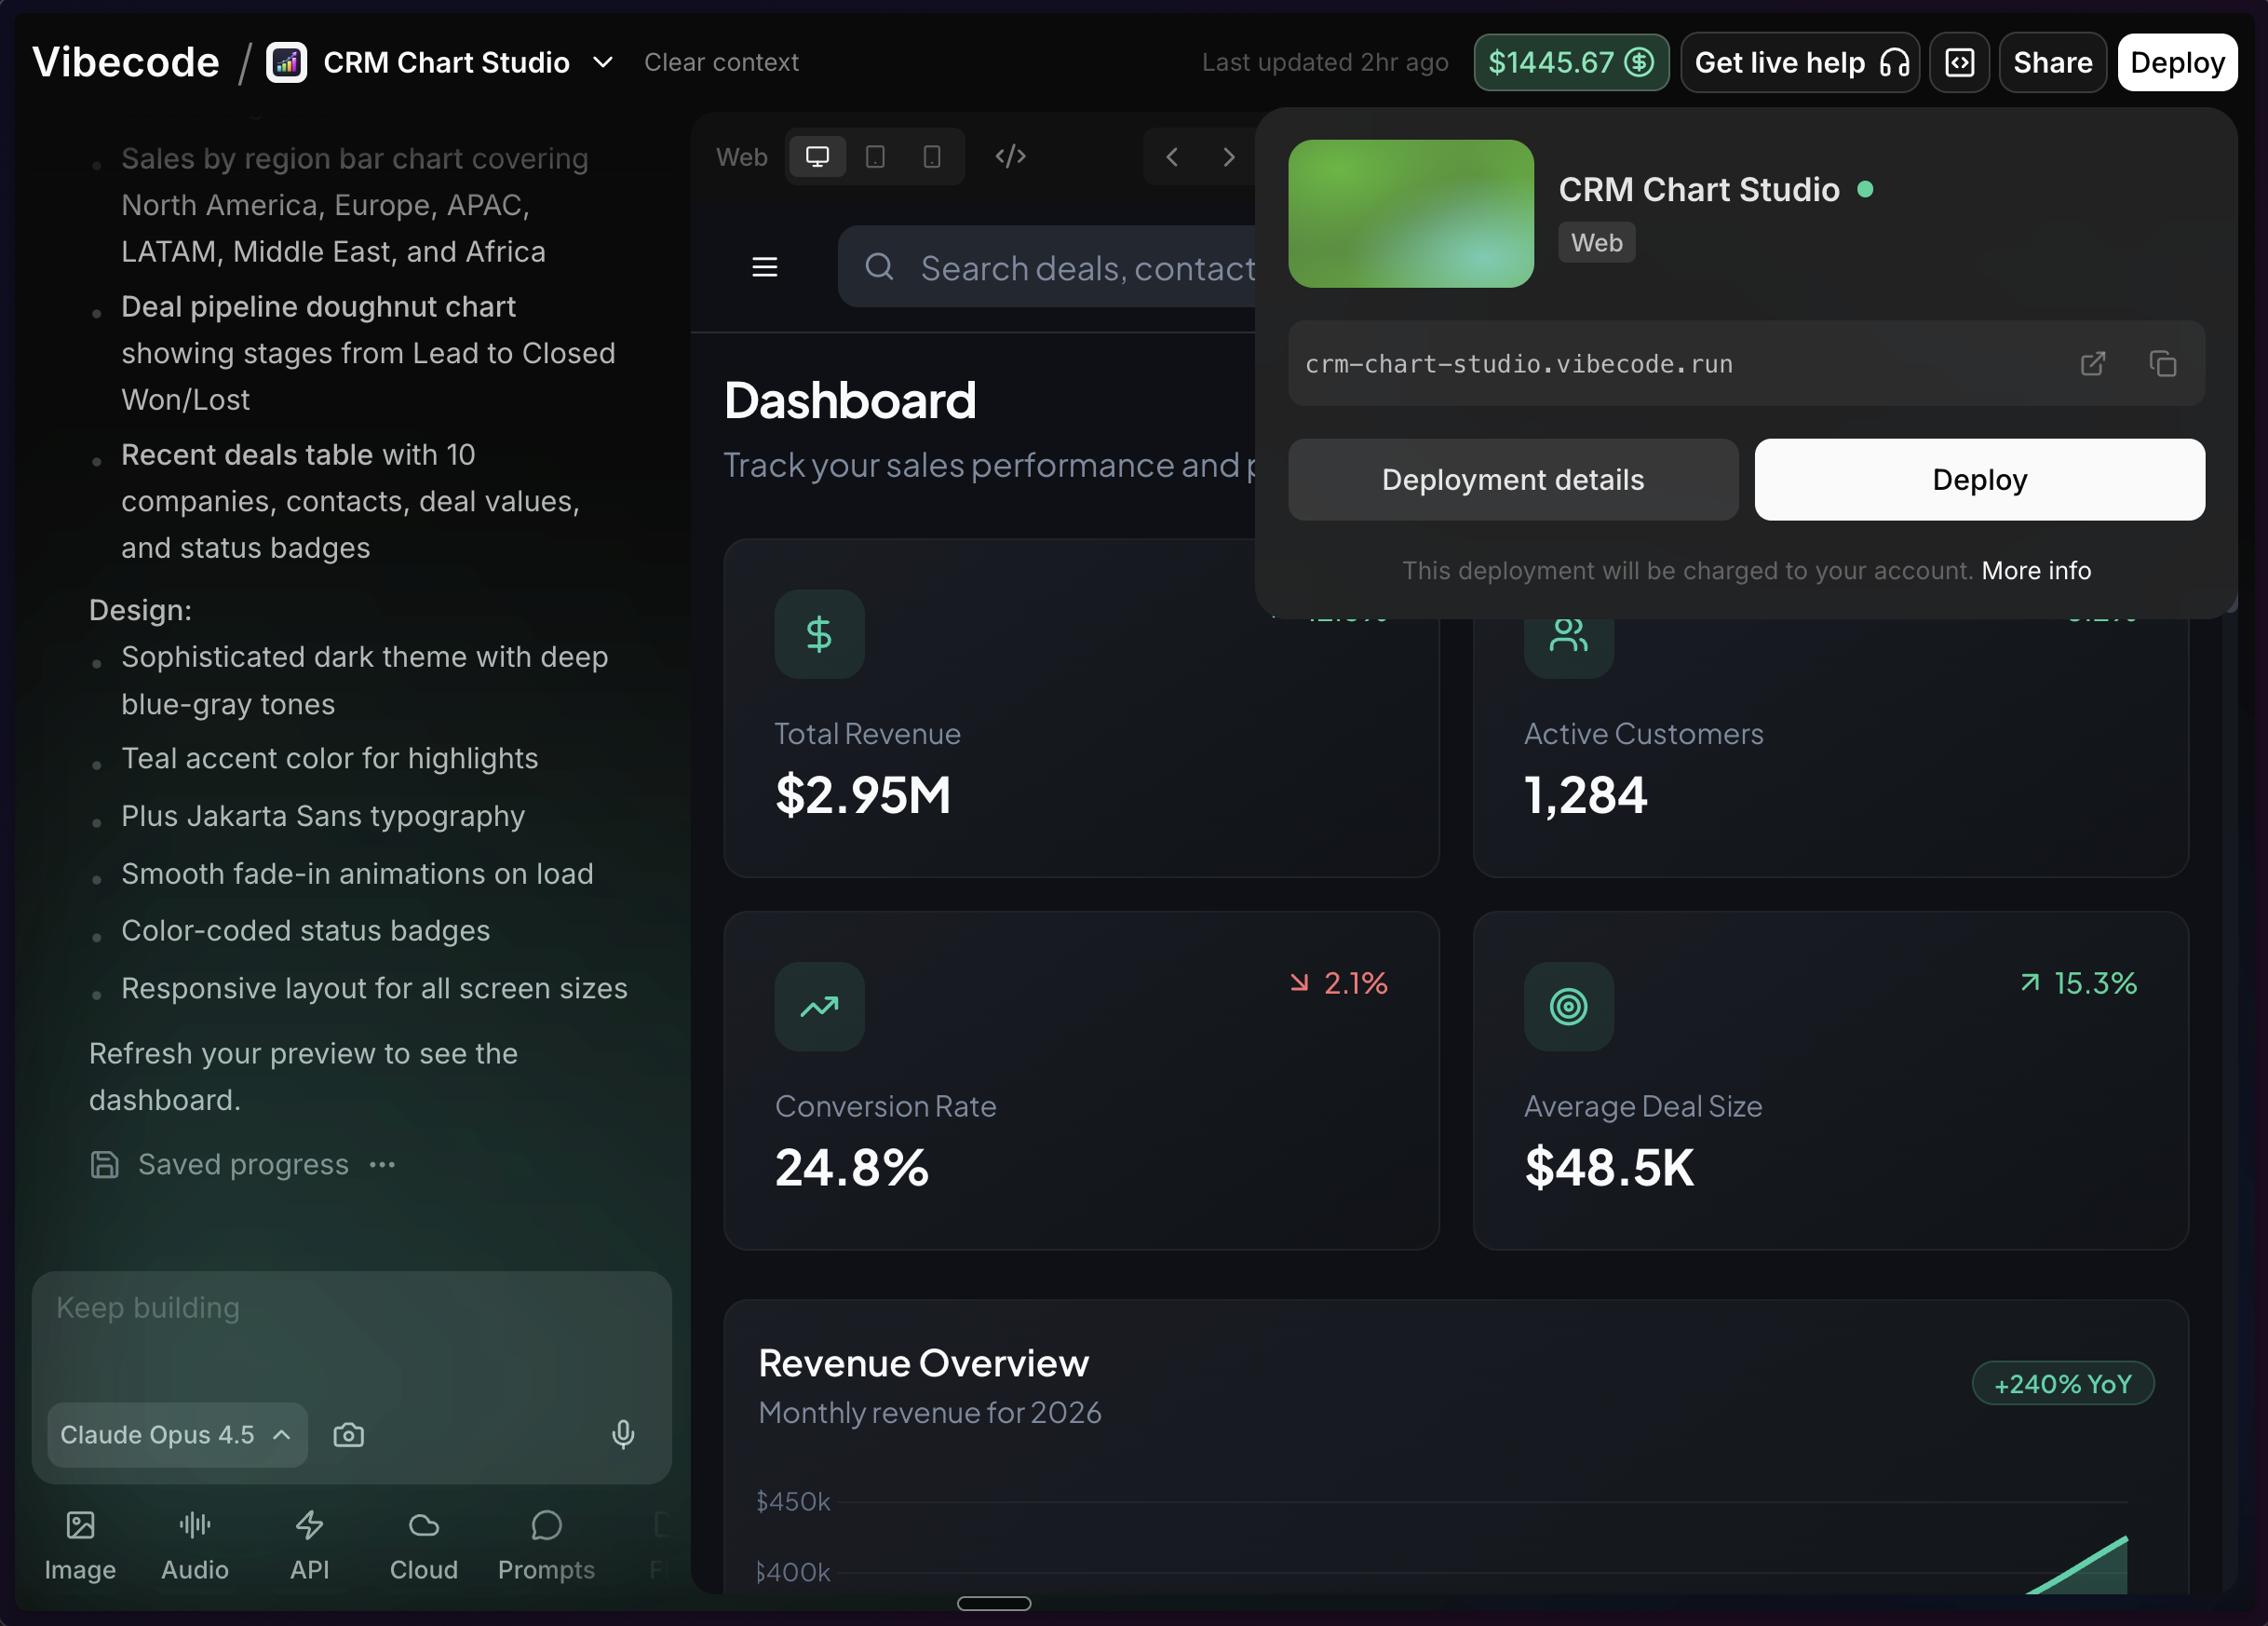 This menu is your home base for everything deployment-related—launching new deployments, checking on existing ones, and accessing your deployment dashboard.
## Step 2: Choose Your URL (WEBSITE ONLY)
The first time you deploy, you'll pick a URL for your project. This is the web address people will use to access your app. Mobile apps will also have their server hosted, but since it is not accessible directly as a URL, this step is skipped.
This menu is your home base for everything deployment-related—launching new deployments, checking on existing ones, and accessing your deployment dashboard.
## Step 2: Choose Your URL (WEBSITE ONLY)
The first time you deploy, you'll pick a URL for your project. This is the web address people will use to access your app. Mobile apps will also have their server hosted, but since it is not accessible directly as a URL, this step is skipped.
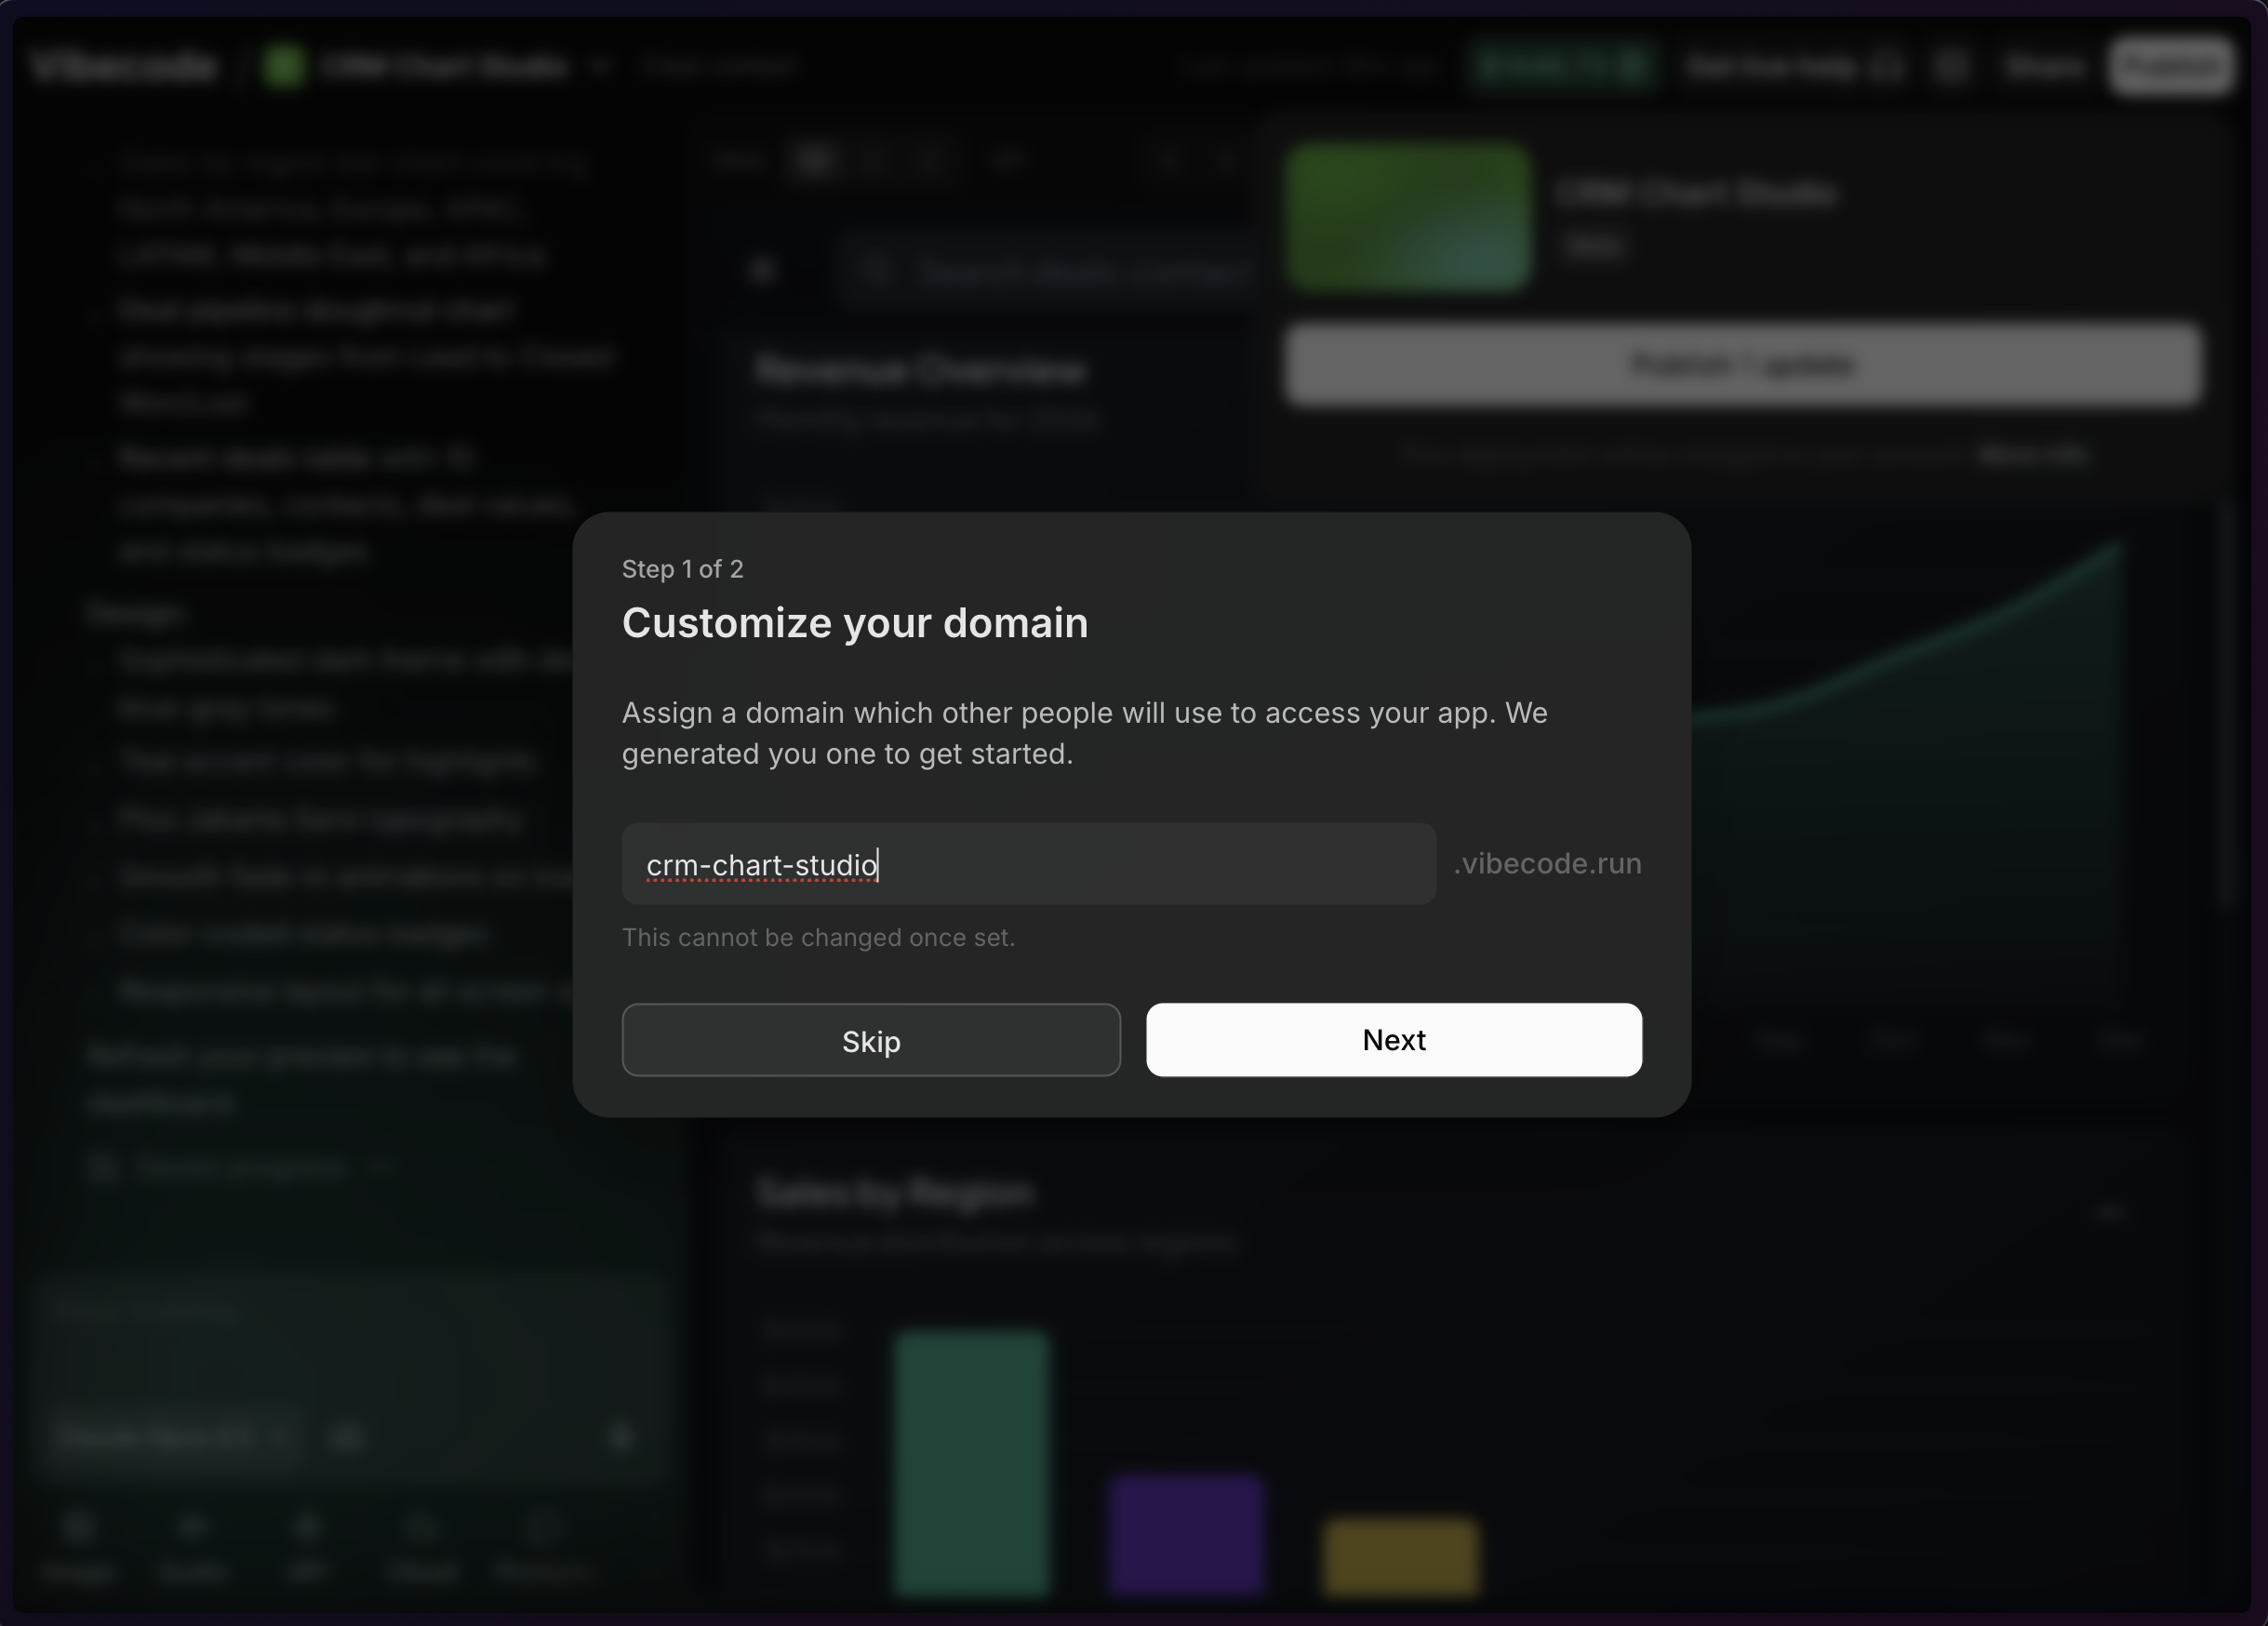 Choose something memorable and relevant to your project. Your URL will look like `your-project.vibecode.run` or similar. You can also [connect a custom domain](/deploying/custom-domain) to use your own URL.
Pick a URL that's easy to share and remember. You can change it later from the
deployment dashboard if needed.
## Step 3: Configure Environment Variables
Next, you'll review and confirm your environment variables. These are the secret (API) keys your app needs to connect to external services.
Choose something memorable and relevant to your project. Your URL will look like `your-project.vibecode.run` or similar. You can also [connect a custom domain](/deploying/custom-domain) to use your own URL.
Pick a URL that's easy to share and remember. You can change it later from the
deployment dashboard if needed.
## Step 3: Configure Environment Variables
Next, you'll review and confirm your environment variables. These are the secret (API) keys your app needs to connect to external services.
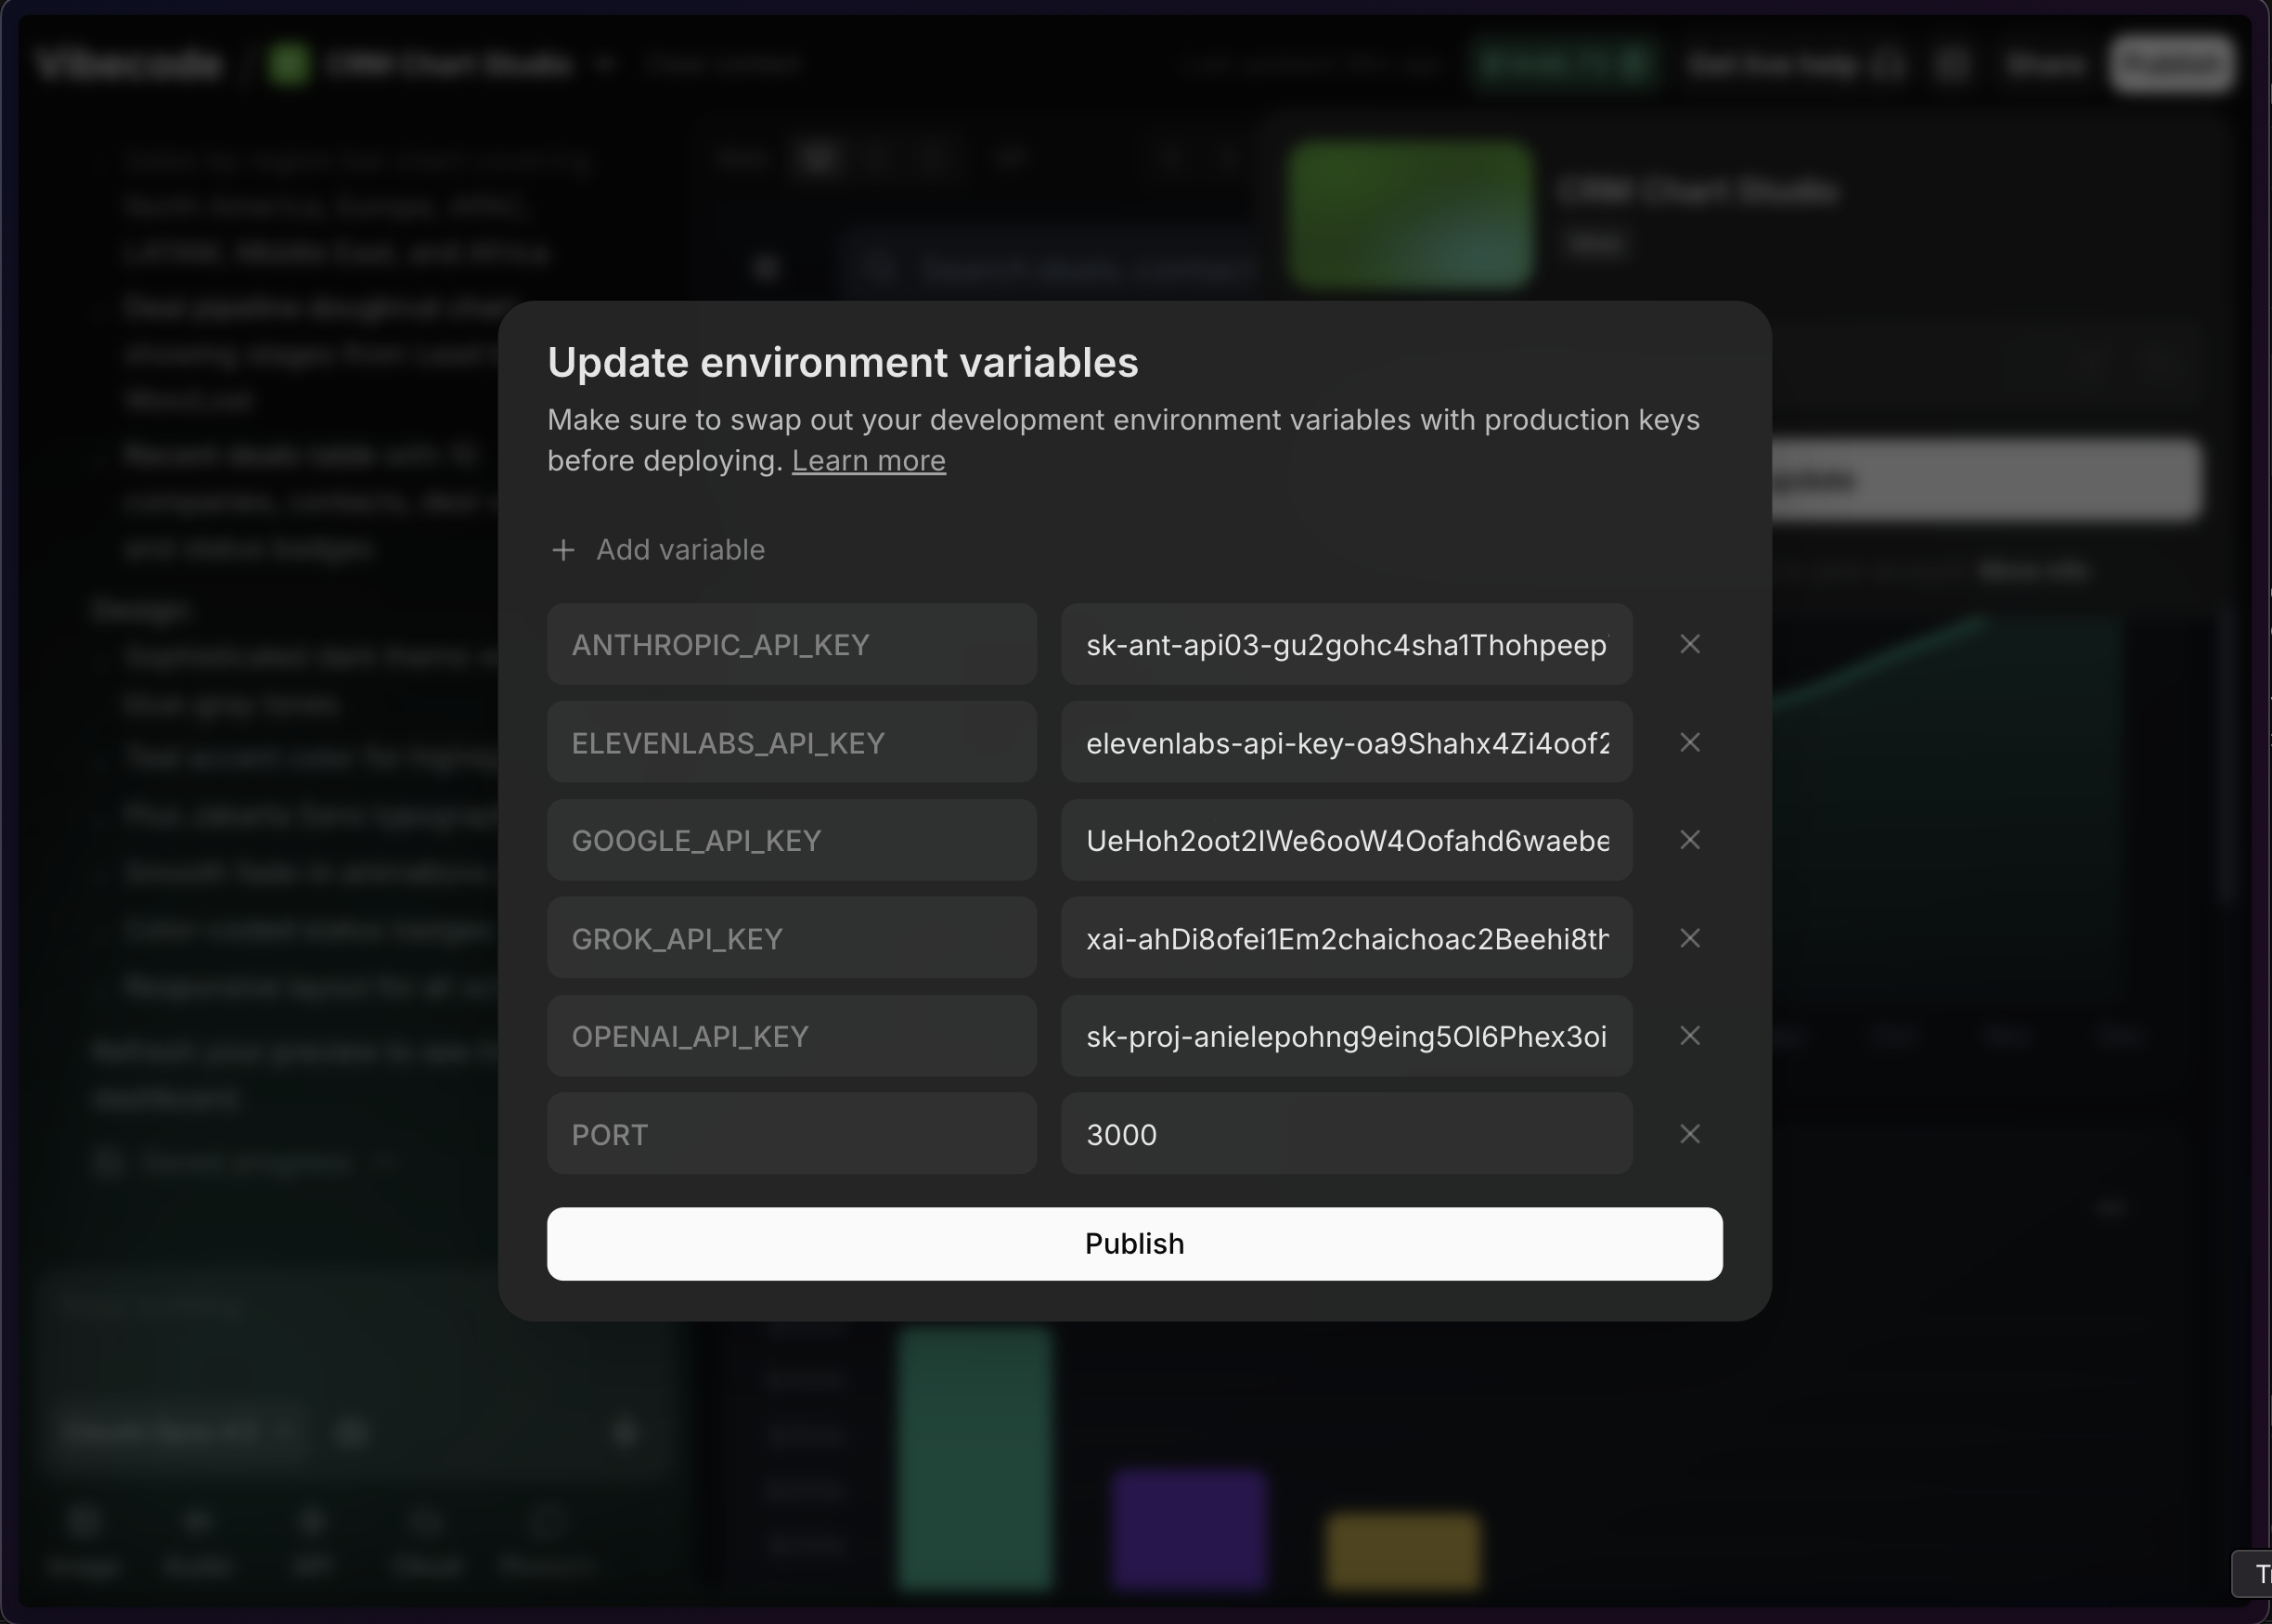 **Important:** Many API providers give you two sets of keys—test keys and production keys. Test keys work during development, but you need production keys for your deployed app.
For example:
* **RevenueCat** has sandbox keys and production keys
* **Stripe** has test mode and live mode API keys
Double-check that you're using your production keys here. Using test keys in a deployed app can cause features to break or behave unexpectedly.
If you're unsure which keys to use, check your API provider's documentation.
Using the wrong keys is one of the most common deployment issues.
## Step 4: Launch Your Deployment
Once your URL and environment variables are set, hit **Deploy**. Vibecode will build and publish your app. This usually takes a minute or two.
When it's done, your app is live. You can share the URL with anyone (for websites), and they'll be able to use your app immediately. If you have a Testflight build, you may need to publish a new build pointing to your deployed backend.
## Step 5: Access the Deployment Dashboard
After deploying, you can manage everything from the deployment dashboard. Access it through the deployment dropdown -> 'deployment details' button. There is also a all 'deployments' page which is accessible on the Vibecode workspace home page under 'App library' on the left.
**Important:** Many API providers give you two sets of keys—test keys and production keys. Test keys work during development, but you need production keys for your deployed app.
For example:
* **RevenueCat** has sandbox keys and production keys
* **Stripe** has test mode and live mode API keys
Double-check that you're using your production keys here. Using test keys in a deployed app can cause features to break or behave unexpectedly.
If you're unsure which keys to use, check your API provider's documentation.
Using the wrong keys is one of the most common deployment issues.
## Step 4: Launch Your Deployment
Once your URL and environment variables are set, hit **Deploy**. Vibecode will build and publish your app. This usually takes a minute or two.
When it's done, your app is live. You can share the URL with anyone (for websites), and they'll be able to use your app immediately. If you have a Testflight build, you may need to publish a new build pointing to your deployed backend.
## Step 5: Access the Deployment Dashboard
After deploying, you can manage everything from the deployment dashboard. Access it through the deployment dropdown -> 'deployment details' button. There is also a all 'deployments' page which is accessible on the Vibecode workspace home page under 'App library' on the left.
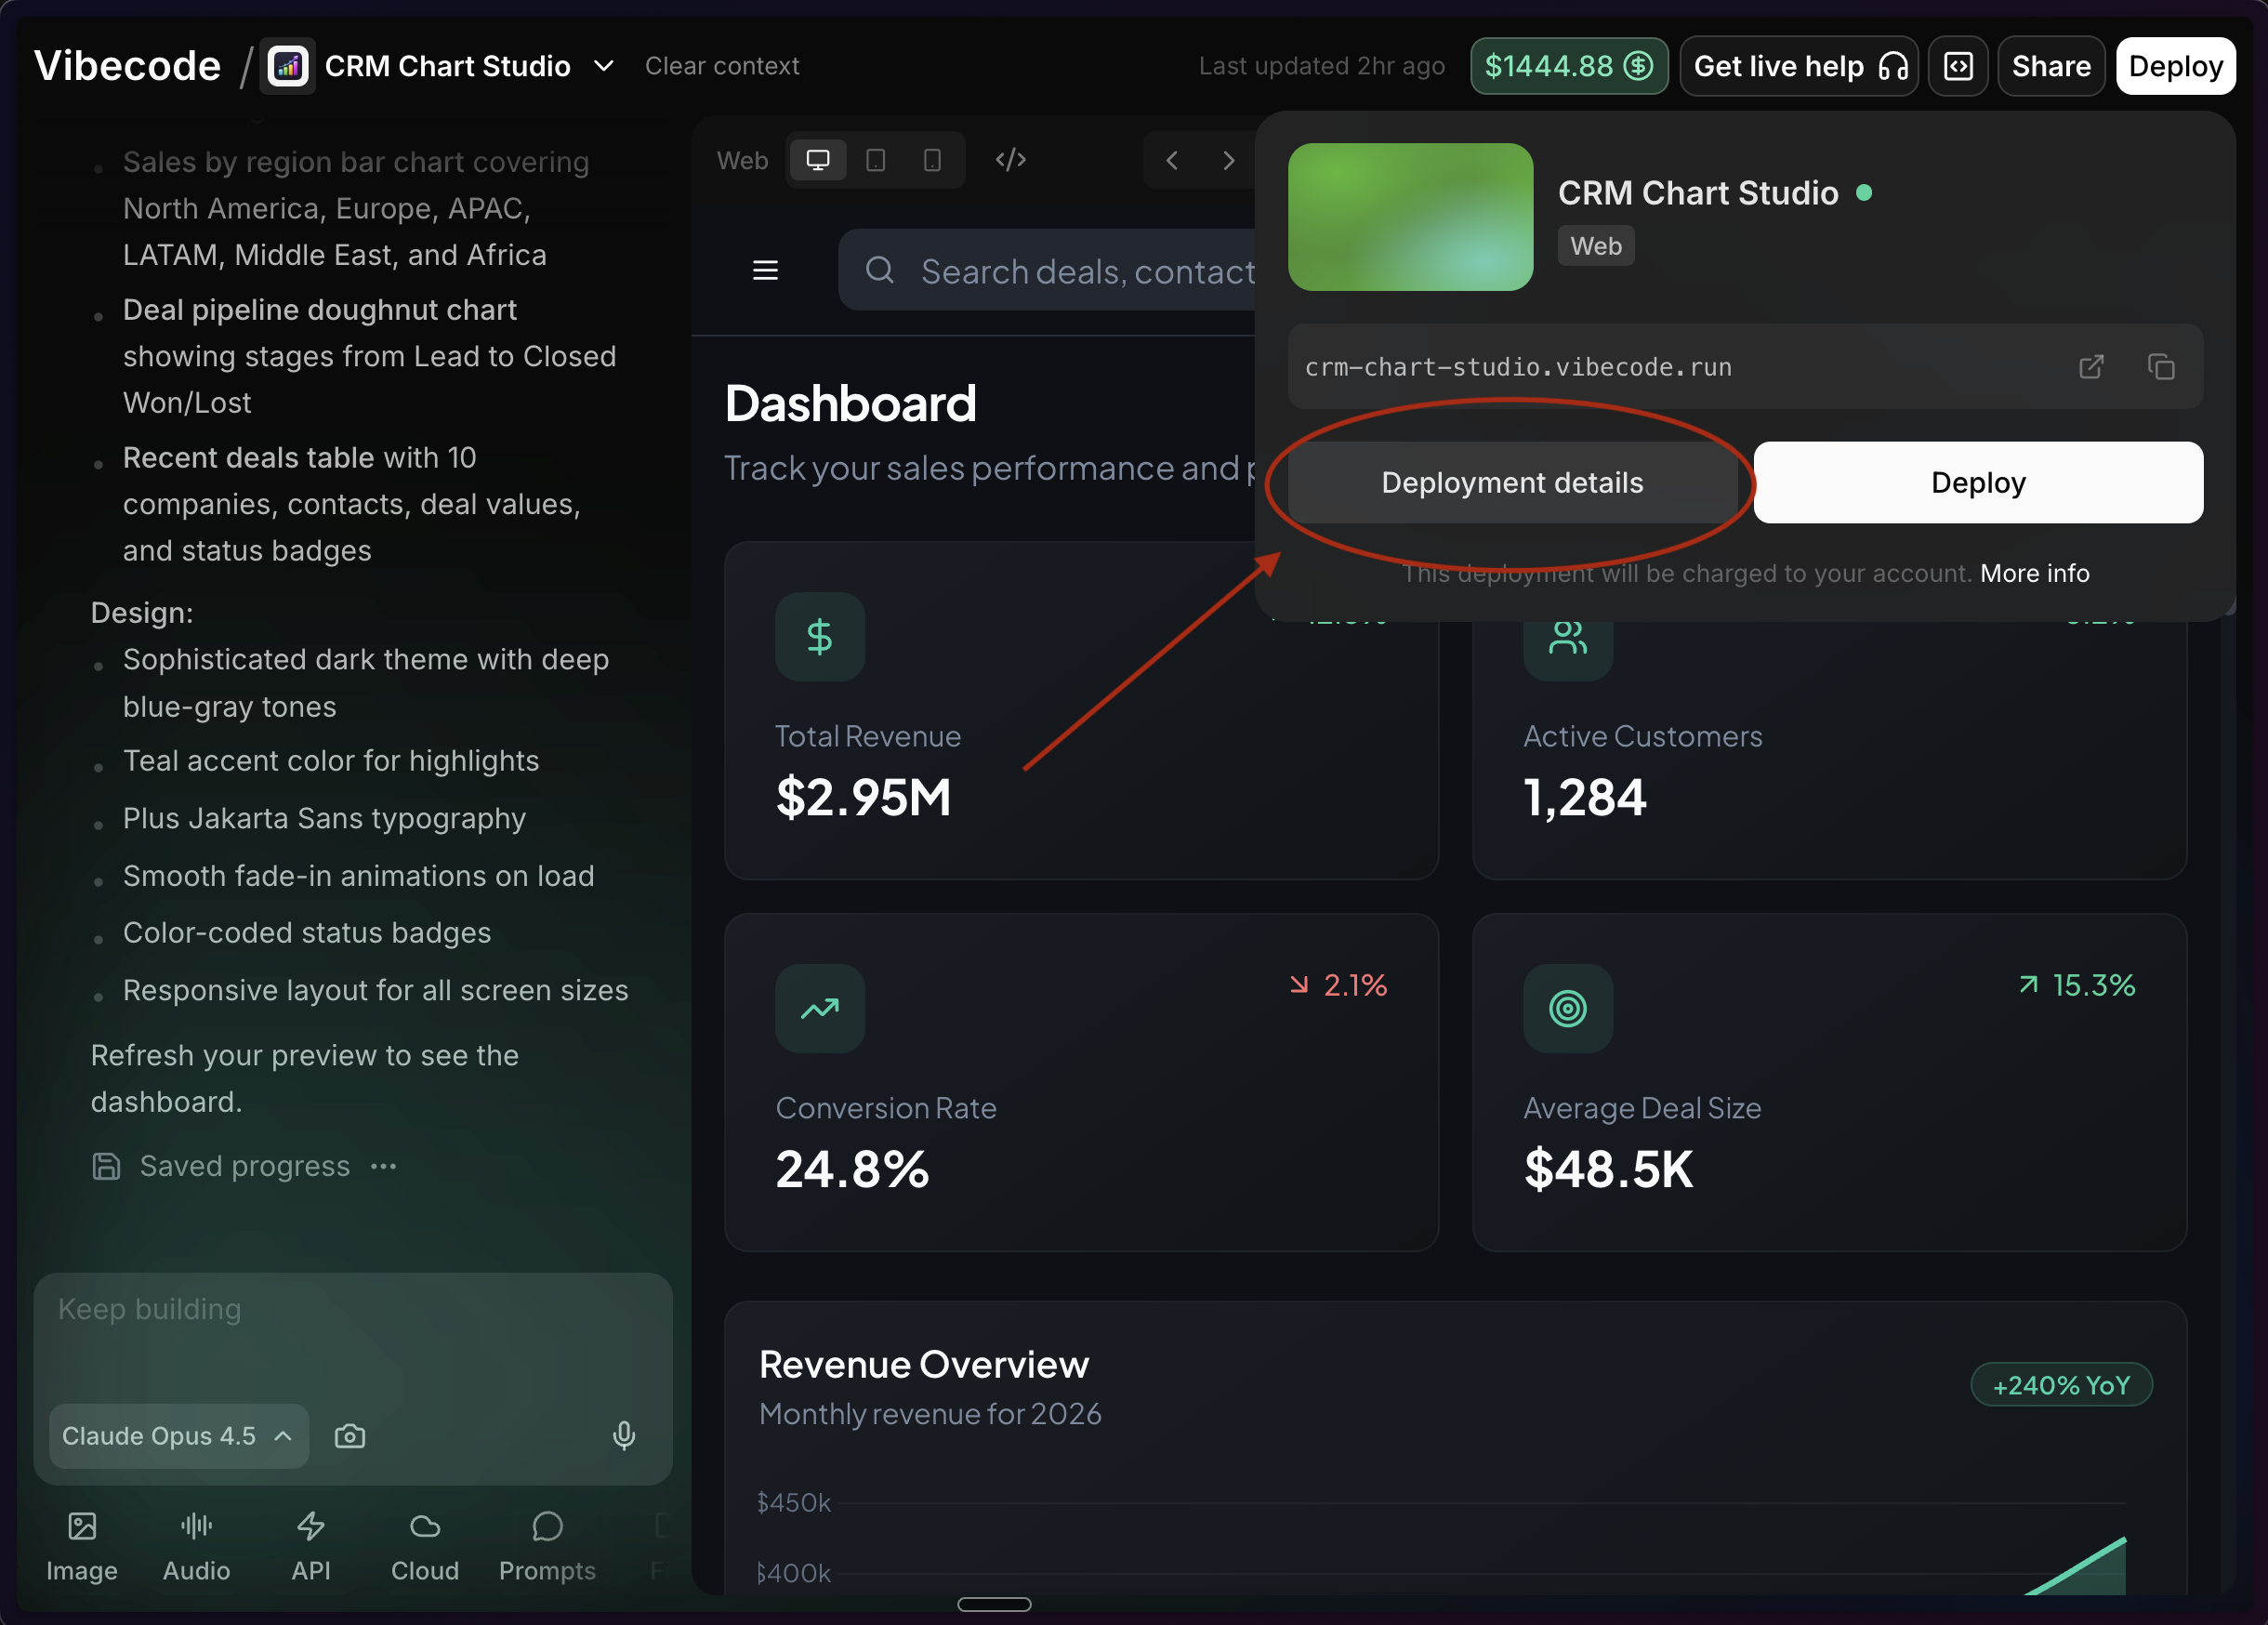 The dashboard gives you full visibility into your deployed app—what's happening, what's broken, and what needs attention.
## The Deployment Dashboard
The dashboard gives you full visibility into your deployed app—what's happening, what's broken, and what needs attention.
## The Deployment Dashboard
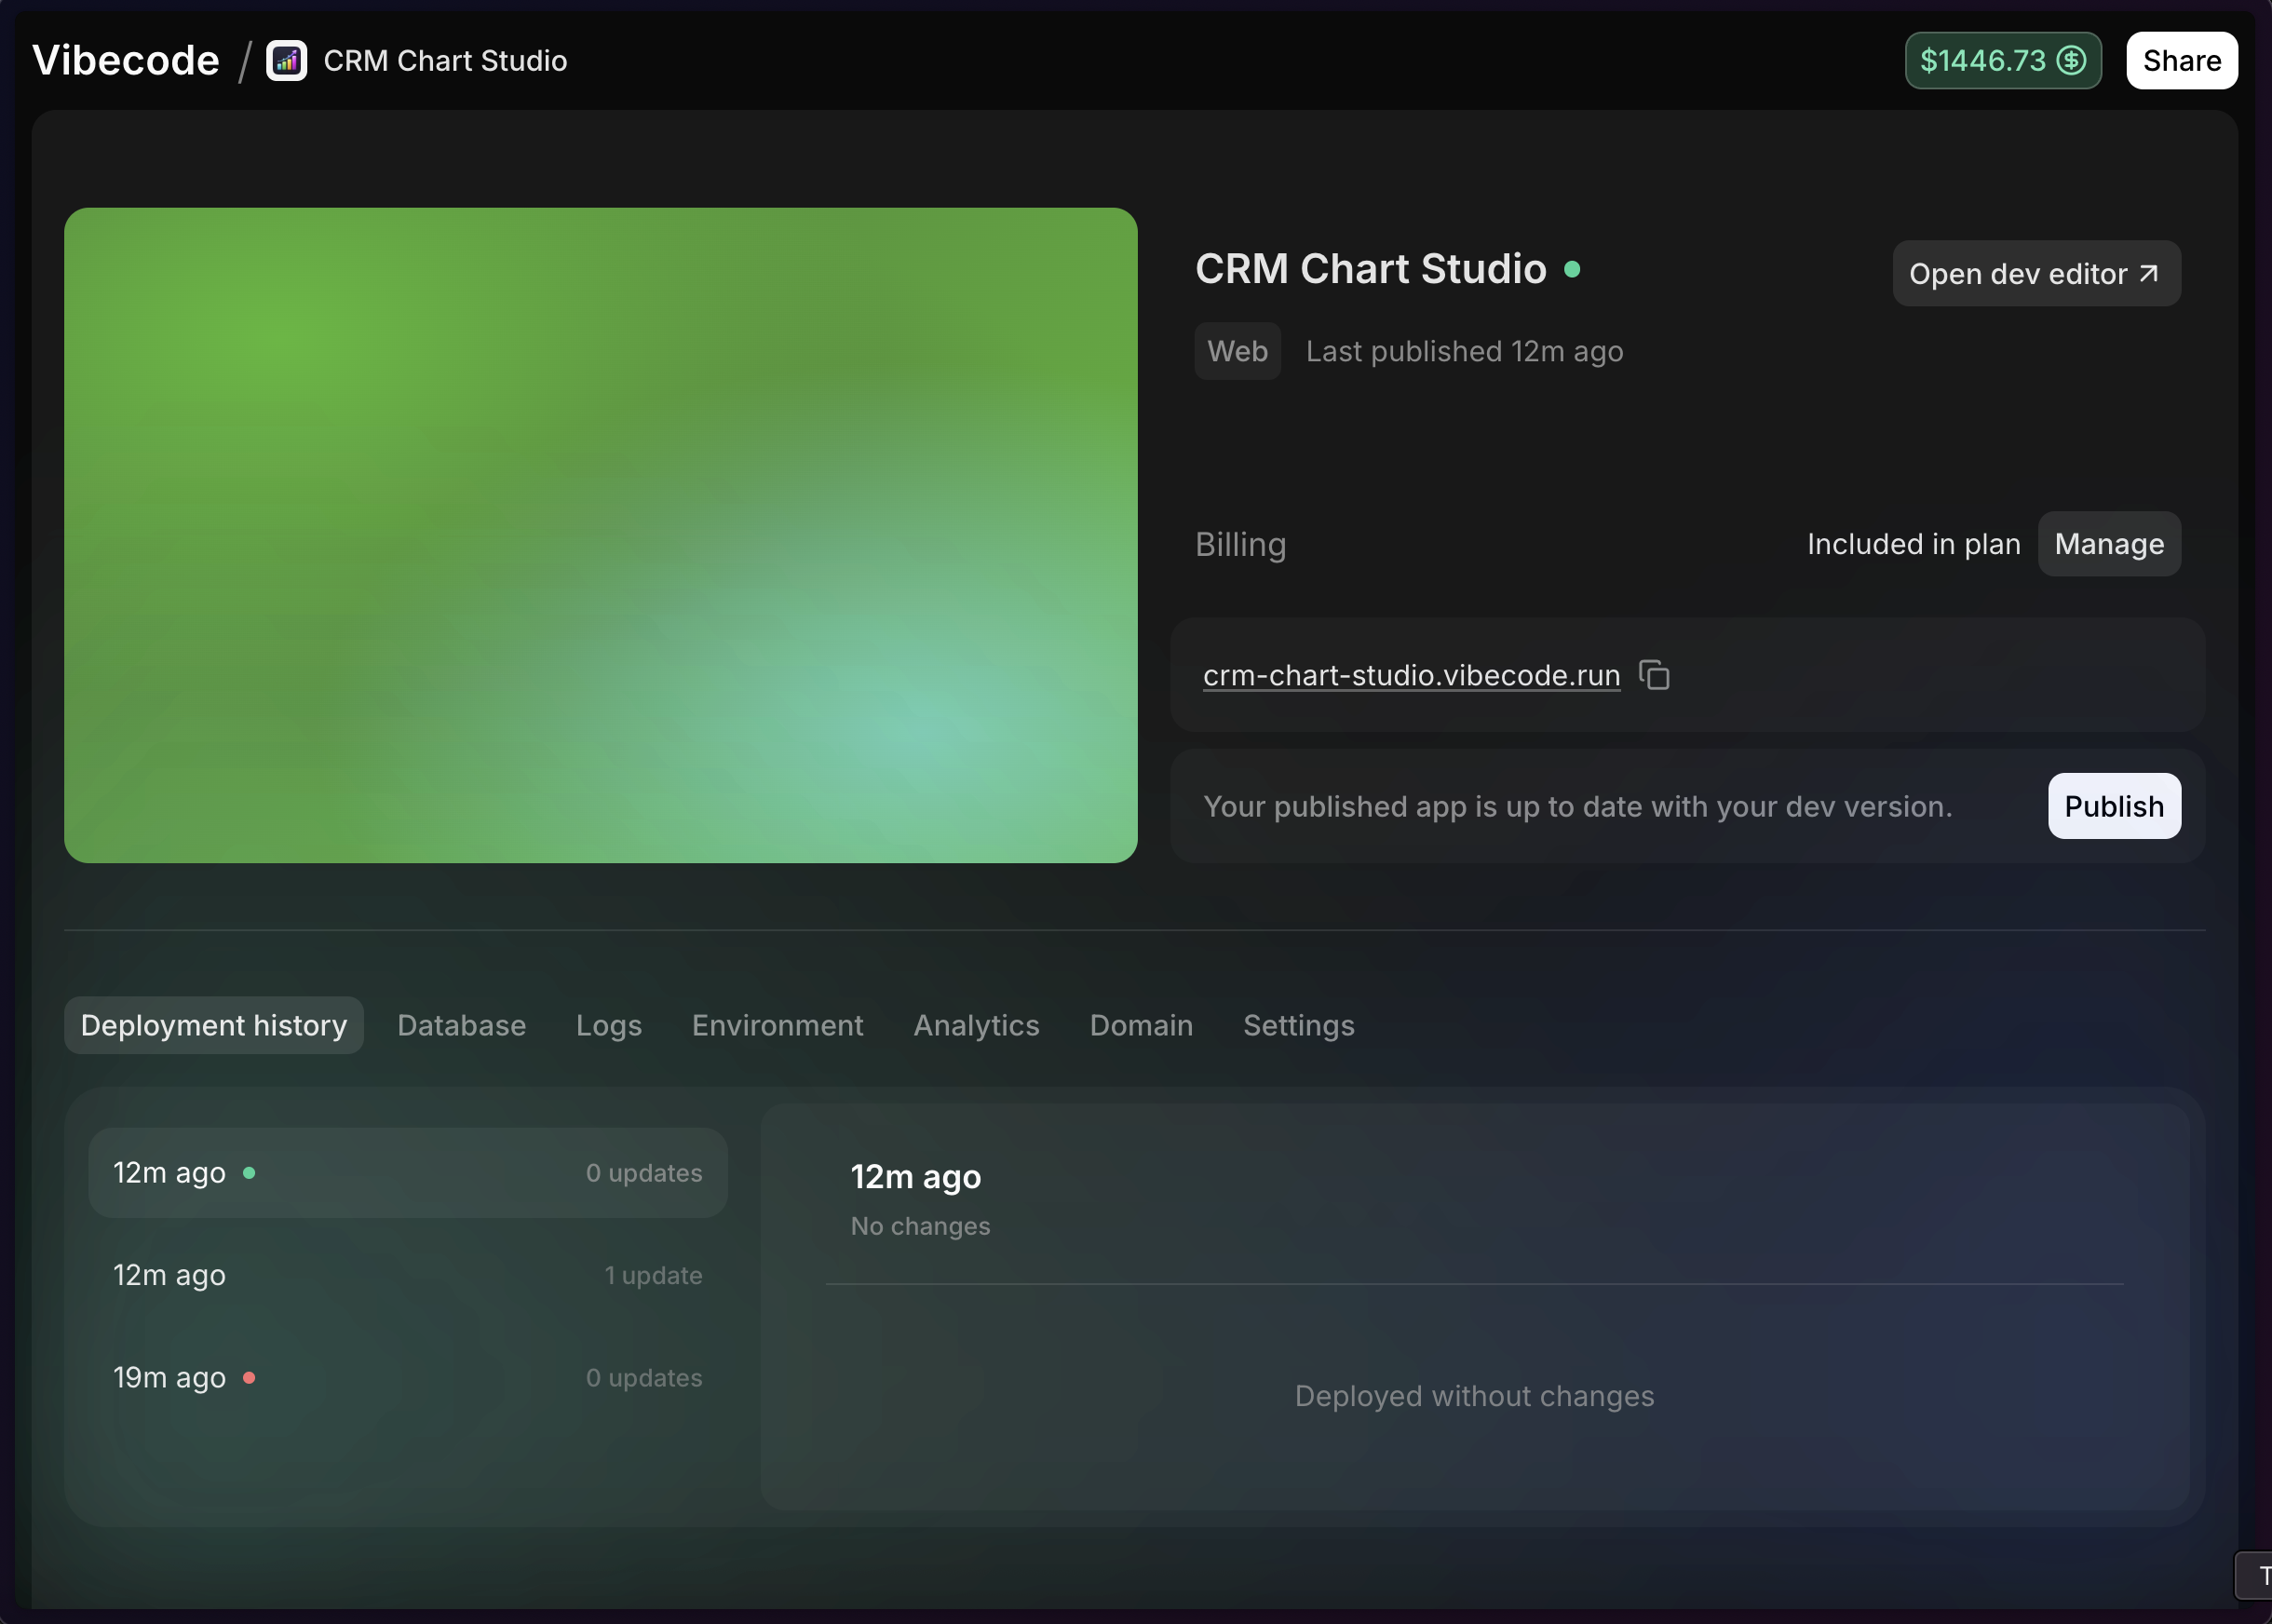 Your deployment dashboard has seven tabs, each serving a specific purpose:
 ### Deployment History
View a complete history of every deployment you've made. See when each version went live, roll back to previous versions if something goes wrong, and track changes over time.
### Database
If your app uses Vibecode Cloud for data storage, this tab lets you view and edit your data, which can be big assistance in debugging.
### Logs
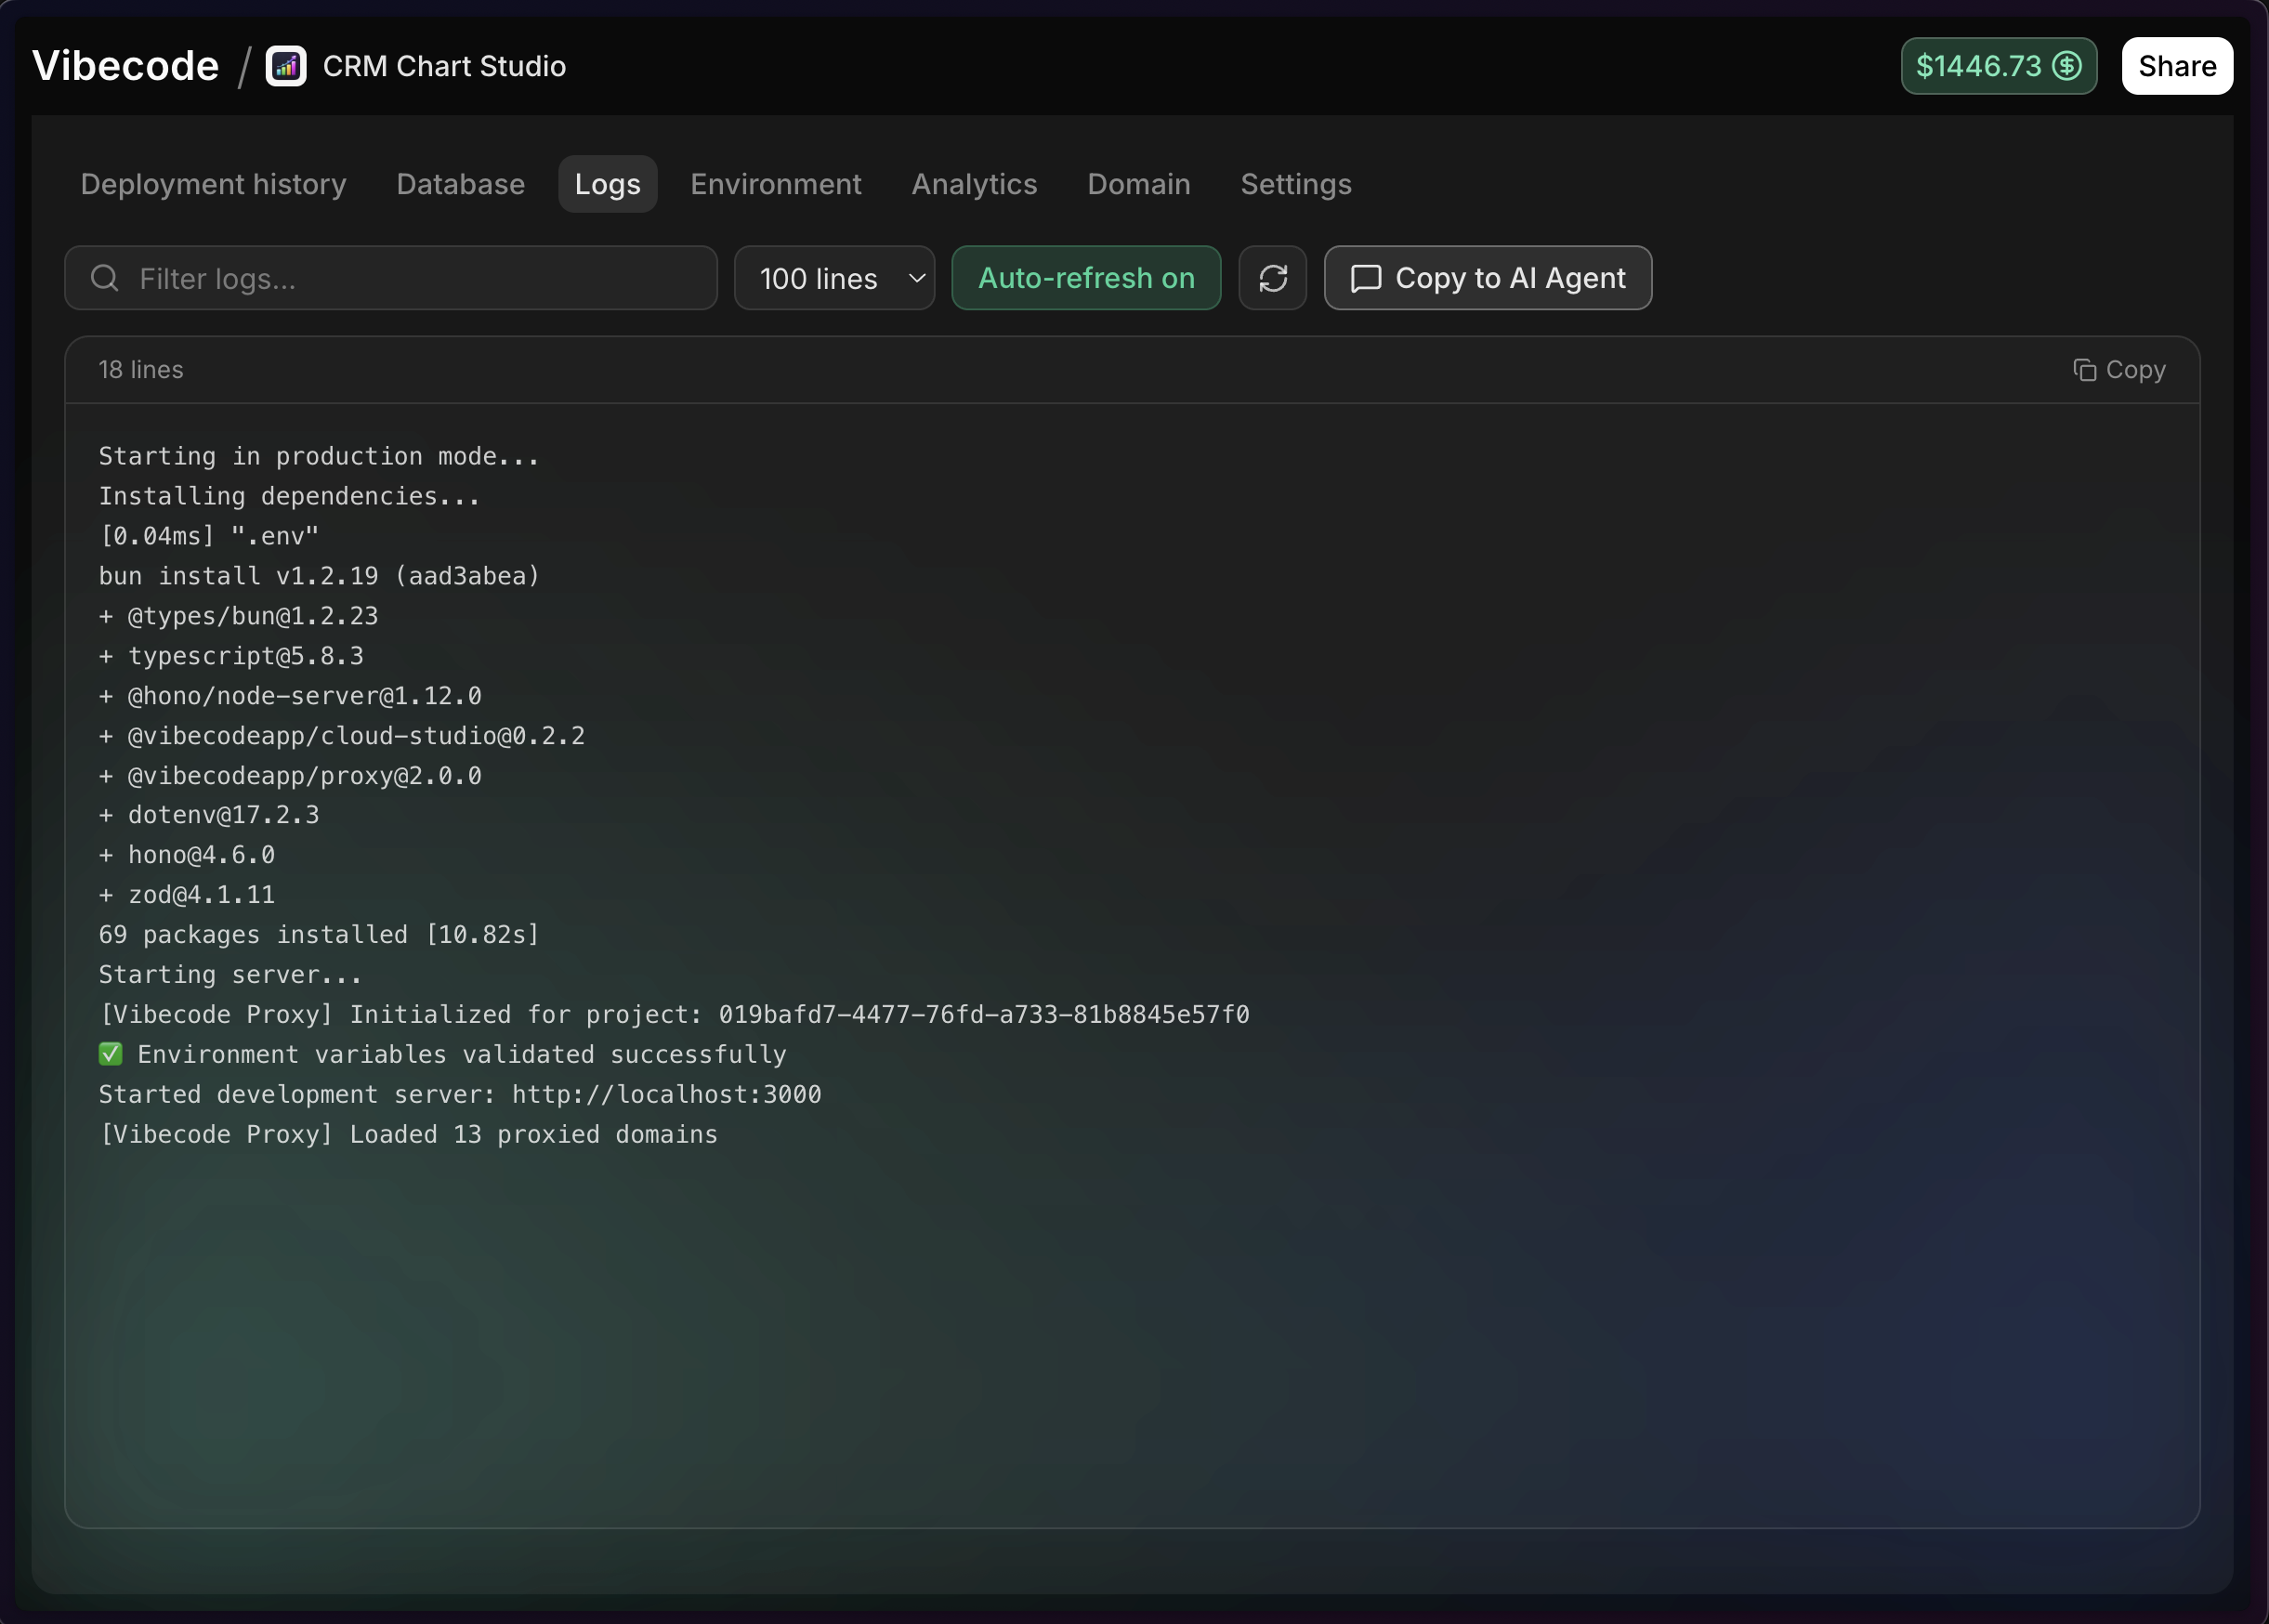
This is where you'll spend time when something isn't working. Production logs show you what's happening inside your deployed app—errors, warnings, and any logging your agent added to the code.
**Dev logs vs. Production logs:** When you're testing inside Vibecode, logs
appear in the chat panel. But once your app is deployed—whether someone is
using it on TestFlight or your live website—those logs appear here in the
dashboard instead. Logs are generated directly by the code in your project, if
you are expecting logs are not seeing many, ask the AI what logs exist, and if
if can add more around the logic that you are debugging!
### Environment
View and edit your environment variables after deployment. If you need to rotate an API key, add a new integration, or fix a misconfigured secret, this is where you do it.
### Analytics (coming soon!)
Track how people are using your app. See visitor counts, popular pages, and usage patterns. *(Coming soon)*
### Domain
Configure your app's domain settings. By default, you get a `.vibecode.run` subdomain. You can connect your own domain — see [Connect a Custom Domain](/deploying/custom-domain) for the full setup guide.
### Settings
General settings for your deployment. Manage access, or take down your deployment if needed.
## Pricing
Deployment pricing is straightforward and included with your Vibecode subscription:
| Plan | Included Deployments |
| -------- | -------------------- |
| **Plus** | 1 deployment |
| **Pro** | 3 deployments |
| **Max** | 5 deployments |
Need more? Additional deployments are **\$20/month each**.
## Payment and Billing
The included deployments with your plan (1 for Plus, 3 for Pro, 5 for Max) are part of your Vibecode subscription. As long as your subscription is active, these deployments stay online at no extra cost.
### Adding More Deployments
If you need more deployments than your plan includes, you have two options:
1. **Upgrade your plan** — Moving from Plus to Pro (or Pro to Max) gives you more included deployments
2. **Pay for additional deployments** — Each extra deployment costs \$20/month, billed separately
Additional deployments must be paid for with a credit card and cannot be
purchased with Vibecode credits. This applies regardless of how many credits
you've accrued in your account—deployment fees require a direct payment
method.
### Updating Payment Information
You can update your payment method in two places:
* From the **Deploy** dropdown menu
* From the deployment dashboard for a specific project
We only ask for your payment method once. After you add a card for your first
additional deployment, that same payment method is automatically used for any
future deployments—no need to re-enter your details each time.
### What Happens if a Payment Fails?
If a payment fails, you have a **7-day grace period** to update your payment information. During this time, your deployments will continue to work normally.
If payment isn't resolved within 7 days, **all of your deployments will be
taken offline**. This applies to every deployment on your account since they
share the same payment method. Update your payment information promptly to
avoid any interruption.
## Troubleshooting
**Deployment failed?**
* Check your environment variables for typos or missing values
* Review the build logs for specific error messages
* Make sure your app runs correctly inside Vibecode before deploying
**App not working after deployment?**
* Check the **Logs** tab in your dashboard for errors
* Verify you're using production API keys, not test keys
* Try redeploying after making fixes
**Can't access the dashboard?**
* Make sure you're signed into the same account that created the deployment
* Try refreshing the page or signing out and back in
**Need help?** Reach out via Live support chat in the app for the fastest
support. You can also join our [Discord
community](https://discord.gg/qXyWYYX5Ts) to connect with other Vibecode
builders.
## Next Steps
Publish your mobile app to the App Store
Use your own domain name
### Deployment History
View a complete history of every deployment you've made. See when each version went live, roll back to previous versions if something goes wrong, and track changes over time.
### Database
If your app uses Vibecode Cloud for data storage, this tab lets you view and edit your data, which can be big assistance in debugging.
### Logs
This is where you'll spend time when something isn't working. Production logs show you what's happening inside your deployed app—errors, warnings, and any logging your agent added to the code.
**Dev logs vs. Production logs:** When you're testing inside Vibecode, logs
appear in the chat panel. But once your app is deployed—whether someone is
using it on TestFlight or your live website—those logs appear here in the
dashboard instead. Logs are generated directly by the code in your project, if
you are expecting logs are not seeing many, ask the AI what logs exist, and if
if can add more around the logic that you are debugging!
### Environment
View and edit your environment variables after deployment. If you need to rotate an API key, add a new integration, or fix a misconfigured secret, this is where you do it.
### Analytics (coming soon!)
Track how people are using your app. See visitor counts, popular pages, and usage patterns. *(Coming soon)*
### Domain
Configure your app's domain settings. By default, you get a `.vibecode.run` subdomain. You can connect your own domain — see [Connect a Custom Domain](/deploying/custom-domain) for the full setup guide.
### Settings
General settings for your deployment. Manage access, or take down your deployment if needed.
## Pricing
Deployment pricing is straightforward and included with your Vibecode subscription:
| Plan | Included Deployments |
| -------- | -------------------- |
| **Plus** | 1 deployment |
| **Pro** | 3 deployments |
| **Max** | 5 deployments |
Need more? Additional deployments are **\$20/month each**.
## Payment and Billing
The included deployments with your plan (1 for Plus, 3 for Pro, 5 for Max) are part of your Vibecode subscription. As long as your subscription is active, these deployments stay online at no extra cost.
### Adding More Deployments
If you need more deployments than your plan includes, you have two options:
1. **Upgrade your plan** — Moving from Plus to Pro (or Pro to Max) gives you more included deployments
2. **Pay for additional deployments** — Each extra deployment costs \$20/month, billed separately
Additional deployments must be paid for with a credit card and cannot be
purchased with Vibecode credits. This applies regardless of how many credits
you've accrued in your account—deployment fees require a direct payment
method.
### Updating Payment Information
You can update your payment method in two places:
* From the **Deploy** dropdown menu
* From the deployment dashboard for a specific project
We only ask for your payment method once. After you add a card for your first
additional deployment, that same payment method is automatically used for any
future deployments—no need to re-enter your details each time.
### What Happens if a Payment Fails?
If a payment fails, you have a **7-day grace period** to update your payment information. During this time, your deployments will continue to work normally.
If payment isn't resolved within 7 days, **all of your deployments will be
taken offline**. This applies to every deployment on your account since they
share the same payment method. Update your payment information promptly to
avoid any interruption.
## Troubleshooting
**Deployment failed?**
* Check your environment variables for typos or missing values
* Review the build logs for specific error messages
* Make sure your app runs correctly inside Vibecode before deploying
**App not working after deployment?**
* Check the **Logs** tab in your dashboard for errors
* Verify you're using production API keys, not test keys
* Try redeploying after making fixes
**Can't access the dashboard?**
* Make sure you're signed into the same account that created the deployment
* Try refreshing the page or signing out and back in
**Need help?** Reach out via Live support chat in the app for the fastest
support. You can also join our [Discord
community](https://discord.gg/qXyWYYX5Ts) to connect with other Vibecode
builders.
## Next Steps
Publish your mobile app to the App Store
Use your own domain name